Now that you’ve learned how to install this great tool, let’s see what it has to offer via a guided tour of its most interesting functionalities, starting with its SQL Editor.
Last time around, I explained how to install SQuirreL SQL, and most of the readers’ feedback was very positive. For those of you who tried and failed to install this tool, here’s a little tip: Before trying to install this tool, update your Java Runtime Engine (JRE) to the latest available. It’s true that SQuirreL’s documentation says that JRE 1.4 or higher is OK, but there are a lot of threads on the tool’s forums complaining about “unable to find the main class” errors. These errors seem to be related with the JRE version, so update to the latest available and try again. It’ll be worth it, as you’ll see in this TechTip!
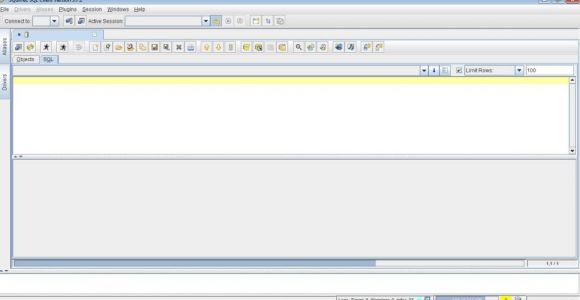
Every tour needs to start somewhere, so launch SQuirreL SQL and connect to your IBM i, using the connection you created on the last TechTip of this series. If you haven’t read it, this is a good time to do so, because this is a follow-up to that article. Once the application finishes loading the schemas and other information it needs to work (and this may take a while), you’ll be presented with something similar to Figure 1.
Figure 1: SQuirreL SQL’s screen after connecting to a database
Let’s start from the top: just below the customary menu line, there’s a connection menu bar. This bar allows you to use the “Connect to” dropdown menu to quickly connect to one of the databases you configured earlier, to set the global and new session preferences via the two small buttons next to it, and a couple of other things. Just position the mouse over each button and you’ll be presented with a tooltip text explaining what the respective button can be used for.
If you continue down, you’ll see the interesting part—the current connection tab. This tab contains a row of buttons (I’ll explain a few of them in a while, don’t worry) and, if the “SQL” sub-tab is selected, a working space similar to ACS’ Run SQL Scripts main window. However, this editor hides some time-saving goodies! I’ll demonstrate it using a schema I created for my new book, soon to be published by MC Press. You can use one of your own schemas to follow along.
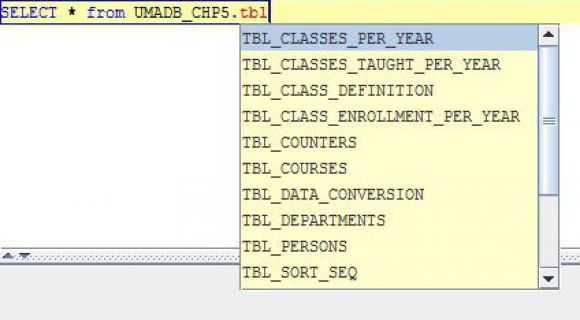
Let’s start with the simplest (and arguably the best) of them: auto-complete. Try typing “sel” and press Ctrl+Space. The auto-complete tool will immediately transform the three letters you typed into SELECT. This simple, yet very useful trick is available to nearly everything, and it’s really smart: If there’s more than one match to what you’ve typed, it’ll present you a list of choices, similar to the one shown in Figure 2.
Figure 2: Auto-complete showing a list of tables
Figure 2 shows all the tables in the UMADB_CHP5 schema that start with “tbl.” I typed “SELECT * from UMADB_CHP5.tbl” and pressed Ctrl+Space to get this list. The next step is to use the up and down arrow keys to highlight the appropriate table and press ENTER to select it. Once you have the statement completed, you can format it, just like in ACS, using another key combination: Ctrl+Alt+F.
But there’s a lot more you can do! Just right-click on the workspace and you’ll see a large context menu with the couple of functionalities I mentioned and many others, such as commenting and uncommenting a block of code, validating the SQL statement, and one that I find particularly useful when I’m writing dynamic SQL: the Quote SQL option. This option transforms your SQL statement into a string, ready to use in a stored procedure as dynamic SQL. For instance, let’s say I have the following SQL statement:
SELECT PERSON_ID, HOME_ADDRESS, HOME_PHONE_NBR, MOBILE_NBR, EMAIL_ADDRESS from umadb_chp5.TBL_PERSONS
Now I want to transform it in order to use it in a stored procedure. I follow a two-step process: first, I format the statement so that the column list is isolated in a line that I can easily manipulate, using the aforementioned “Format SQL” option. Here’s the output:
select
PERSON_ID,HOME_ADDRESS,HOME_PHONE_NBR,MOBILE_NBR,EMAIL_ADDRESS
from umadb_chp5.TBL_PERSONS
Then I right-click the block of code (a blue rectangle that delimits my statement is added by SQuirreL SQL) and select the “Quote SQL” option. The result is shown below:
"select " +
"PERSON_ID,HOME_ADDRESS,HOME_PHONE_NBR,MOBILE_NBR,EMAIL_ADDRESS " +
"from umadb_chp5.TBL_PERSONS ";
This may seem trivial, but it’s very useful, especially when you need to test long and complex statements before converting them to dynamic SQL. The process itself is simple but very prone to error. Forgetting a quotation mark (“) or a plus sign (+) can lead to annoying errors that will likely cost you precious time. Allowing this tool to do the work for you will surely save time (and give you some piece of mind)!
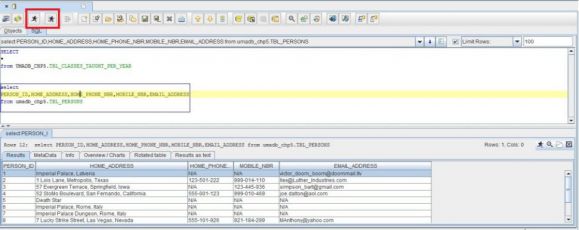
Let’s go back to our “regular” SQL statement and run it. You can press the icon with the running man that you’ll find in the icon strip just below the tab title (or press Ctrl+Enter) to run the currently highlighted statement. You don’t need to select the statement; just place the cursor somewhere on it and a blue rectangle will appear, delimiting the complete statement. Alternatively, you can run all the statements of the current editor by clicking on the other, smaller running dude icon (positioned to the right of the one I mentioned a moment ago) or press Alt+Shift+Enter. Figure 3, shown below, shows the result of the execution of the SQL statement I’ve been playing with, as well as the aforementioned blue rectangle and the two buttons you can use to run your statements. For your convenience, I’ve drawn a red rectangle over the two buttons.
Figure 3: SQuirreL’s SQL editor after running a statement
But there’s more! The results pane also harbors some useful functionalities, which I’ll explain in the next TechTip, as I’m running out of space here. Until then, feel free to comment/suggest/criticize using the Comments section below.


 Business users want new applications now. Market and regulatory pressures require faster application updates and delivery into production. Your IBM i developers may be approaching retirement, and you see no sure way to fill their positions with experienced developers. In addition, you may be caught between maintaining your existing applications and the uncertainty of moving to something new.
 IT managers hoping to find new IBM i talent are discovering that the pool of experienced RPG programmers and operators or administrators with intimate knowledge of the operating system and the applications that run on it is small. This begs the question: How will you manage the platform that supports such a big part of your business? This guide offers strategies and software suggestions to help you plan IT staffing and resources and smooth the transition after your AS/400 talent retires. Read on to learn:
LATEST COMMENTS
MC Press Online