The HLPARA keyword is a great first step to providing help, but HLPPNLGRP provides your users with next-level support. See them in play here.
In my previous article, I described the underlying architecture of contextual help for the IBM i 5250 interface: define rectangles on your display and assign help text to them. I focused entirely on defining the rectangles and purposely didn't go into any detail on the actual help text. That's because the keyword used for defining the rectangles (HLPARA) is the same no matter which help text technique you use. Now that we know how to access the help text, it's time to learn how to write it.
The Three Basic Techniques
IBM provides three ways to define the actual text in your help text, each with its own keyword. The HLPDOC keyword allows you to specify an OfficeVision/400 document. This technique passed into oblivion along with OfficeVision around V4R4, so I'm going to ignore it.
The second method uses the HLPRCD keyword, which allows you to specify a traditional DDS record format to display. The record format can be in the current display file or in an external display file. This is probably the easiest approach for an IBM i programmer, since it requires no additional skills; if you can create the display file, you can create the help text. That's why it's relatively common.
The third technique is the HLPPNLGRP keyword. HLPPNLGRP lets you specify a help panel. Help panels use a subset of the functionality contained in IBM’s extensive User Interface Manager (UIM). The IBM command CRTPNLGRP compiles a source member containing normal text and markup tags to create an object called a panel group (*PNLGRP). One of the primary benefits of this technique is that you don't have to worry about formatting or line breaks; the UIM layer does that for you.
Why Switch to Something New?
Well, in the first place it's really not that new. Even if you haven’t used IBM help panels in your display files, you’ve used IBM’s help system. You use it every time you hit F1 on a command. Let's take an example of an IBM command and pretend like it's an application panel prompting for data from the user. We'll use the CALL command. Go to a command line, type CALL, and hit Enter.
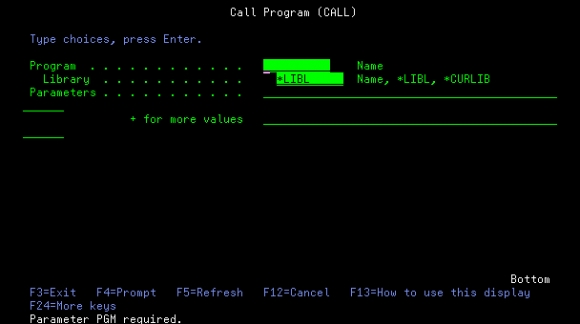
Figure 1: This is the screen you get for a CALL command if you don't specify a program name.
Figure 1 shows the result, which if you squint at it, you can pretend is an application program where the user didn't enter a required field. Note the interface: The field is reverse image and the cursor is positioned on the field. Typically, at this point you would like the user to be able to hit the help key (or typically F1 as well) to get field-specific help.
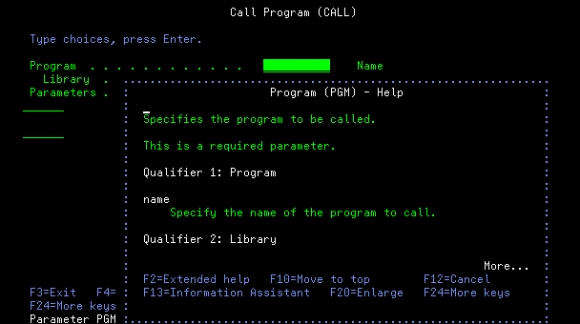
Figure 2: This is what the field-specific help text looks like for field PGM.
Using a panel group, the developer specifies some help text and ties it to the field name, PGM. The help key processor sees that the user hit help for field PGM and displays the help in a window. You'll notice a number of keys on the bottom of the window; these are enabled and handled by the panel group processor. They're standardized and available on every screen where they're appropriate. For example, if you position your cursor anywhere in the help text and press F10, the help text processor will move that line to the top of the window. Or you can hit F2 and get the extended help, which typically starts with an overview of the command and then includes all the keyword definitions.
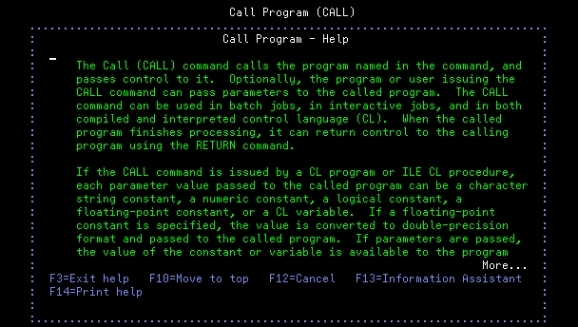
Figure 3: This is the extended help displayed when the user hits F2 from within field-specific help.
You could probably do some or even all of this yourself using HLPRCD, but it would be quite a feat and definitely a lot harder than just specifying a record format on a help definition in your display file DDS. And that is a good segue to a more rigorous comparison the two techniques.
Comparing HLPRCD and HLPPNLGRP
So now let's compare HLPRCD to HLPPNLGRP. The easiest comparison is in the help definitions. Let's take a look at the two:
A H HLPARA(7 2 21 4)
A HLPRCD(HELP_OPT)
A H HLPARA(7 7 21 10)
A HLPRCD(HELP_ID)
A H HLPARA(7 14 21 43)
A HLPRCD(HELP_DESC)
A H HLPARA(1 1 24 80)
A HLPRCD(HELP_RCD)
Listing 1: These are the help definitions when using HLPRCD.
A HLPCLR
A HLPTITLE('Line List')
A H HLPARA(*NONE)
A HLPPNLGRP('RCD' LINLSTH)
A H HLPARA(7 2 21 4)
A HLPPNLGRP('OPT' LINLSTH)
A H HLPARA(7 7 21 10)
A HLPPNLGRP('ID' LINLSTH)
A H HLPARA(7 14 21 43)
A HLPPNLGRP('DESC' LINLSTH)
A HLPBDY
Listing 2: These are the help definitions when using HLPPNLGRP.
A quick comparison shows that the HLPARA keywords are exactly the same with the exception of the "default" help text. In the HLPRCD scenario, you must manually define it to cover the entire panel and then place it at the end. If you don't, it will be the active help text wherever you place your cursor. For HLPPNLGRP, on the other hand, you can use the special keyword *NONE and place it anywhere in the list, and that help text will be the default for any position that doesn't have a HLPARA specifically identified. So if it doesn't matter where the default definition goes, why put it at the beginning? We'll see why in a moment. You may also notice a few extra keywords, such as HLPCLR, HLPTITLE, and HLPBDY. Those mostly bracket the help text and are pretty standard for every panel. But first let's take a look at the actual text for each.
A R HELP_DESC WINDOW(8 25 6 30 *NOMSGLIN)
A 1 2'Description'
A COLOR(WHT)
A 3 2'This is the full description'
A 4 2'of the train line. '
A R HELP_RCD WINDOW(8 20 8 40 *NOMSGLIN)
A 1 2'LINLST-01'
A COLOR(WHT)
A 3 2'LINLST brings up a list of all the'
A 4 2'defined train lines and allows you'
A 5 2'to display either the statiosn or '
A 6 2'the schedules for each line. '
Listing 3: This is a partial listing of the help text, showing the entries for Description and for the default.
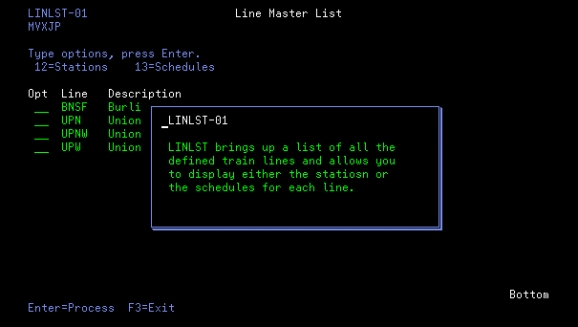
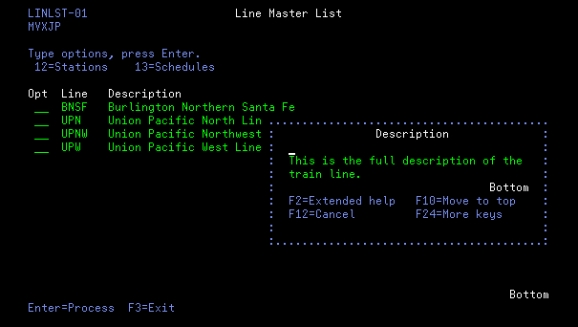
Listing 3 has the DDS specifications for the help text for the Description rectangle (HELP_DESC) and for the default help text (HELP_RCD). These are both in the same DDS as the display file itself, which is why I only had to specify the record name on the HLPRCD keywords. The next two figures will show you the results of hitting Help (or F1) in the Description rectangle, and then in an undefined area.
Figure 4: This is the help as displayed for HLPRCD when the cursor is in the Description rectangle.
Figure 5: This is the default help displayed when the cursor is not in a defined rectangle.
The good news is that you have complete control over the placement and formatting of the help text. The bad news is that you have complete responsibility for the placement and formatting of the help text. This becomes particularly difficult when you're trying to put long blocks of text into play. For example, the first line says "LINLST brings…" but if you wanted to change it to "Line Master List brings…" the text would no longer fit on that first line and you'd have to readjust all the subsequent lines. It's even more of an issue when you have more help text than can fit in a single panel. There is a way to support multi-panel views, but it's pretty rudimentary. We'll see shortly that the HLPPNLGRP approach eliminates these problems. Let's start with the help text itself.
:PNLGRP.
:HELP NAME='RCD'.Line List
:P.This program brings up a list of all the defined train lines and allows
you to display either the stations or schedules for each line. The schedule
option has two modes, single and wide (which display multiple schedules at
a time and allows you to window through them).
:EHELP.
:HELP NAME='OPT'.Option
:XH2.Option
:P.Enter the option number, either option 12 for stations or 13 for schedules.
:EHELP.
:HELP NAME='ID'.Line ID
:XH2.Line ID
:P.This is the four-character ID for the line.
:EHELP.
:HELP NAME='DESC'.Description
:XH2.Description
:P.This is the full description of the train line.
:EHELP.
:EPNLGRP.
Listing 4: This is the entire panel group source for all three fields and the default test.
Listing 4 shows the entire source of the panel group LINLSTH, which is referenced in the HLPPNLGRP keywords in Listing 2. The source uses tags that start with a colon and end with a period, and in this very simple case the primary tags are PNLGRP/EPNLGRP and HELP/EHELP. Each HLPPNLGRP specifies the panel group name and the help name, which corresponds to the NAME= keyword in the panel group source. While there are a couple of details that I'm going to gloss over (such as exactly what the XH2 tag does), you can see that each HELP tag corresponds to an entire record in the DDS source for the HLPRCD technique. Let's see the results.
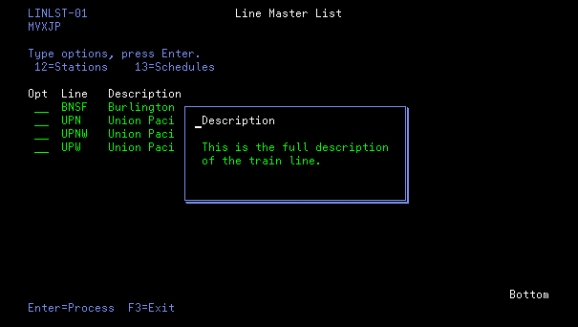
Figure 6: This is what you see when you hit F1 in the Description rectangle.
You'll notice that the text is displayed in a window with a title, and the text is nicely wrapped to fit the window. There are a number of keys on the bottom of the window; these are the standard UIM help keys that the IBM i handles for you. You don't have a lot of control over the size or position of the window; the system tries to position it the best that it can based on your cursor position at the time you hit Help. Now let's hit Help in an undefined area.
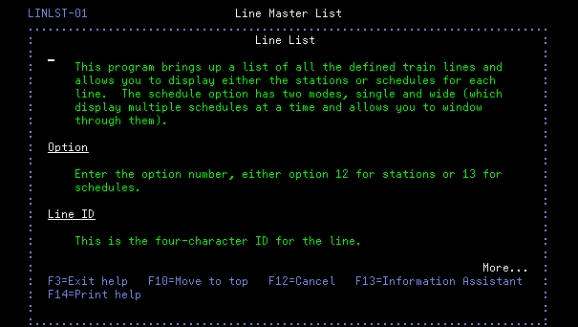
Figure 7: The default help contains not only the default but also all the other help for this record.
Whereas the default for the HLPRCD approach shows only the default text (see Figure 5), the UIM processor automatically combines all of the defined help text into one large, scrollable panel. This is why putting the default first is important; the order of the entries in the combined panel is based on the order of the help specifications.
One other very cool feature of UIM can be found in the predefined UIM command keys shown in Figure 6. Note the label for F2=Extended help; if you hit F2 in any defined help text, it will automatically bring up the larger default text shown in Figure 7. So if you hit help for a field and then you want more information on all the fields in the display, just hit F2 and scroll through the entire panel.
Pros and Cons of HLPPNLGRP
If you already have help text defined using HLPARA and HLPRCD, I think you can see that it's a relatively straightforward task to move that text into a panel group and change to HLPPNLGRP. The benefits are immediate. And if you don't have help text at all, I think you should consider starting with panel groups from the beginning.
All is not sweetness and light with HLPPNLGRP, though. As noted, you have less control over the specific formatting. But this help style is more about being able to provide meaningful verbiage that can be easily maintained, and I hope that Listing 4 shows that the text can be edited by normal application users, rather than entered into DDS by programmers. We also still have the issue of defining rectangles, especially for folded subfiles. But the next article in this series will present a possible programmatic solution to that issue, with its own perks and pitfalls.
And I haven't even touched on what to do with a soft-formatted subfile, but I'm still working on that one. I'll let you know when I work it out. Stay tuned!




 Business users want new applications now. Market and regulatory pressures require faster application updates and delivery into production. Your IBM i developers may be approaching retirement, and you see no sure way to fill their positions with experienced developers. In addition, you may be caught between maintaining your existing applications and the uncertainty of moving to something new.
 IT managers hoping to find new IBM i talent are discovering that the pool of experienced RPG programmers and operators or administrators with intimate knowledge of the operating system and the applications that run on it is small. This begs the question: How will you manage the platform that supports such a big part of your business? This guide offers strategies and software suggestions to help you plan IT staffing and resources and smooth the transition after your AS/400 talent retires. Read on to learn:
LATEST COMMENTS
MC Press Online