National Language Support (NLS) is a huge part of the IBM i, and this is quick way to take advantage of it.
The IBM midrange platform has always supported multiple languages, typically more consistently than the various devices we connected to it. I remember creating client/server applications for the Japanese market. The support on the IBM i was relatively easy to enable, but the support on the PCs (even the IBM-brand PCs) required jumping through a lot of hoops. But even on the IBM i, there are numerous moving parts, and this article shows you how to get to many of them in one easy step.
NLS Job Attributes
Much of the work required for multiple languages falls to your current job attributes. There are a number of them, including these:
- CNTRYID—The country identifier
- CCSID—The coded character set identifier
- LANGID—The language identifier
- DATFMT—The date format
- DATSEP—The date separator
- TIMSEP—The time separator
- CURSYM—The currency symbol
- DECFMT—The decimal format
Each of these values can be changed for the job by using the CHGJOB command. So if you wanted to change the date separator on your job to a dash instead of a slash, you could use the command CHGJOB DATSEP('-'). Now any system date displays (such as using the DATE keyword in a display file) will use a dash rather than a slash.
NLS System Defaults
Each of the NLS attributes listed above has a default value for entire machine stored in a corresponding system value. To restore your job attributes to the system default, use the command CHGJOB DATSEP(*SYSVAL). And of course you can use that for any of those NLS attributes.
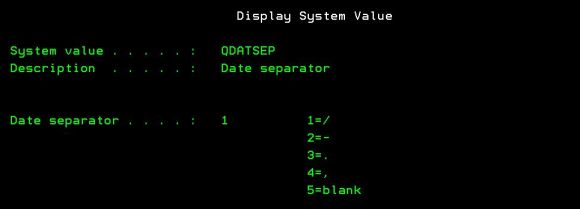
You can view all the defaults using the WRKSYSVAL or DSPSYSVAL command. Specify the name of the system value by putting a Q on the front of the corresponding job attribute. For example, to see the current system value for the date separator, use the command DSPSYSVAL QDATSEP. One warning, though: rather than actual values for system values, the IBM i likes to use option numbers that can only be one of a fixed set of options. For example, here are the options for the value QDATSEP:
Figure 1: The values for QDATSEP are not character values, but option numbers from 1 to 5.
So if you wanted to change the value for the system value QDATSEP to a dash, you would use the command CHGSYSVAL SYSVAL(QDATFMT ) VALUE(2). From that point forward, any new jobs would use a dash as the date separator. Please note: I don't recommend ever changing the system value without a lot of prior preparation. Changing one of these values can seriously affect your users.
Supporting Multiple Languages on One Server
At this point, you may be wondering how you would support multiple languages on one server, since everything is defaulted at the system level. It's pretty simple: you change the values for your job. Using a CL program, you can update all the values in your job to the appropriate values for that session's locale. But where do you get those values? That's where things get interesting.
IBM supports multiple languages on a single machine through the use of secondary language libraries. You can install multiple languages on your machine and then select the language for your job by adding a library to the beginning of your system library list. When you add a new secondary language, IBM provides a sys library specific to that language. For example, Polish is feature code 2978, so IBM provides QSYS2928 as the Polish language library. To select Polish as your language, use the CHGSYSLIBL to place the language library at the beginning of your job's library list. For more detailed information on the process, refer to this IBM web page.
But you'll still have the same primary language values for the various NLS attributes because those are the system defaults. What should the new values be? You could hardcode them knowing what you know, but as it turns out, IBM does a very nice job of providing all of that information in an easy-to-access place.
CPX8416 and How to Use It
One of the many things in the language library is a language-specific copy of the system message files, such as QCPFMSG. And within QCPFMSG is a special message, CPX8146. All of the NLS job attributes (and a few more besides) are available in the message data of the CPX8146 message. This last part of today's article will go through a very simple program that retrieves all those values using a single call to the QMHRTVM (Retrieve Message) API. You can read all about the API here, but this program uses a simple prototype for QMHRTVM.
dcl-pr QMHRTVM extpgm;
oMessage char(1) options(*varsize);
iLength int(10) const;
iFmt char(8) const;
iMsgID char(7) const;
iMsgf char(20) const;
iMsgData char(1) options(*varsize) const;
iMsgDLen int(10) const;
iReplace char(10) const;
iReturn char(10) const;
oErr int(10) const;
end-pr;
Listing 1: This is the simple prototype used for QMHRTVM.
Like many other APIs, the first three parameters are the receiver variable and its length, followed by the 8-character format identifier, which defines the layout of the returned data. Next are the message ID and message file (using a standard qualified name that concatenates the message file name with the message file library). The next two parameters allow you to pass in message data and the length of that data, even though we won't be using them here. The last two input parameters specify whether to substitute variables from the message data and whether to return special formatting values in the returned message string. The last parameter is the error data structure, but if you've followed other articles of mine, you know that if you specify this as an integer and then pass in zero, it will tell the API to raise an exception if any errors occur. Since the lack of CPX8416 signals a very serious error, I'm comfortable using this shortcut approach.
Now that we've defined the prototype to get the data from CPX8416, next we need to define a structure to receive the data. IBM does a very good job of detailing this message on this web page, and the following listing provides a programmatic version of the information from that page.
dcl-ds dsCPX8416;
QCHRID char(21) pos(037);
QCURSYM char(01) pos(070);
QDATFMT char(03) pos(083);
QDATSEP char(01) pos(098);
QDECFMT char(01) pos(111);
QLEAPADJ char(01) pos(124);
QCCSID char(05) pos(137);
QTIMSEP char(01) pos(154);
QLANGID char(03) pos(167);
QCNTRYID char(02) pos(182);
QIGCCDEFNT char(21) pos(196);
QLOCALE char(50) pos(229);
end-ds;
Listing 2: This data structure properly defines all the data in the returned data structure.
The message data in the CPX8416 has all of the data in specific fixed positions. These positions correspond to the offsets in the web page I referred to earlier. Note that they aren't exactly the same, because the RTVM0100 return variable returns 24 bytes of information before the actual message data begins, but other than that they match exactly.
Now that we have the prototypes to QMHRTVM and the definition of the returned data, it's time to call the API. That's done with a single line of RPG code:
QMHRTVM( dsCPX8416: %size(dsCPX8416): 'RTVM0100': 'CPX8416':
'QCPFMSG *LIBL': ' ': 1: '*NO': '*NO': 0);
Listing 3: This is the call to QMHRTVM that will retrieve the NLS information.
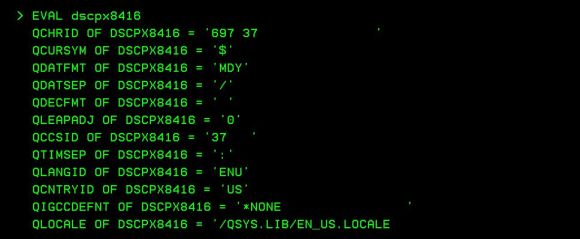
That's all there is to it. There are a few nuances, but it's relatively straightforward. The format is RTVM0100, which maps to the data structure in Listing 2. The message ID is CPX8416, and the qualified message file is QCPFMSG in our current library list (*LIBL). The next four parameters are constant values that tell the API to do as little extra processing as possible, and then, as I noted earlier, we pass in zero for the error data structure. I'll finish with a screen shot of the returned data.
Figure 2: This is the data returned in the dsCPX8416 data structure.
You can now use this data to execute your CHGJOB commands. Put this into an initial program for your jobs and you'll be able to easily switch to any installed language on your machine. Have fun with it!


 IT managers hoping to find new IBM i talent are discovering that the pool of experienced RPG programmers and operators or administrators with intimate knowledge of the operating system and the applications that run on it is small. This begs the question: How will you manage the platform that supports such a big part of your business? This guide offers strategies and software suggestions to help you plan IT staffing and resources and smooth the transition after your AS/400 talent retires. Read on to learn:
 Business users want new applications now. Market and regulatory pressures require faster application updates and delivery into production. Your IBM i developers may be approaching retirement, and you see no sure way to fill their positions with experienced developers. In addition, you may be caught between maintaining your existing applications and the uncertainty of moving to something new.
LATEST COMMENTS
MC Press Online