One of the issues we seem to run up against a lot is the need to analyze inventory data using periodic samples. Once a week, we look at billing, orders, and purchasing so we can maintain an optimum inventory position.
The problem is that this process is transfer-dependent. One sheet alone uses 18 different file transfer specifications. We've had instances in which the user gets interrupted or forgets where he is in the process, and voila, a screw-up! Not only do you get bad results, you also get a situation in which figuring out why you got bad results is nearly impossible.
Integration to the rescue!
The good news is that we can now integrate the process of moving data to the spreadsheet into the spreadsheet itself. As part of a single process, we can use macros to bring all the data into the spreadsheet and place it on the appropriate worksheet in the appropriate workbook. If we must have the spreadsheet, at least we can eliminate one possible source of errors in bringing data into the spreadsheet.
In this particular case, we know what fields we want and what file we want them from, so the user form is built around that information. In next month's column, we'll use the system catalog information contained in QADBIFLD and QADBXREF in QSYS to present a dynamic form to let users make better choices about the data transferred. QADBIFLD lists all the fields with their textual descriptions in all the physical and logical files on the system, and QADBXREF lists all the files (and their descriptions).
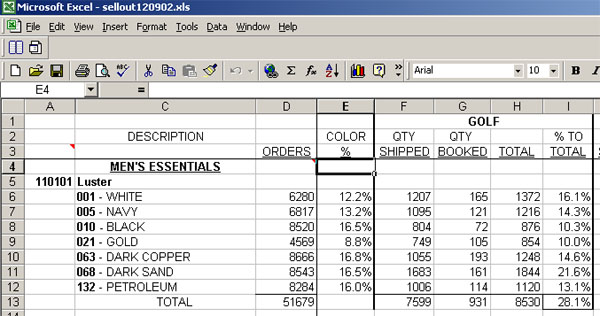
In this case, our task is somewhat simplified for us. Figure 1 shows a portion of the target spreadsheet.

Figure 1: Here's our target.
The QTY SHIPPED and the QTY BOOKED come from iSeries data. How did they get there? Well, therein hangs a tale....
Note that the set of columns from F to I are headed GOLF. This is an operating division of the business. There are four other operating divisions. The value in QTY SHIPPED comes from invoicing. The value in QTY BOOKED comes from orders.
So, in times of old, the user would run a series of queries. There were two queries for each operating division. One would extract invoices for that division into a physical file in QGPL. The other would extract customer bookings into a physical file in QGPL. Then, the user would download those files to a spreadsheet. Using cut-and-paste, the user would copy the data into worksheets within the workbook depicted above. Each division has a worksheet for invoices and a worksheet for bookings. The analysis workbook you see here used formulas to bring the data forward.
So, the users now have eight separate file transfer specifications to execute and eight separate cut-and-paste operations to execute--amidst phone calls, visits, fire drills, and other interruptions. Think they might have made a mistake or two?
Well, they did. And who do you think gets to figure that out? I had to use integration as a form of self-defense!
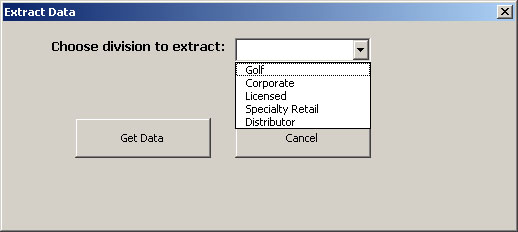
So, I created a macro and made it part of a user form. Figure 2 shows the form.

Figure 2: Da form! Da form!
This simple form contains three controls. The Get Data command button (cmdGetData), the Cancel command button (cmdCancel), and the division drop-down list (divisionlist). In the form's initialize event (userforms use an initialize event rather than a load event), I placed the following code:
DivisionList.Clear
DivisionList.AddItem "Golf"
DivisionList.AddItem "Corporate"
DivisionList.AddItem "Licensed"
DivisionList.AddItem "Specialty Retail"
DivisionList.AddItem "Distributor"
Set cniSeries = New ADODB.Connection
cniSeries.Open "Provider=IBMDA400;Data Source=192.168.1.2;", ", "
End Sub
Private Sub UserForm_QueryClose(Cancel As Integer, CloseMode As Integer)
cniSeries.Close
End Sub
When users run the macro, they are presented with this form. When the form initializes, it sets the values for the drop-down list (which is a combobox control) and opens the connection to the iSeries. Note also the inclusion of the QueryClose event, which occurs when the form is ready to unload. When the form unloads, we close the iSeries connection.
If you look up the syntax for the QueryClose event, you'll also notice that you can tell what requested the close (the user, an unload method, or the task manager) and that you can abort the close. In this case, I don't do any of that stuff. I just use it to clean up after myself.
The user selects a division and presses the "Get Data" button to place the information in the appropriate worksheet.
Here's the code behind "Get Data":
Dim pcSelect As String
Dim invTarget As String
Dim bkTarget As String
Dim SQL As String
Dim lRow As Long
Dim rsInvoiceData As ADODB.Recordset
Dim rsBookingData As ADODB.Recordset
Application.ScreenUpdating = False
If DivisionList.ListIndex = -1 Then
MsgBox "No division is selected. Please select a division.", _
vbOKOnly, "File Extract"
Exit Sub
End If
Select Case DivisionList.List(DivisionList.ListIndex)
Case "Golf"
pcSelect = "010"
invTarget = "gs"
bkTarget = "go"
Case "Corporate"
[snip]
End Select
Sheets(invTarget).Select
Range("A1").Select
Range(Selection, ActiveCell.SpecialCells(xlLastCell)).Select
Selection.ClearContents
SQL = "SELECT T01.SIPRF, SUBSTR(T02.ILPROD, 1, 9) AS STYCLR, " _
& "SUM(T02.ILQTY) AS ILQTY " _
& "FROM BPCS405CDF.SIHL60 T01 " _
& "INNER JOIN BPCS405CDF.SILL02 T02 " _
& "ON T01.SIINVN = T02.ILINVN " _
& "WHERE T01.SIPRF = '" & pcSelect & "' " _
& "AND (SUBSTR(ILPROD,1,6) BETWEEN '110101' AND '901301') " _
& "GROUP BY T01.SIPRF, SUBSTR(T02.ILPROD, 1, 9)"
Set rsInvoiceData = New ADODB.Recordset
rsInvoiceData.Open SQL, cniSeries, adOpenStatic, adLockReadOnly
lRow = 1
Do While Not rsInvoiceData.EOF
Cells(lRow, 1) = rsInvoiceData("STYCLR")
Cells(lRow, 2) = rsInvoiceData("ILQTY")
rsInvoiceData.MoveNext
Loop
[snip]
Application.ScreenUpdating = True
MsgBox "Your selected data has been extracted!", _
vbOKOnly, "Data Extract"
End Sub
I start by checking the listindex property of the divisionlist combobox. If listindex's value is –1, then no selection has been made. Otherwise, I use a select/case to react to the choice. The values set by the select structure are used in the SQL statement and in the spreadsheet:
This bit of code sets the profit center in the select criteria. To set the sheet that I stuff the data into, invTarget is used:
This selects the "gs" worksheet for invoice data. Later on, we'll use the "go" worksheet in a similar way. We clear the sheet, get our recordset, and drop in the data:
Do While Not rsInvoiceData.EOF
Cells(lRow, 1) = rsInvoiceData("STYCLR")
Cells(lRow, 2) = rsInvoiceData("ILQTY")
rsInvoiceData.MoveNext
Loop
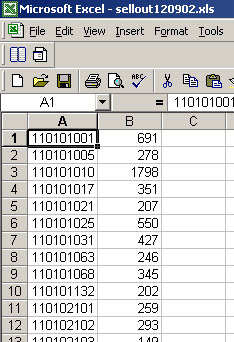
This simple Do loop puts the data into the appropriate spreadsheet, as shown in Figure 3.

Figure 3: Drop the data into the "gs" worksheet.
If you look back at Figure 1, you'll see that columns F and G display numbers. These are the formulas behind them:
(IF(ISERROR(VLOOKUP($B6,gs,2,FALSE))=TRUE,0,VLOOKUP($B6,gs,2,FALSE)))+(IF(ISERROR(VLOOKUP($B6,gc,2,FALSE))=TRUE,0,VLOOKUP($B6,gc,2,FALSE)))
Lovely formula, isn't it? The English translation: Using the value in column B of this row, go to the "gs" worksheet and search for that value in the first column. If you don't find the value from column B in the first column of the "gs" worksheet, then return the number zero. If you do find the value from column B in the first column of the "gs" worksheet, return whatever value you find in column 2 of that row.
By using the existing spreadsheet, all I had to do was create my transfer process and put the results in the right place. In so doing, I can use the existing spreadsheets and their formulas. This method lets me integrate without a complete redesign.
So do your homework on the system catalog, and I'll see you next month!
Chris Devous is the Director of IT Systems Development at The Antigua Group, Inc., a Peoria, Arizona, garment manufacturer. Chris has been in IT since '82 and lives Arizona with his wife, three children, a bird, two dogs, a cat, and various marine life forms. He can be reached by email at


 Business users want new applications now. Market and regulatory pressures require faster application updates and delivery into production. Your IBM i developers may be approaching retirement, and you see no sure way to fill their positions with experienced developers. In addition, you may be caught between maintaining your existing applications and the uncertainty of moving to something new.
 IT managers hoping to find new IBM i talent are discovering that the pool of experienced RPG programmers and operators or administrators with intimate knowledge of the operating system and the applications that run on it is small. This begs the question: How will you manage the platform that supports such a big part of your business? This guide offers strategies and software suggestions to help you plan IT staffing and resources and smooth the transition after your AS/400 talent retires. Read on to learn:
LATEST COMMENTS
MC Press Online