Many Microsoft Office users are not aware that a helper utility that came with Office, MS Query, can be used as a standalone utility. This month, I'll explain how MS Query works and how you can use it with iSeries data.
Several Office applications--like Excel, Word, and Access--are capable of working with external data. Excel can import external data into a spreadsheet, Word can bring iSeries data into a document, and Access can link to and update iSeries files. Beyond these capabilities, however, MS Office applications can also perform more complex data selection, grouping, and updating, thanks to the full-function services provided by MS Query. MS Query, with its own set of screens, can be a valuable tool for iSeries data handling, especially for developing SQL statements and for ad hoc reporting.
Accessing iSeries Data with MS Query
As with other database utilities, access to iSeries data using MS Query is accomplished through ordinary ODBC or OLE DB/ADO communication services. Since MS Query is SQL-based, the ODBC method delivers more efficient performance (ADO is better for record-level access). Therefore, before you can access iSeries data with MS Query, you must install and configure the IBM ODBC driver for the iSeries. For purposes of this discussion, it is assumed that you're familiar with ODBC services and have configured an ODBC data source for accessing your iSeries data.
Where Is Microsoft Query?
Installing MS Query with the other Office applications is optional, and even when it is installed, Office does not give MS Query an icon or an entry in the Office program group. Apparently, Microsoft perceives MS Query only as an adjunct to other Office applications, not as a standalone utility.
MS Query is accessed through the program named msqry32.exe. On a Windows XP system with Office 2003, this program is located in C:Program FilesMicrosoft OfficeOFFICE11, but other installations will differ, so you may have to run a search.
If you don't have msqry32.exe on your system, you'll have to install it from your Office media. In the Office 2003 setup program, MS Query is listed under "Choose advanced customization of applications" and then "Office Tools." Select those options (or the equivalent) to display a screen of installation options (Figure 1). Specify that you'll be running Microsoft Query from your computer and click the Update button.
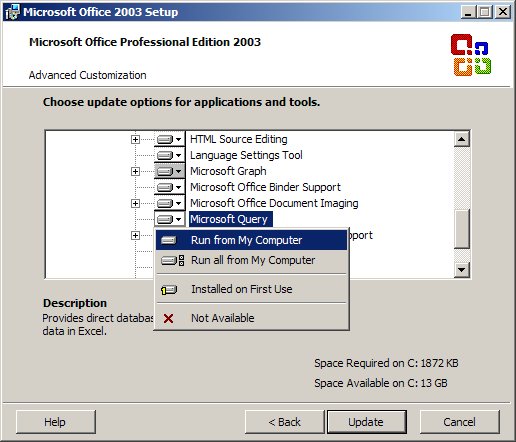
Figure 1: Select Microsoft Query in the Office setup program. (Click images to enlarge.)
Once MS Query is installed and the location of program msqry32.exe is determined, create a shortcut to the program and put it on your desktop or your Start menu.
Developing SQL Statements with MS Query
One of the most useful aspects of MS Query is its transparent use of SQL statements to get at iSeries data. When you develop a query with the utility, SQL statements are being created by MS Query. Those SQL statements can then be studied to gain an understanding of SQL syntax for basic data access. Additionally, when more complex SQL statements are in order, syntax can often be manually developed by using an additional feature of MS Query: direct SQL submission. To illustrate the first feature, we'll create a simple query using the Query Wizard that comes with MS Query.
When you launch MS Query, you'll be presented with the main interface screen (Figure 2). From here, you can create a query and save it for use in other Office applications (since MS Query is the data access engine used by Excel and Word,) or you can submit SQL statements to the iSeries interactively as you would for an ad hoc report.
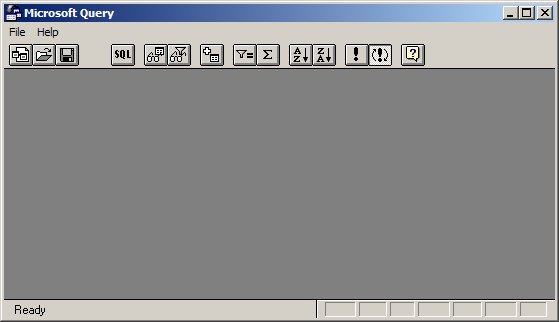
Figure 2: This is the main user interface in MS Query.
Click on "File" and then select "New...". You will be asked to specify the name of the ODBC data source you configured previously. Before you click the OK button, however, make sure the option labeled "Use the Query Wizard to create/edit queries" is checked.
When you click the OK button, MS Query will submit a request to the iSeries for a listing of the files contained in the libraries specified in your ODBC data source (Figure 3).
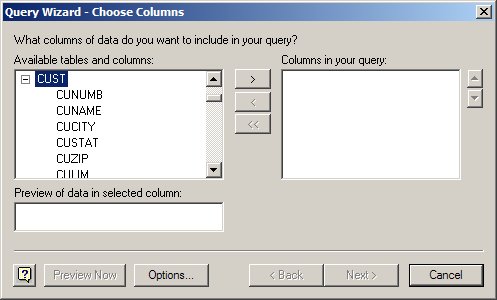
Figure 3: Select iSeries files and fields in the Query Wizard.
Select a file in the left panel and click the plus sign (+) to list the fields. Select the fields you're interested in and click the arrow button (>) to move the fields to the right panel. If you select multiple files without matching key field names, you'll specify how they're to be linked in a moment.
Once you've made your selections, click the Next button. Depending on the names of your fields, you may be notified that MS Query can't automatically determine how the files should be linked, but just click OK to go on. You should then be greeted with a grid in the Query screen along with images representing your selected files (Figure 4.)
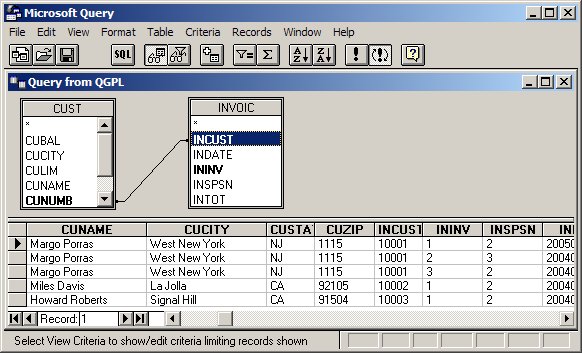
Figure 4: MS Query shows your files and their associated data.
In Figure 4, two iSeries files are represented in the boxes: CUST and INVOIC. How these files are linked is shown by the black line that is drawn from CUNUMB in the CUST file to INCUST in the INVOIC file. This link had to be established manually by dragging the field in file 1 and dropping it onto the field name displayed in file 2. When you do so, the line will be drawn and the data in the grid will be updated to reflect the result of your effort.
Since your request for data is submitted to the iSeries in the form of an SQL statement in more-or-less plain English, let's take a look at the statement as generated by MS Query. Click the button labeled SQL in the Query toolbar. The SQL statement will be displayed in a box (Figure 5). In the SQL statement shown in the figure, you can see the basic structure of a data request over two files--how the fields are selected and how the files are linked.
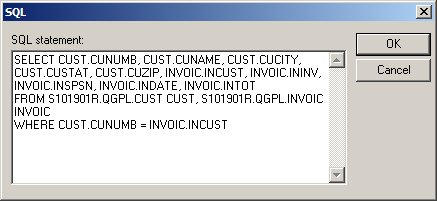
Figure 5: The MS Query Wizard generated this SQL statement.
To take the illustration one step further, click on the Criteria menu and then select Add criteria... Specify a field within your query and give it a selection criterion to be used to filter records. If you now click the SQL button, you'll see that the selection criteria clause has been added to your SQL statement.
Advanced SQL Statements
Sometimes, the default SQL statement produced by the Query Wizard is not correct for your needs and a more direct approach is in order. To this end, MS Query allows you to key your own SQL statement and submit it to the iSeries for execution. This technique is especially helpful for developing and testing complex forms joining files or doing selects on selects.
As an example, suppose I need to see all customer records and their invoices, but I also want to see customer records for those customers that do not have any invoices. By default, SQL will show only customers that have an invoice to link to. To remedy this shortcoming, a more advanced SQL statement that uses a left outer join technique is available.
To illustrate this method, start a new MS Query session, open the File menu, and select Execute SQL.... You'll be asked to identify your ODBC data source (click on the Data Sources... button). Once you're done, you may key an SQL statement for direct submission to your iSeries (Figure 6.)
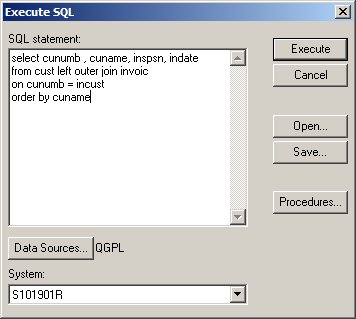
Figure 6: Submit a left outer join SQL statement directly to the iSeries.
Click the Execute button to submit the statement to the iSeries. If all is well, your data will populate the Query data grid.
Executing a Stored Procedure with MS Query
One more feature of MS Query merits presentation. Query allows you to test the result of running a stored procedure that is resident on your iSeries. For example, suppose I've created a stored procedure on my iSeries named CUSINQ. The stored procedure will return a record set in the form of a file cursor to my client application. To check the validity of my stored procedure, I can step through the process and look at the output with MS Query.
From the Execute SQL screen in MS Query, you can submit the name of a stored procedure for execution on the iSeries and then see the resulting record set. Note that the stored procedure must be in an iSeries library that is listed in your ODBC data source configuration.
In the SQL Execute screen, key "Call" and the stored procedure name inside curly braces (e.g., {Call CUSINQ}). Then click the Execute button. Your request will be sent to the iSeries, and the record set cursor will be returned. MS Query will accept the cursor and step through the records automatically, and the transferred data will be passed into the Query data grid for display.
All in all, MS Query can be a good friend of the iSeries developer--and with very little fuss. Further, since MS Query is the data access engine used in Excel and Word, an understanding of the services provided and the way SQL behaves can be a real benefit.
Chris Peters has 27 years of experience in the IBM midrange and PC platforms. Chris is president of Evergreen Interactive Systems, a software development firm and creators of the iSeries Report Downloader. Chris is the author of The OS/400 and Microsoft Office 2000 Integration Handbook, The AS/400 TCP/IP Handbook, AS/400 Client/Server Programming with Visual Basic, and Peer Networking on the AS/400 (MC Press). He is also a nationally recognized seminar instructor. Chris can be reached at


 Business users want new applications now. Market and regulatory pressures require faster application updates and delivery into production. Your IBM i developers may be approaching retirement, and you see no sure way to fill their positions with experienced developers. In addition, you may be caught between maintaining your existing applications and the uncertainty of moving to something new.
 IT managers hoping to find new IBM i talent are discovering that the pool of experienced RPG programmers and operators or administrators with intimate knowledge of the operating system and the applications that run on it is small. This begs the question: How will you manage the platform that supports such a big part of your business? This guide offers strategies and software suggestions to help you plan IT staffing and resources and smooth the transition after your AS/400 talent retires. Read on to learn:
LATEST COMMENTS
MC Press Online