This month, I'll continue to explore Active Server Pages (ASP) technology. I'll take last month's look at classic ASP further--to ASP.NET, the latest form of ASP.
Why ASP.NET?
Last month's column examined the established version of ASP called classic ASP. I listed some of the shortcomings of developing Web applications with classic ASP--scripted server-side language, no OOP, mixed HTML and script, and the like. However, to the rescue rides Microsoft's .NET architecture, which includes these advantages:
- Fully object-oriented languages
- Client-side controls
- The use of "code behind" to separate program code from HTML code
- Compiled code for faster execution
- Access to other .NET assemblies
- Easy development and deployment
OK, you're almost sold on ASP.NET. How about a test drive?
You can create an ASP.NET application two ways: with and without code behind. (Recall that "code behind" is the server-side instruction set written in a .NET-aware language like C# or VB.NET.) Writing an ASP.NET application without code behind is a little like trying to grow the world's tallest Bonsai tree; it defeats the point, but it can be done. Instead, with the help of Visual Studio .NET (VS.NET), I'll build an example application here that takes advantage of the code behind benefit.
Creating an ASP.NET Application with Visual Studio
Recall that ASP applications require the background services of an ASP-capable Web server, so the first step in creating a classic ASP application was to create a virtual directory entry in your Internet Information Server (IIS) configuration. When using VS, however, the IIS configuration part is performed for you when you first create your project.
The first step then, is to start VS and create a new project. The example created here will be a C# project; the application type will be an ASP.NET Web Application (Figure 1).
Note the name of the virtual directory where your application will be stored (http://localhost/...). This location will probably map to the real directory c:Inetpubwwwroot... as per your IIS configuration settings.
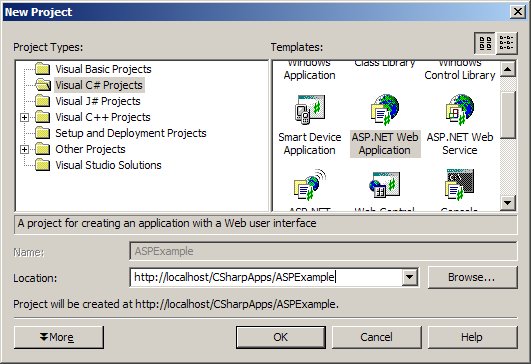
Figure 1: Create a virtual directory for your project. (Click images to enlarge.)
Give your application a directory name and click OK. VS will check for its partner in ASP services (a running instance of IIS) and then churn a bit as your supporting directories are created and IIS is updated. Finally, you'll get a blank form that represents your page (Figure 2). This is where you'll place controls like text boxes and buttons to form the user interface of your application.
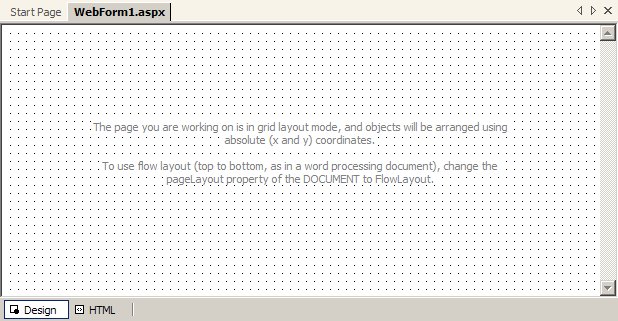
Figure 2: VS creates a blank form as the application's initial user interface.
If you click on the HTML tab at the bottom of the designer display, the supporting HTML will be displayed as Visual Studio generated it (Figure 3).
|
Figure 3: Visual Studio generates this HTML code.
Some things to notice here about the HTML generated are the "Page" directives on the first line. These instructions specify the language that's to be used for the server-side processing (C#) and the form that will be used to inherit form-like things. Note also the directive in the body section that determines the location where the processing will take place (runat="server"').
The only part left is the source statements for the code behind the processing. VS.NET helps out there, too. Click on the Webform1.aspx.cl tab on the top of your editing window (Figure 2) to display some of the C# code generated (Figure 4).
|
Figure 4: Visual Studio generated this code for the "code behind" the page.
If you're comfortable with .NET languages, this should look pretty good. This code is similar to standard Windows application instructions for applications built with VS.NET.
Also similar are the components to be placed on the user interface. One of the most significant aspects of the ASP.NET platform is the familiar controls. These widgets look and act like Windows desktop controls rather than Web components built with other, less accommodating languages. To illustrate, I'll create a user ID and password entry screen that corresponds to the HTML version you developed last month. The example application will collect the user ID and password and echo the data back to the client for display.
Click on the WebForm1.aspx tab and then the Design tab to access the user interface designer screen. Open the Web Forms toolbox on the left side of the VS display and select the TextBox button (Figure 5).
Figure 5: The ASP.NET Web Forms toolbox offers many options for user interface design.
Draw the text box on your page somewhere near the top to act as the space for the user ID to be keyed. Next, draw another text box on your page to act as the password field. Then, press F4 to access the control's properties. Scroll down to the TextMode property and set it to Password to make the text non-display. Now, add a command button that the user can click on to submit the information to the code behind. Then, add a few label controls to hold the values that are echoed back to the browser for display.
Finally, in this humble example, you'll add a bit of code to read from the server's database. In this case, the database will just be a text file of city names that is stored on the server and is loaded to the ASP page dynamically for display at the browser. The user can then select the city from a drop-down list. Bear in mind that the file data, instead of coming from a text file on the server, could be obtained from your iSeries or network server using a high-level access method like ODBC or ADO.
Select a DropDownList control from the toolbox and draw it on your form. The list will be loaded from the text file during the InitializeComponent event (Figure 6).
Note: To use the StreamReader, you have to include this statement in your code (shown in the first line of code in Figure 4): using System.IO;
|
Figure 6: Load the DropDownList box from a text file in the InitializeComponent event.
OK, so your form should now look something like Figure 7.
Figure 7: The example ASP page looks like this in the Visual Studio page designer.
Next, in standard VS style, double-click on the page's Logon button to access the click event. Add some code to load the user-keyed values into labels for display:
|
Figure 8: Add this code in the Click event for Button1 to echo values back to the browser.
To see the result of your efforts, save your project and then "build" the application (from the menu bar, select Build > Rebuild Solution). Your code will be compiled into a DLL and placed in the virtual directory that was specified when the project was started. (Note: Another copy is actually created and placed in what's called a "shadow directory" with other temporary Internet files when IIS is asked to service the page.)
For the payoff, press F5 or click the Run button to set the processing in motion. Your browser will start, and you should be greeted with a page like that shown in Figure 9. The drop-down list box shows city names for the user to select, along with the usual user ID and password text boxes.
Figure 9: Your ASP client page should look like this now.
Key some nonsense into the user ID and password text boxes, select a city from the list, and click the Logon button. The server-side code will return the values for inspection in the label controls (Figure 10).
Figure 10: Values echo back to the client from the server-side code behind.
With this sort of arrangement, you can bring a tremendous level of capability and flexibility into your Web-based applications. The server-side code can perform complex tasks and interact with your existing databases just as if the user were running a conventional desktop application. All your coding know-how can be leveraged to the ASP.NET platform to create a capable Web-based solution.
With the groundwork laid, I'll take up the ASP.NET cause again in the near future to explore some of the more useful aspects of the platform.
Chris Peters has 27 years of experience in the IBM midrange and PC platforms. Chris is president of Evergreen Interactive Systems, a software development firm and creators of the iSeries Report Downloader. Chris is the author of The OS/400 and Microsoft Office 2000 Integration Handbook, The AS/400 TCP/IP Handbook, AS/400 Client/Server Programming with Visual Basic, and Peer Networking on the AS/400 (MC Press). He is also a nationally recognized seminar instructor. Chris can be reached at
LATEST COMMENTS
MC Press Online