If you have to manage the same user profiles across multiple iSeries systems, the User and Group functionality within Management Central can help make that task easier. It won't help if each system has its own unique set of profiles, but it will if the same profiles generally exist on more than one system.
System Requirements
To manage users and groups with Management Central, all systems managed must be running OS/400 V5R1 or later. The PC from which management will occur must be running iSeries Access for Windows or Client Access Express.
Setup and Configuration
You must first ensure that Management Central is installed on your PC. Management Central is installed when you install iSeries Navigator (formerly Operations Navigator, or Ops Nav). To get to Management Central, open iSeries Navigator. You can find iSeries Navigator in the Client Access folder on your desktop or by going to Start->Programs->IBM iSeries Access (or IBM AS400 Client Access Express )->iSeries Navigator (or Operations Navigator)
If you have never opened iSeries Navigator before, you may get a message about the system scanning for and installing new plug-ins--that's OK; let it do its thing.
At the top of the window that opens, you will see an entry for Management Central (see Figure 1). The system name shown in parentheses is the "central system." In Figure 1, the central system is SkyView.
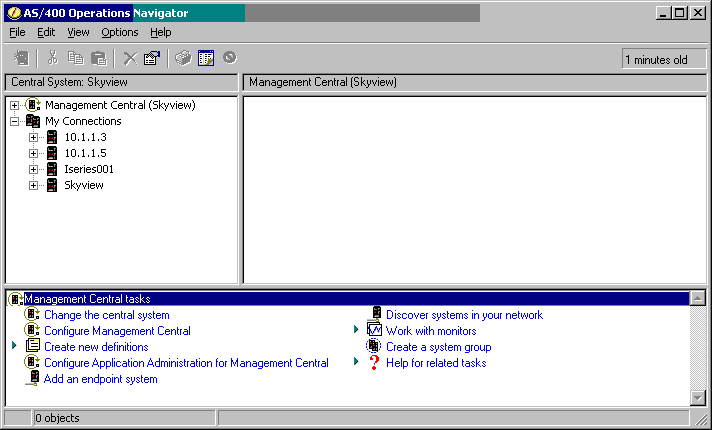
Figure 1: If you right-click on Management Central, the tasks available are shown in the bottom pane. (Click images to enlarge.)
The central system is the system from which all requests and commands originate. In addition, the central system stores some information from the other systems. The central system should be one that is consistently available (in other words, don't choose a test system that is frequently reloaded or IPLed). If you want to change which system is the managing system, click on "Change the central system" in the task list in the bottom pane.
Now that you have defined the central system, you need to define the systems that you are going to take action on. These systems get grouped together into something called a "system group." For example, you have four systems in your company, and the same users are created on three of those systems (the fourth system is a development system). You would define a system group that includes the three systems that are managed in the same way. Or perhaps you centrally manage multiple organizations within your corporation. You could define one group that consists of the two systems that service the financial organization, a second group that consists of the four systems that service the manufacturing organization, and a third group that consists of the 10 systems that service the retail outlets.
To create a system group, double-click on "Create a system group" in the task list shown in Figure 1. The screen shown in Figure 2 will be displayed.
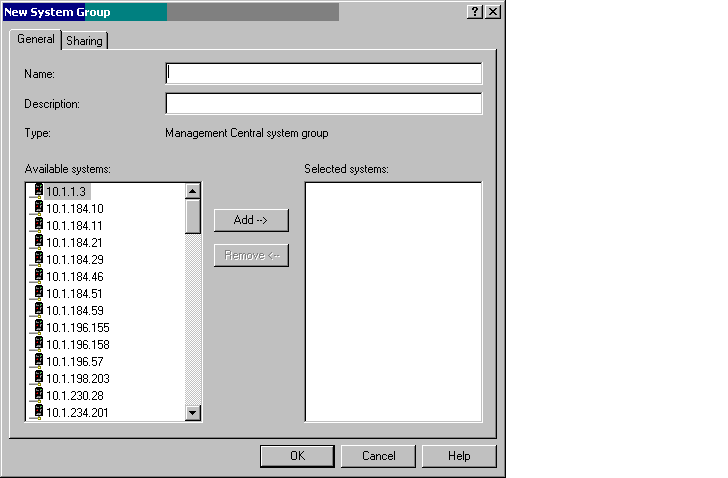
Figure 2: Choose the systems you want in the system group and click Add.
Name the system group, add a description, and then choose the systems you want in this group. The pane on the left shows all of the systems in the network (Management Central goes out and discovers those--you don't have to add them). Click on the system name and press the Add button to add it to the system group. The central system does not have to be one of the systems in the group.
If you have colleagues who will also want to use this group, click on the Sharing tab at the top of this window. Choose Full to allow others to use this system group (see Figure 3) and then click OK. You have just defined a system group. Repeat this process for all of the groups you want to define.
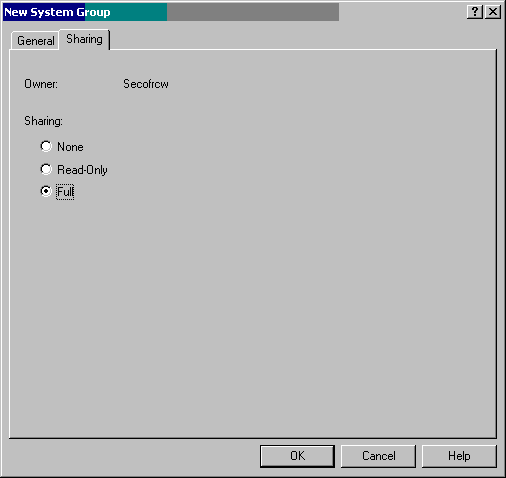
Figure 3: To allow multiple users to use this system group, choose Full.
As part of the setup, you will want to schedule a job that will collect "inventory" information about all users and groups that have been created on the systems in your system groups. (As you continue to read this article, it will become more apparent why you want this information.) For each system group, right-click on the system group name and choose Inventory->Collect. The screen shown in Figure 4 will appear.
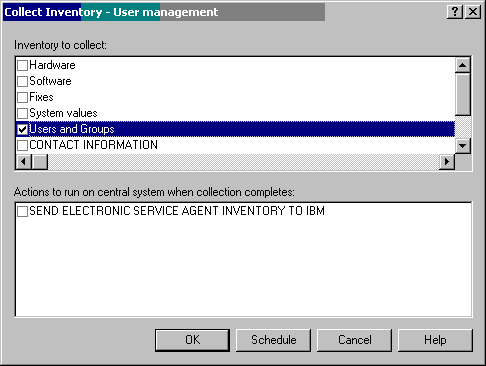
Figure 4: Uncheck all boxes except for Users and Groups.
Make sure that the only box checked is Users and Groups. Click on Schedule. You'll get the screen shown in Figure 5.
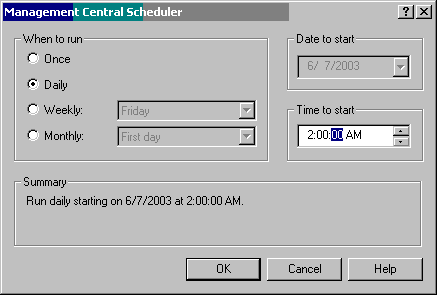
Figure 5: Use this feature to schedule when the inventory collection will occur.
This screen allows you to schedule a job that will run at 2:00 every morning. It will collect all user profile and group profile information from all the systems defined in the system group and make this information available so that you can take action on it (i.e., modify the profile or delete the profile from all of the systems). To make sure you can modify or delete profiles, gather the users and groups information regularly.
To check that the collection job has been scheduled, open Scheduled Tasks and then click on Inventory--you can see the scheduled jobs listed on the right. See Figure 6.
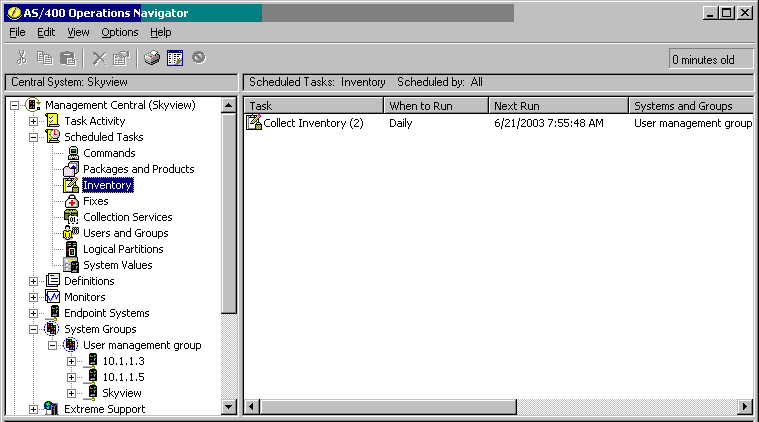
Figure 6: To make sure the inventory is being collected, look at the Inventory under Scheduled Tasks.
Performing Actions on Multiple Systems
Now that setup is complete, let's look at the actions you can perform.
Creating Profiles
In the left nav pane under Management Central, expand (click on the +) System Groups. Right-click on one of the groups you created. Choose Users and Groups and then New User. The screen shown in Figure 7 is displayed.
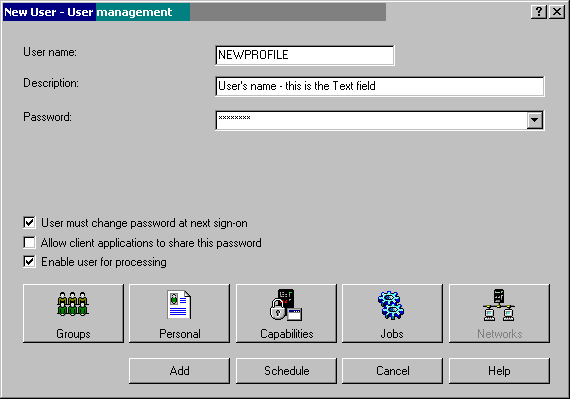
Figure 7: Define a new user who will be created on all systems in the system group.
This is a graphical interface for creating user profiles on OS/400. You click on each of these boxes to define the user's group, special authorities, job settings, directory entry, etc. Once you've specified those parameters, click Add. The user profile NEWPROFILE will be created on each of the systems defined in the system group you are currently using. Beats signing on to each individual system and creating the profile multiple times, doesn't it?
Creating profiles does have its limitations, however. While Management Central does allow you to define commands or programs to run after creating a profile, many of my clients go into their applications and manually add the new user to a list of application users and define which menu options they are allowed to use. Unless this can be done programmatically, Management Central doesn't help you manage the application enrollment and configuration.
Modifying Profiles
You can also modify or "edit" a profile on multiple systems. Right-click on the system group, choose Users and Groups, and then choose Edit user. You'll see the screen in Figure 8.
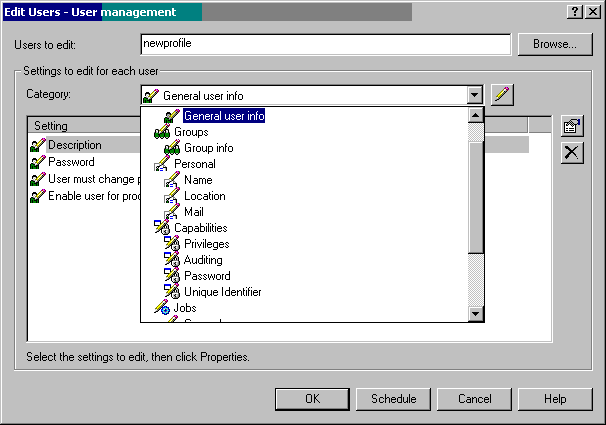
Figure 8: User profile attributes are grouped into categories. Choose the category and then the specific attribute that you want to change.
Specify the name of the profile you want to change and find the field or fields that you want to update. If you don't see the user profile field listed under the Setting field, use the drop-down box to find the right setting. In Figure 9, the accounting code is chosen to be changed.
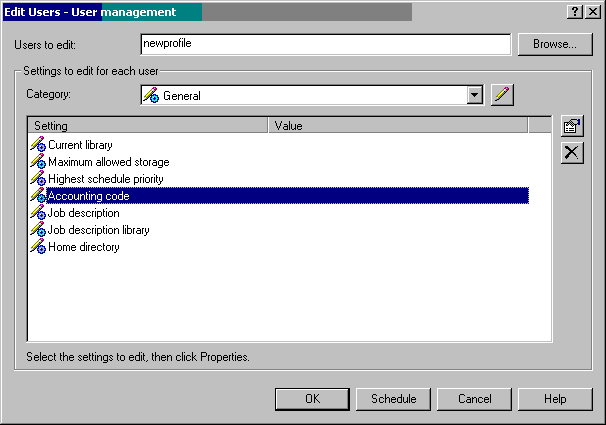
Figure 9: The accounting code of the profile NEWPROFILE is chosen to be modified.
Click on the field you want to update and then click on Properties. It's not obvious which button is Properties, however! It's the button above the delete (or the "X" box). The screen shown in Figure 10 is where you enter the new accounting code.
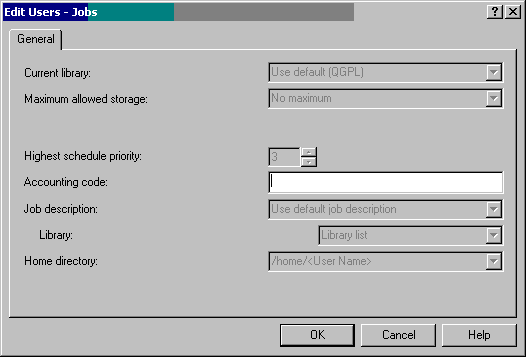
Figure10: Enter a new value for the Accounting code.
Click OK and then OK again. The accounting code for the profile NEWPROFILE will be changed on all systems in the chosen system group.
Deleting Profiles
There are two ways to delete profiles.
Deleting Profiles--Method 1
Right-click on the system group name, choose Users and Groups, and then Delete User. You'll get the screen in Figure 11.
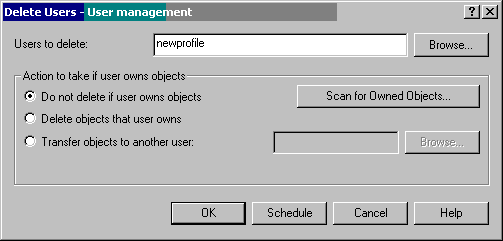
Figure 11: Specify the user to be deleted from all systems in the system group.
Notice that this screen gives you the same options as the Delete User Profile (DLTUSRPRF) command. That is, you can tell the system to not delete the profile if it owns objects (that's the default), delete any owned objects, or transfer the objects to another user. Specify the name of the profile to be deleted and click OK to delete the profile from all systems in the systems group.
Deleting Profiles--Method 2
Use this method of deleting profiles when you want to find the profile based on something other than the profile name and then delete the result of the search. To use this method, right-click on the system group, choose Inventory->Search->Users and Groups, and click on the Advanced tab (see Figure 12).
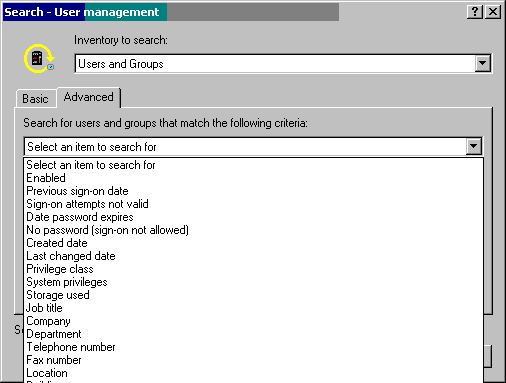
Figure 12: Choose the attribute on which to perform a search of the Users and Groups inventory.
Scroll down to find the unique identifier (UID), click on it, and press OK. Figure 13 shows all of the options you have when searching the inventory.
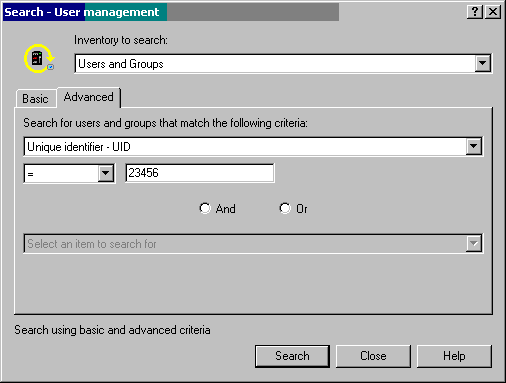
Figure 13: Specify the search criteria for searching the Users and Groups Inventory.
The field name will be filled in, and the operation will default to "equals" (=). Leave those and specify the UID. Click Search. The resulting screen will show all of the systems within the system group that have a user profile with the specified criteria. The profile name and the system on which it resides will be listed. Right-click on the profile name and choose Delete. If you want to delete all of the profiles displayed, click on the first profile, hold down the Shift key, and click on the last profile. All profiles should be highlighted. Then, right-click and choose Delete. You will be presented with the same screen as shown in Figure 11. However, the heading of the box will include the names of all of the systems you will be deleting the user from. Choose the appropriate action to take with their owned objects and click OK to run the delete right away or click Schedule to schedule the deletion to occur later.
To see the status of all of the tasks that you have run, go to Task Activity and click on Users and Groups. In the right nav pane, you can see the status of the tasks you have run (see Figure 14). Once complete, you can get rid of these tasks. Right-click on the task and then choose Delete.
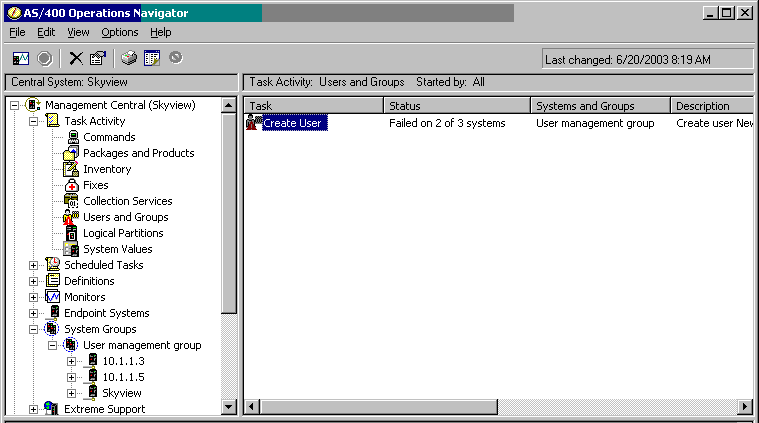
Figure 14: To see the status of your tasks, click on Users and Groups under Task Activity.
If there was some kind of failure, as shown in Figure 14, you can click on the task for more details. Figure 15 shows the details of the failure.
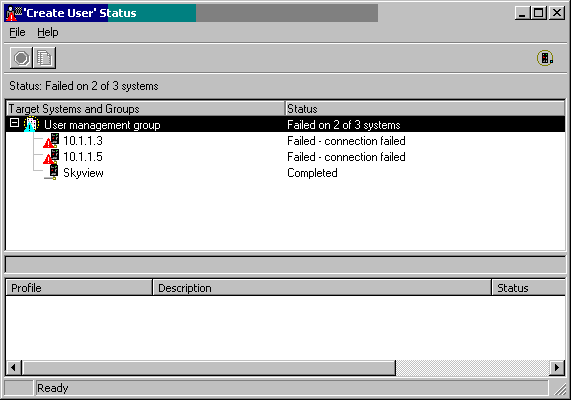
Figure 15: The user profile was not created on two systems because of a connection problem.
Frequently Asked Questions (FAQs)
Here are some questions I've been asked by system administrators who implement Management Central.
Question 1: What if I am creating a user for a system group and it gets created on only two of five systems? (The connection fails on the other three.) Can I create the same user on the same system group again? Or do I have to create the profile on each individual system?
Answer: You can go ahead and run the create against the system group. Obviously, it will fail on the two systems that the profile was created on earlier, but that's OK.
Question 2: I have a system group of five systems. I know that a profile I have to delete exists on only four of those systems. Can I use the delete function against the system group, or do I have to delete the profile from each individual system?
Answer: You can run the delete function against the system group. You should get a message that the profile was deleted on four of five systems. For the system on which the profile did not exist, you should get a message that says the profile couldn't be deleted because it did not exist.
Question 3: I have a system group of 10 systems. I know that a profile owns objects on four of those systems. Can I still run the delete function against the system group? Do I have to specify to delete the profile even if it owns objects?
Answer: You can run the delete function against the system group. You can leave the delete option at the default (i.e., delete the profile if it does not own objects). The system will delete the profile on the systems where the profile does not own objects. It will not delete the profile on the systems where the profile does own objects. Messages will tell you from which systems the profile was deleted.
Question 4: I tried an operation, but it did not complete successfully. The error message said there was a connection issue or problem. What do I do?
Answer: This is probably the biggest frustration you'll have with Management Central--making sure the connection between all systems is available. Sometimes, you'll discover that the Management Central server isn't started. Sometimes, you'll find that you need a PTF. Sometimes, the other system is not available. Unfortunately, many situations can produce a connection issue.
Carol Woodbury is co-author of the book Implementing AS/400 Security as well as co-founder of SkyView Partners, a firm specializing in security consulting and services. Carol has over 12 years in the security industry, 10 of those working for IBM's Enterprise Server Group as the AS/400 Security Architect and Chief Engineering Manager of Security Technology. Carol can be reached at


 Business users want new applications now. Market and regulatory pressures require faster application updates and delivery into production. Your IBM i developers may be approaching retirement, and you see no sure way to fill their positions with experienced developers. In addition, you may be caught between maintaining your existing applications and the uncertainty of moving to something new.
 IT managers hoping to find new IBM i talent are discovering that the pool of experienced RPG programmers and operators or administrators with intimate knowledge of the operating system and the applications that run on it is small. This begs the question: How will you manage the platform that supports such a big part of your business? This guide offers strategies and software suggestions to help you plan IT staffing and resources and smooth the transition after your AS/400 talent retires. Read on to learn:
LATEST COMMENTS
MC Press Online