Learn how to set up Apache and PHP to run on your local PC.
This tip is a gamble. Either you'll dislike it so much you'll flame me on the Web or you'll nod your head and say, "Why didn't somebody tell me this long ago?"
Everybody is talking about PHP these days, and in the publications you and I read, it's usually how to run it on System i. But if for some reason installing PHP on your i is not in your current plan, read on and learn how you can create your own Web server and start playing around with PHP in about 10 minutes.
Let's start by downloading and installing the Apache server. I have provided a lot of screen shots to make it very easy for you to follow the installation step by step.
Start by pointing your browser to the Apache Web site. Select the "Win32 Binary without crypto (no mod_ssl) (MSI Installer)" link and save the file somewhere on your PC.
When you're done, click the apache_2.2.11-win32-x86-no_ssl.msi file (ignore any warnings you might get), and this screen will appear:
Figure 1: The wizard makes installation easy. (Click images to enlarge.)
Click Next to get the license agreement. Accept the terms and click Next. The "Read This First" screen will come up. Click Next.
Now we're getting to the meat of the installation wizard.
Figure 2: Enter your server's information.
Because you're installing the Web server locally, enter the information as shown above and click Next.
Figure 3: Choose the setup type.
Select the Typical setup type and click Next.
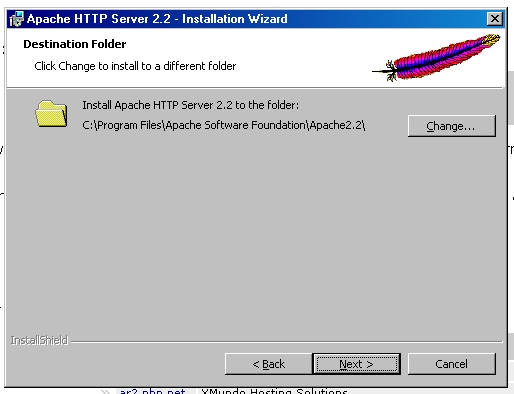
Figure 4: Select a folder for your installation.
If you like the path where Apache wants to install the server, just accept the entered value. Otherwise, change the path to something you like better. When you click Next, accept the confirmation dialog, and the Apache server will be installed. After awhile, you will see the following:
Figure 5: You have successfully installed Apache.
Click Finish. You now have a very stable open-source Web server installed on your PC.
The Apache server runs as a Windows service, and here's one way you can start and stop it. In your system tray, you'll notice a small icon like this:
Right-click the icon and see the following:
Figure 6: Open the Apache monitor.
Select the Open Apache Monitor option. You can now start and stop the server as you wish.
Figure 7: You've opened the Apache Service Monitor.
If you click the Services button, the Windows Service screen will open up, and you will see the Apache service. As a default, the installer has installed the service to start automatically every time the PC starts, but of course you can change that according your needs.
Note that the description of the service tells you the version of the Apache server installed.
Figure 8: You can see the description of the Apache Service Monitor you have installed.
If you open up your browser and enter http://localhost as the address, the service will confirm with a screen:
Figure 9: Your service is confirmed.
Essential Apache Folders
There are a few essential Apache folders that you should know about. I have listed a short description of them below. The "../" refers to the installation path of the Apache Web server, and you should replace it with the path you previously selected.
../htdocs
This is the Web server's document root. All files you place here will be visible from http://localhost. By standard, only one file exists in the document root; it is called index.htm and is the "It works!" document. If you rename it to something else and enter the http://localhost address, you'll get a directory listing of all the files and folders in ../htdocs.
Important: The Web server cannot move outside of ../htdocs unless you change the configuration. It's called the "document root" because that's the place where the Web server's world begins...so to speak.
../conf
This is where all the configuration files for the Web server reside. To change the server, look for the file named httpd.conf. For now, just leave it and wait until you get a little more comfortable with the server. You can find all kind of Apache server-tweaking documentation on the Internet.
I will not go any further into this subject, because the subject is so broad that I could write TechTips on this topic alone.
../logs
This folder contains a few files, but the ones we are looking for are access.log and error.log.
As you can guess, access.log contains information about who has been accessing the documents on your server. Because you run the server locally, it might be a little dull looking into this folder, but still, it will give you an idea of what is really logged. You can find a lot of tools on the 'net that can analyze the access.log data. Just do a quick Google search with the words "apache analyzes logs."
The file called error.log identifies all errors that have occurred when the Web server has tried to load your Web pages. If you make a mistake in a PHP script, this is the place to look. Very often, you'll see a nice message telling you what line went wrong, which makes it very easy to trace errors.
The nice thing about these folders is that if you have Apache installed on your System i, the same names apply to the standard installation. Try running the following command to see for yourself:
wrklnk '/www/apachedft/*'
That's enough about the Apache server for now. Let's get some PHP installed.
Installing PHP
Start by downloading the current stable PHP package. Point your browser to www.php.net/downloads.php#v5 and select the PHP 5.2.10 installer (the most current at the time of writing). Select a location to download and save on your PC.
When you're done downloading, click on the php-5.2.10-win32-installer.msi file, and the following will appear:
Figure 10: You're now in the PHP setup wizard.
Click Next. Accept the PHP license, and click Next again.
Figure 11: Choose a destination folder.
Accept the default installation folder. (Please note that, in the example, I have changed the default.) Click Next.
Figure 12: Select the Web server to set up.
Because PHP must "fit" to the browser, the installer must know what version of the Apache server you are running. Select the "Apache 2.2.x Module" and click Next.
Figure 13: Browse to the folder where httpd.conf is saved.
Now you must navigate to the folder where your httpd.conf (remember that?) resides. Use the Browse button to do that. If you made a standard installation, the path is most likely something like this: C:Program FilesApache Software FoundationApache2.2conf. When you're done, click Next.
Figure 14: Choose the features you want to install.
Now you must select the features you plan you use. Features are small programs that can do various tasks. One of them could be accessing data from a MySQL or MS-SQL database to build an application.
Let's install those extensions by selecting MySQL, MySQLi, and MSSQL. Then, click Next.
Figure 15: Click Install to begin installation.
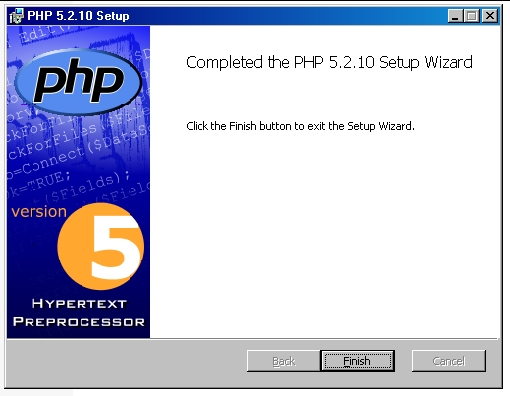
Confirm the installation settings and press Install. After awhile, you'll see the following screen, which confirms that the PHP installation is done.
Figure 16: Installation is complete!
Now you have to tell the Apache Web server that PHP is installed. This is done by restarting the server.When you're done, mark the Apache 2.2 line and you will see the description telling you the Apache and PHP version installed.
Figure 17: When you restart, you'll see what you installed.
Bravo! Well done! You are now ready to move into the wonderful world of PHP.
One Little Script
Before I leave you, I'll create one little script just to get you started.
Open the ../docs folder and create a file called phpinfo.php. Then open it in a text editor like Notepad or Notepad++ and enter the following:
<?php
phpinfo();
?>
Save the script and enter the following address in your browser: http://localhost/phpinfo.php.
You'll see a Web page telling you how your PHP installation is set up.
Figure 18: You can see your PHP setup.
What to Do Next?
Well, that's up to you. Many Web sites can tell you how to get started with PHP. One of my favorites is www.w3schools.com/php/default.asp. I like it because it tells you only what you need to know and offers some brilliant examples. Another great place is www.php.net, but I use it more as a reference. Those are my favorites. If you have different favorites, please tell us all in the forum associated with this TechTip.
PHP is a great language and is pretty easy to learn. You will improve your programming skills very quickly. Then, when you feel ready, install it on the System i and combine it with RPG. You'll feel invincible!


 Business users want new applications now. Market and regulatory pressures require faster application updates and delivery into production. Your IBM i developers may be approaching retirement, and you see no sure way to fill their positions with experienced developers. In addition, you may be caught between maintaining your existing applications and the uncertainty of moving to something new.
 IT managers hoping to find new IBM i talent are discovering that the pool of experienced RPG programmers and operators or administrators with intimate knowledge of the operating system and the applications that run on it is small. This begs the question: How will you manage the platform that supports such a big part of your business? This guide offers strategies and software suggestions to help you plan IT staffing and resources and smooth the transition after your AS/400 talent retires. Read on to learn:
LATEST COMMENTS
MC Press Online