With the introduction of .NET XML Web Services, it's become easier to deliver iSeries data into Excel. In my last article, I explained how to retrieve data from the iSeries using .NET XML Web Services. Now, let's go a step further.
If you work with accounting/finance folks, you probably realize that the iSeries does not take precedence over the almighty Excel. Most accounting/finance professionals prefer to view and manipulate their financial data in Excel. Let's assume your accounting manager wants to see a gross sales report on a daily basis to do some comparative analysis, and he is not enthusiastic about a Web reporting tool that makes him wait forever while almost mocking him with an animated GIF going back and forth.
Data extraction methods are critical to the success of any reporting infrastructure. Hence, it is imperative that you use the most efficient way to extract the data from the iSeries. In this case, .NET Web Services are an excellent option. Web Services can take advantage of your existing RPG programs and business logic to deliver data from iSeries to Excel or any other business application. I will demonstrate how you can deliver data into Excel safely and efficiently. Figure 1 shows the process flow.
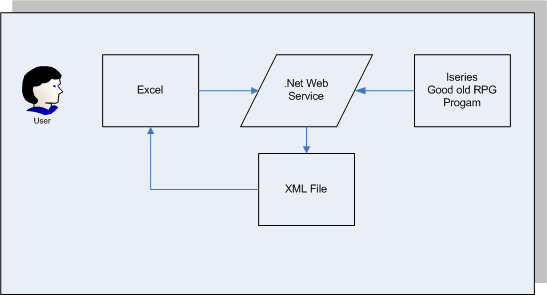
Figure 1: This is the process for delivering data to Excel from the iSeries. (Click images to enlarge.)
There are basically two steps:
1. Excel is the launching point. A hyperlink will redirect the user to the .NET Web Service, which will retrieve data and write it to an XML file.
2. The XML file generated by the Web Service will then be used to map data in Excel.
Step 1
Let's start with Excel. Open a new, empty Excel spreadsheet. Then, from the Insert menu, choose Insert Hyperlink (Figure 2). This hyperlink redirects the user to our Web Service so the data can be updated anytime the user wants.
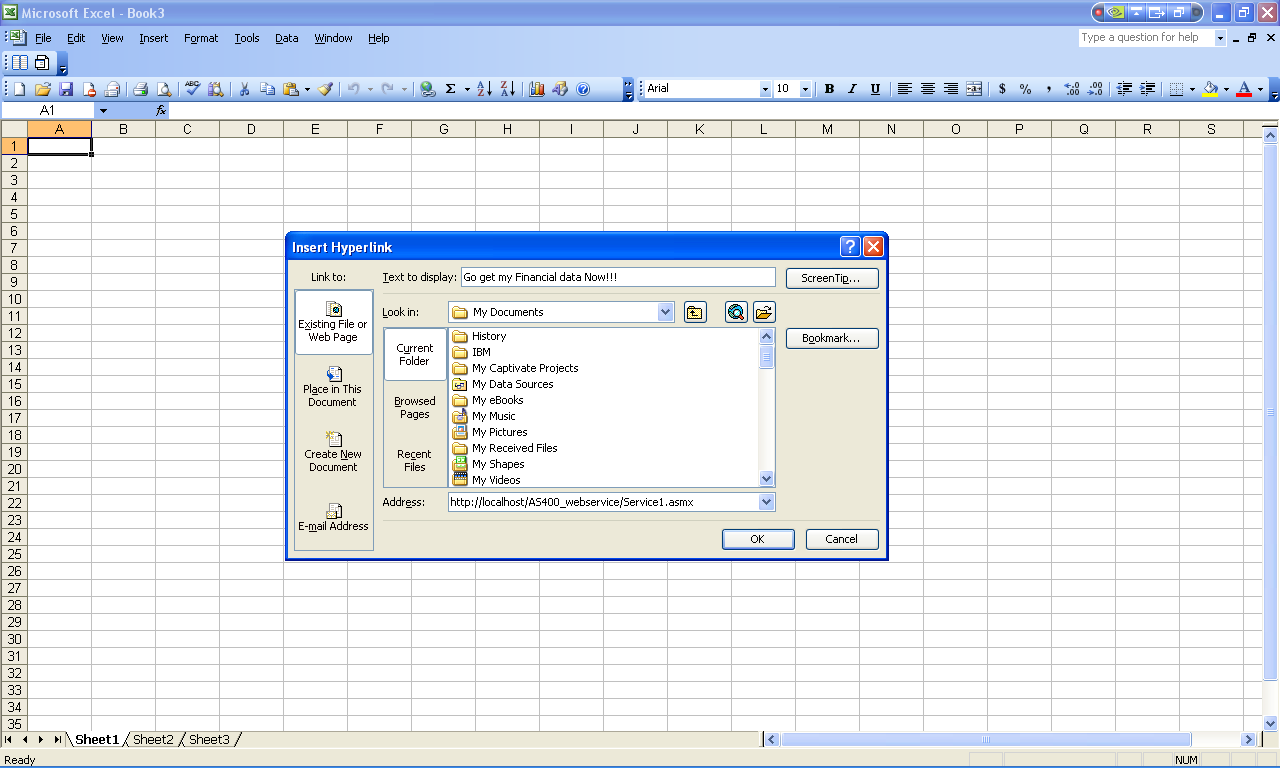
Figure 2: Insert hyperlink.
The hyperlink text to display would be something like "Go get my financial data." For the address attribute, put in the URL for your Web Service, which will be something like http://localhost/AS400Webservices/service1.asmx. Click OK. Your screen will look like Figure 3.
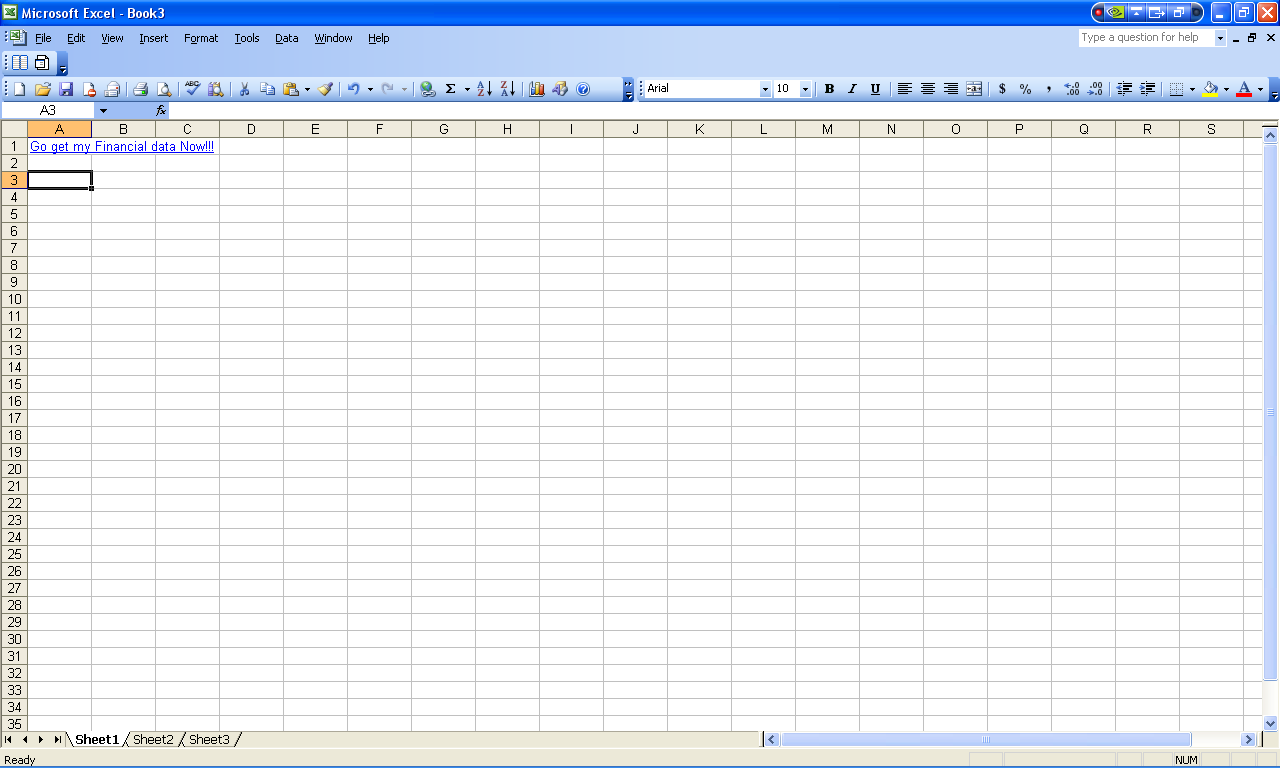
Figure 3: Your hyperlink is added.
You have successfully added a hyperlink to your Web Service. Now, click on the hyperlink to get to the Web Service (Figure 4).
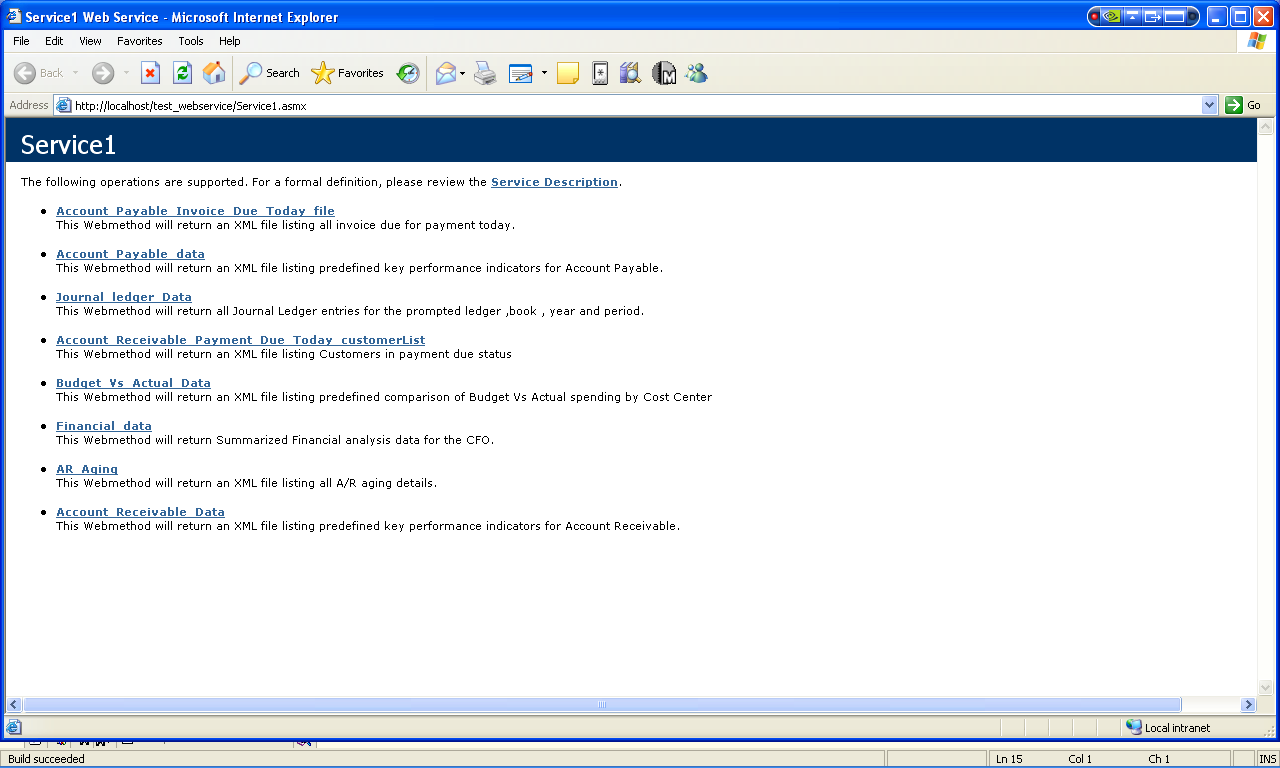
Figure 4: You're at the Web Service.
Notice the "Web methods" listed under Service1. These are simply scenarios for your accounting/financial Web Service. By looking at the descriptions, you'll get a pretty good idea as to what can you do with these Web Services as a middle tier. It is noteworthy that XML files generated here can be used in any application that supports XML. For example, one of the above Web methods generates an XML file that serves as a mail merge data source for a Word document.
Let's click on one of our Web methods (Web Services have Web methods like RPG programs have subroutines or procedures). When we click on Financial_data, the screen in Figure 5 pops up.
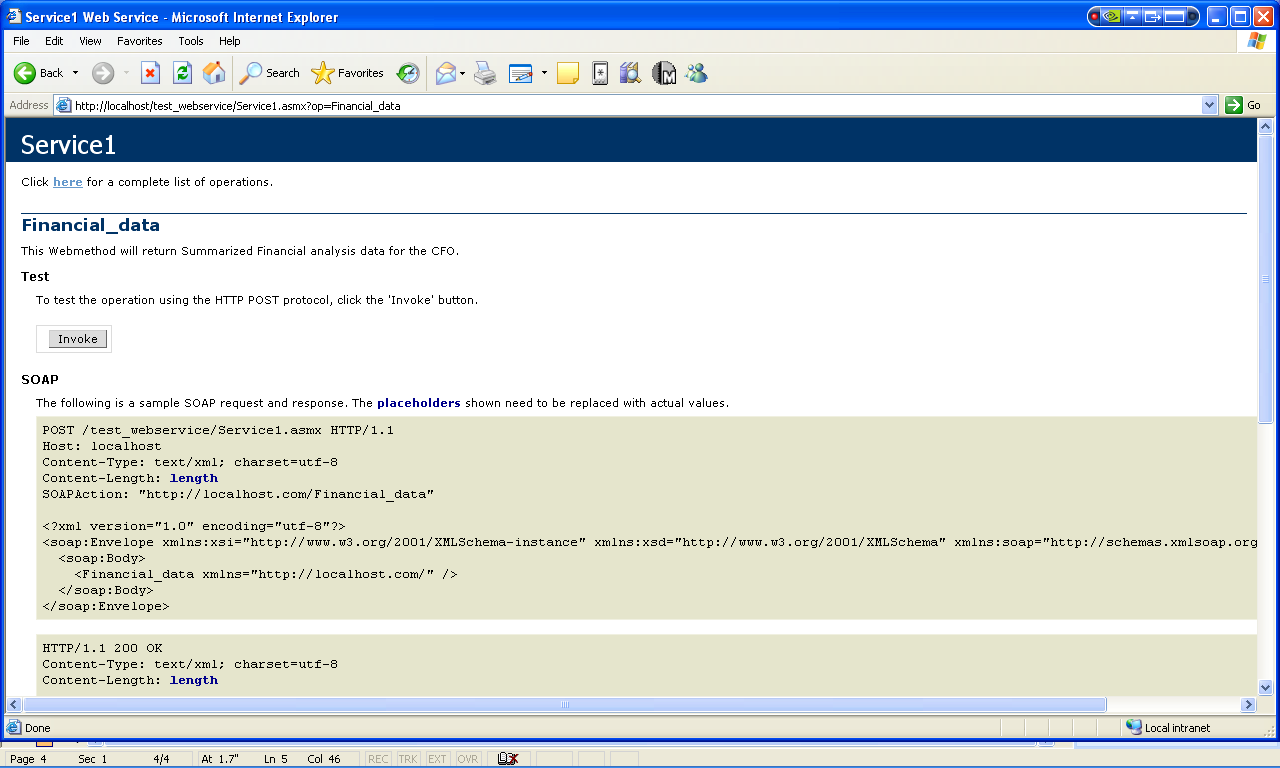
Figure 5: The Financial_data Web method looks like this.
Notice the Invoke button. This button actually invokes the Web Service and causes it to retrieve your data from the iSeries and then turn it into an XML file on the Web server or anywhere on your network. For this example, let's call this file customers.xml and write it to the C: drive.
This straightforward Web method does not pass any parameters. In the real world, you will be using more complex Web Services capable of passing parameters to your RPG programs and getting the appropriate data back. Figure 6 shows such a Web Service.
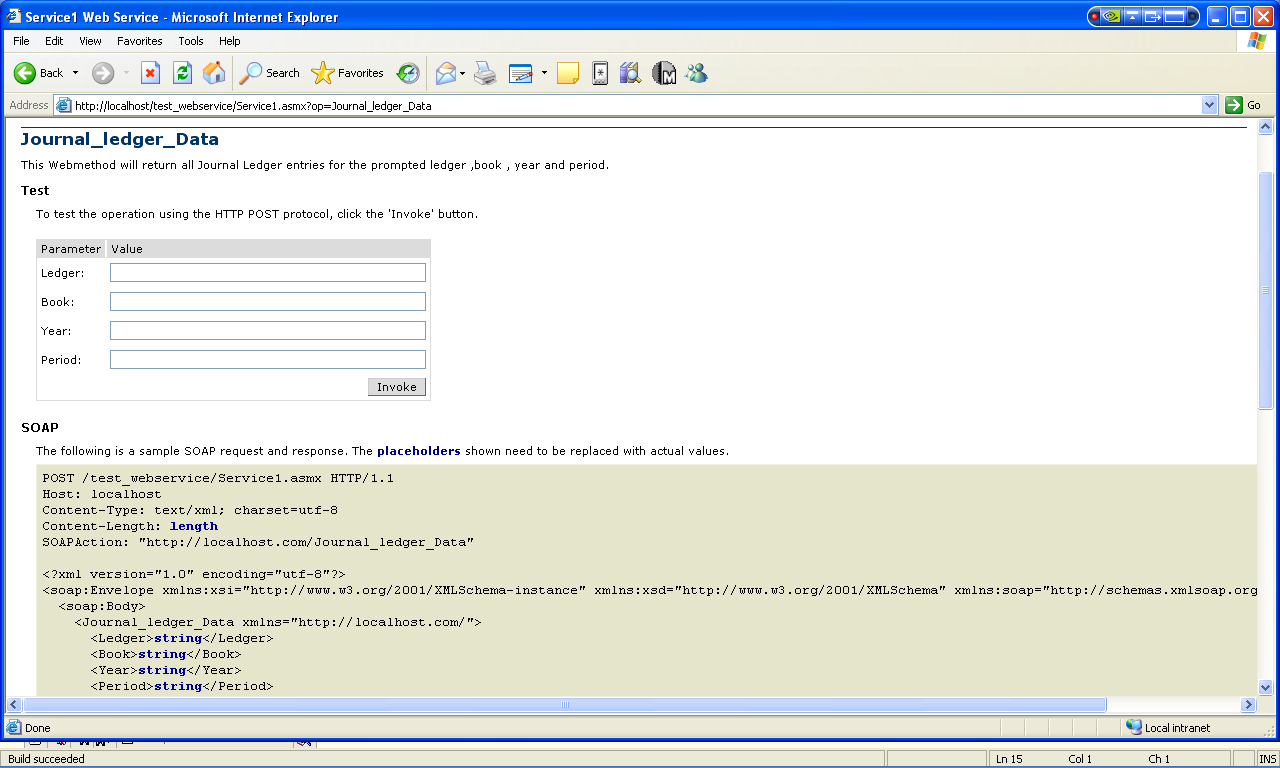
Figure 6: This Web Service passes parameters.
Notice that you have text boxes for your parameters just like you would in an RPG display program or a Web reporting tool. These parameters will be passed directly into your RPG program for processing. Once you fill in the parameters, you simply click Invoke.
Let's get back to our example. After you invoke this Financial_data Web Service, you will get a message like "Thank you for updating your financial data." That tells the user that the process is finished.
At this point, a file called customers.xml is created on your C: drive. You can write a file on any shared network drive as long as it is accessible to the XML Web Service as well as the user who will be using it.
Step 2
Now, let's pull this file into Excel. If you have Microsoft Office 2003, choose Data > XML > XML Source (Figure 7). The screen in Figure 8 will pop up. (If you have a prior version, use the Web Query function of Excel, which is little different but equally effective.)
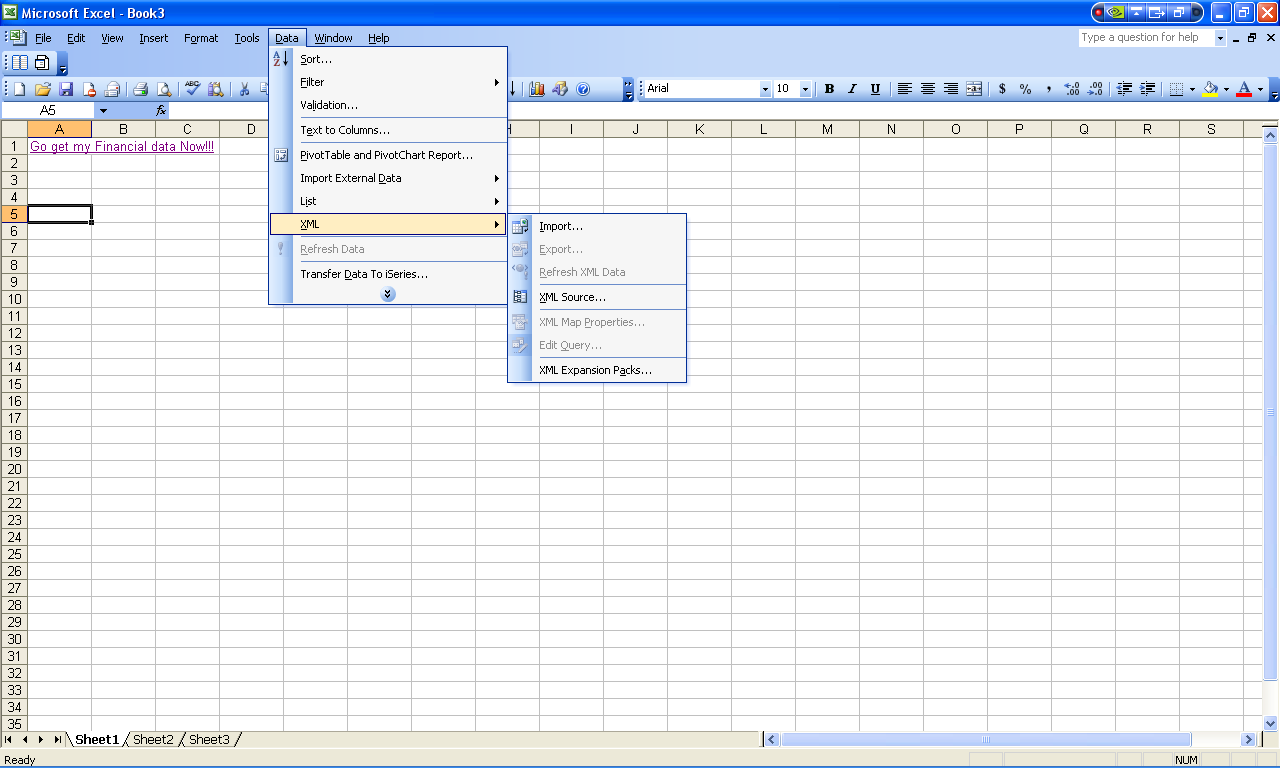
Figure 7: Choose Data > XML > XML Source.
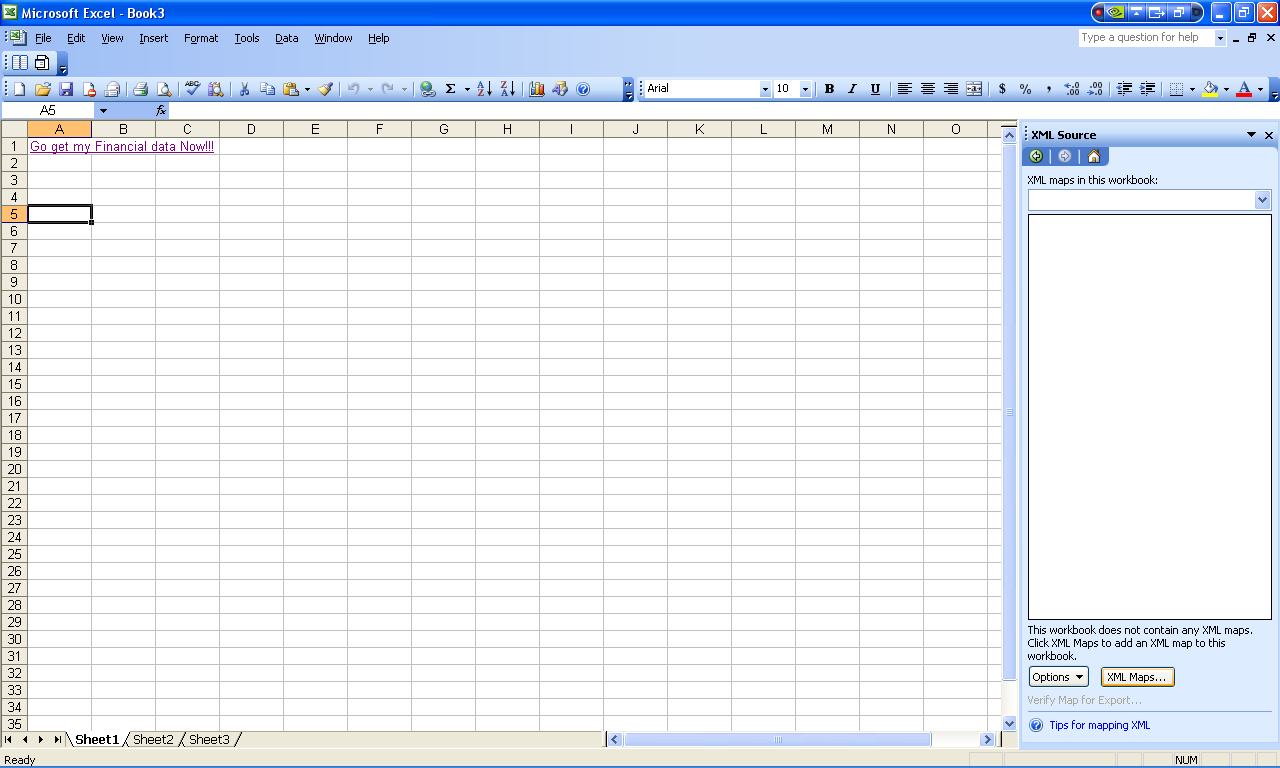
Figure 8: Pull your data into Excel.
Notice the two buttons at the bottom right side of the screen, Options and XML Maps. Clicking on XML Maps brings up a dialog box that asks for an XML data source. We already created the .xml file, and we will use that file as the data source. Click on the Add button in the dialog to navigate to that .xml file (Figure 9).
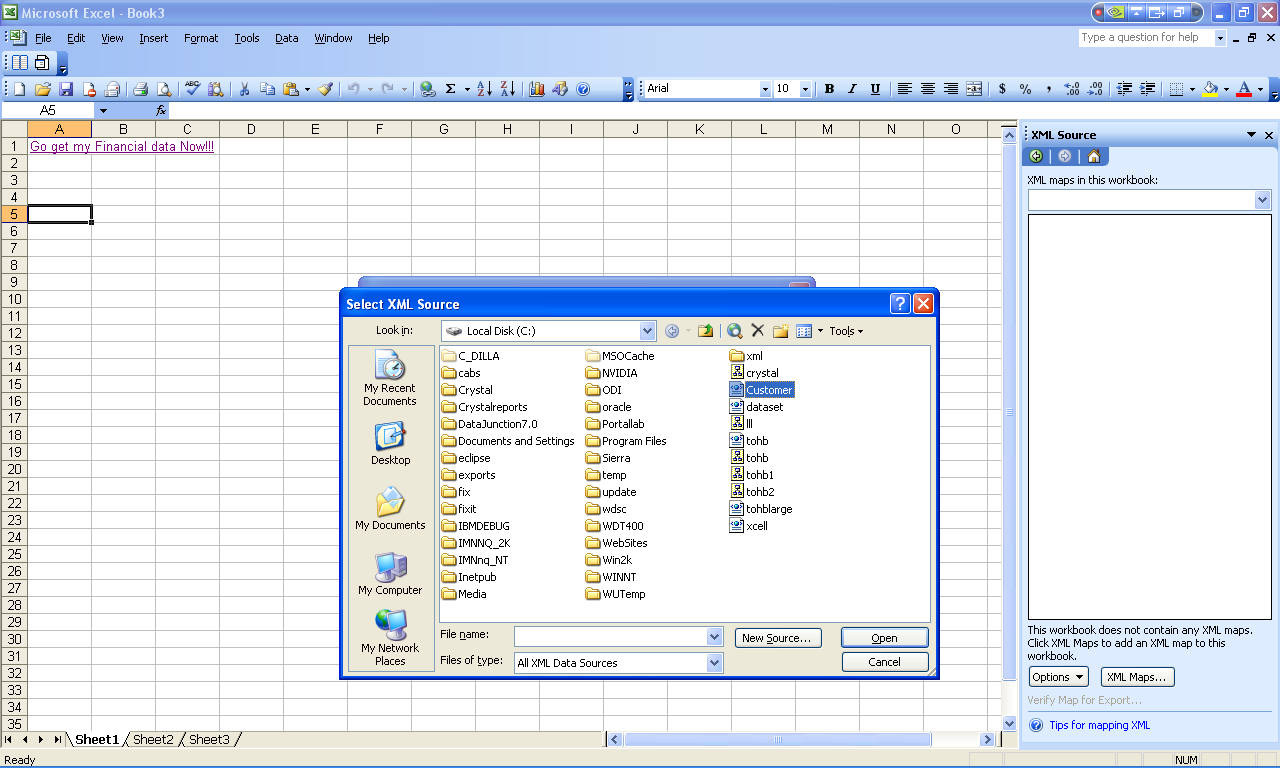
Figure 9: Navigate to the .xml file.
Choose the file that your Web Service created earlier and click Open (Figure 10).
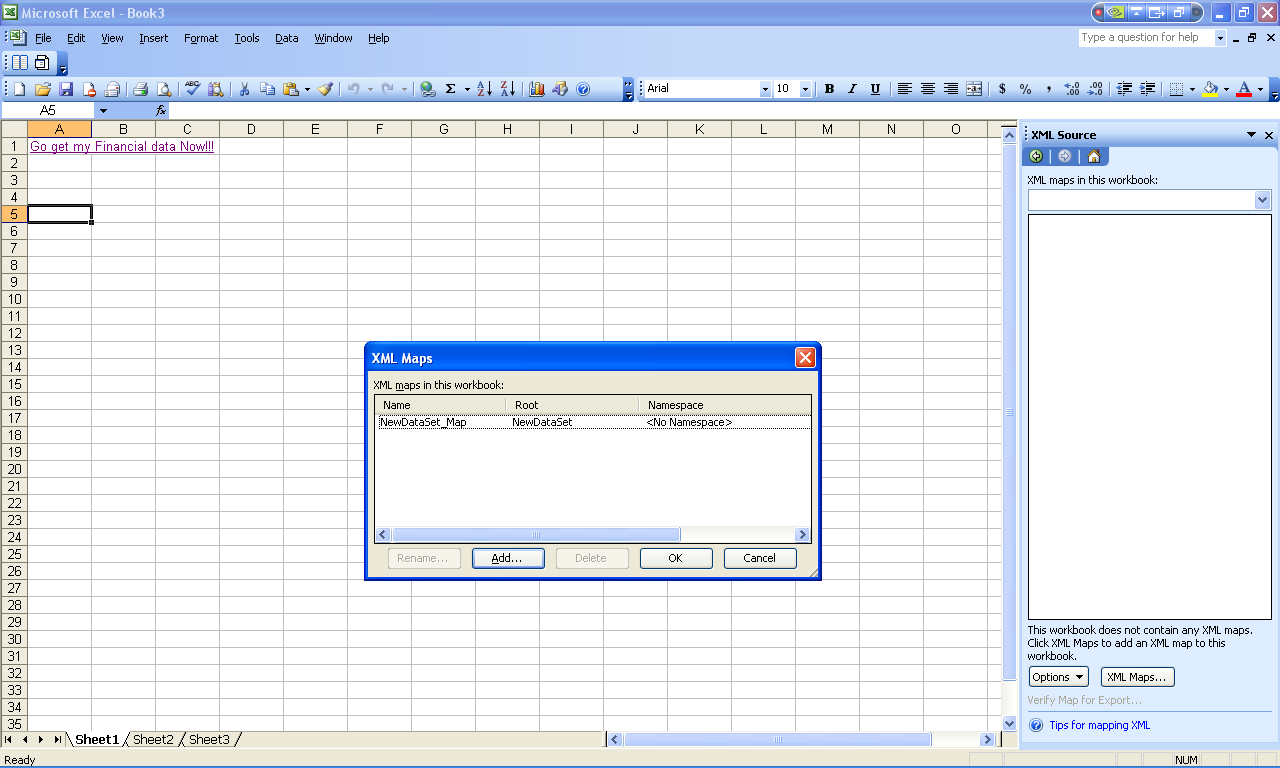
Figure 10: Click Open.
Notice that the file is added to your XML Maps dialog box. You can add several data sources (maps) here. Your Web Service can generate multiple .xml files, and you can add all of them here if you want to see all the data in one spreadsheet.
But for now, let's continue with just one. You can change the name of this data source by clicking on it and then clicking on the Rename button next to the Add button. Let's do that. Rename this to Financial Data for easy reference and hit OK. You will see something like Figure 11.
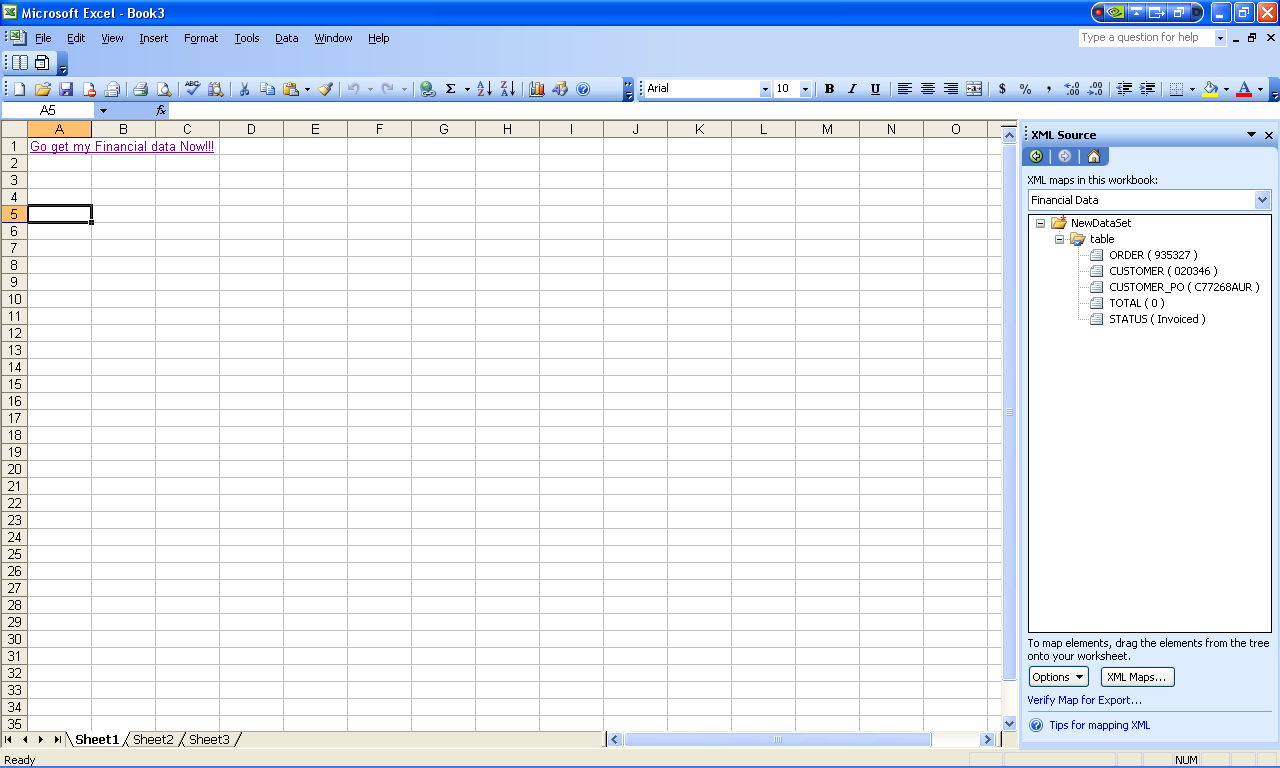
Figure 11: Rename your data source to something intuitive.
On the right side of your spreadsheet, all the nodes of your XML document are displayed for you. Now, drag each of those to a cell on your spreadsheet (Figure 12).
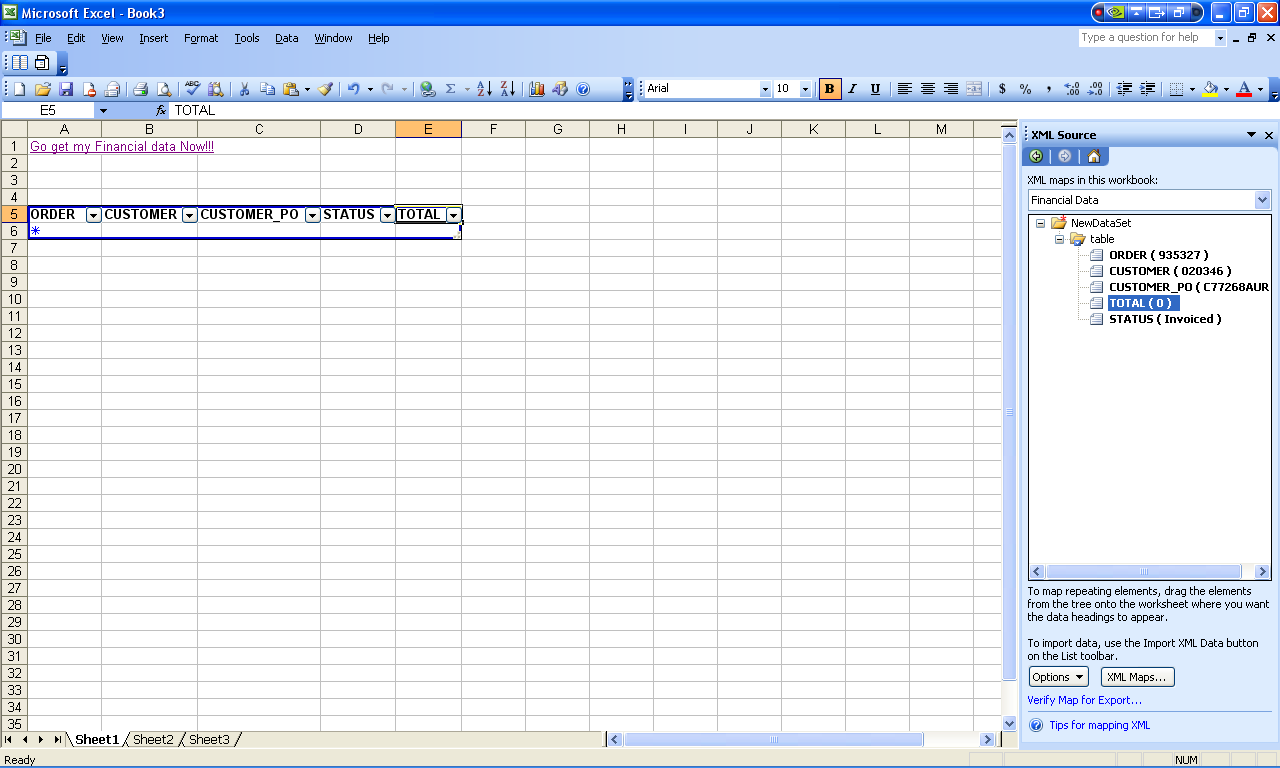
Figure 12: Drag and drop the nodes into the spreadsheet.
Now, you've dragged and dropped all of the nodes from the .xml file onto the spreadsheet. But where is the data? Don't worry. Simply right-click within the blue border, and the following will appear (Figure 13).
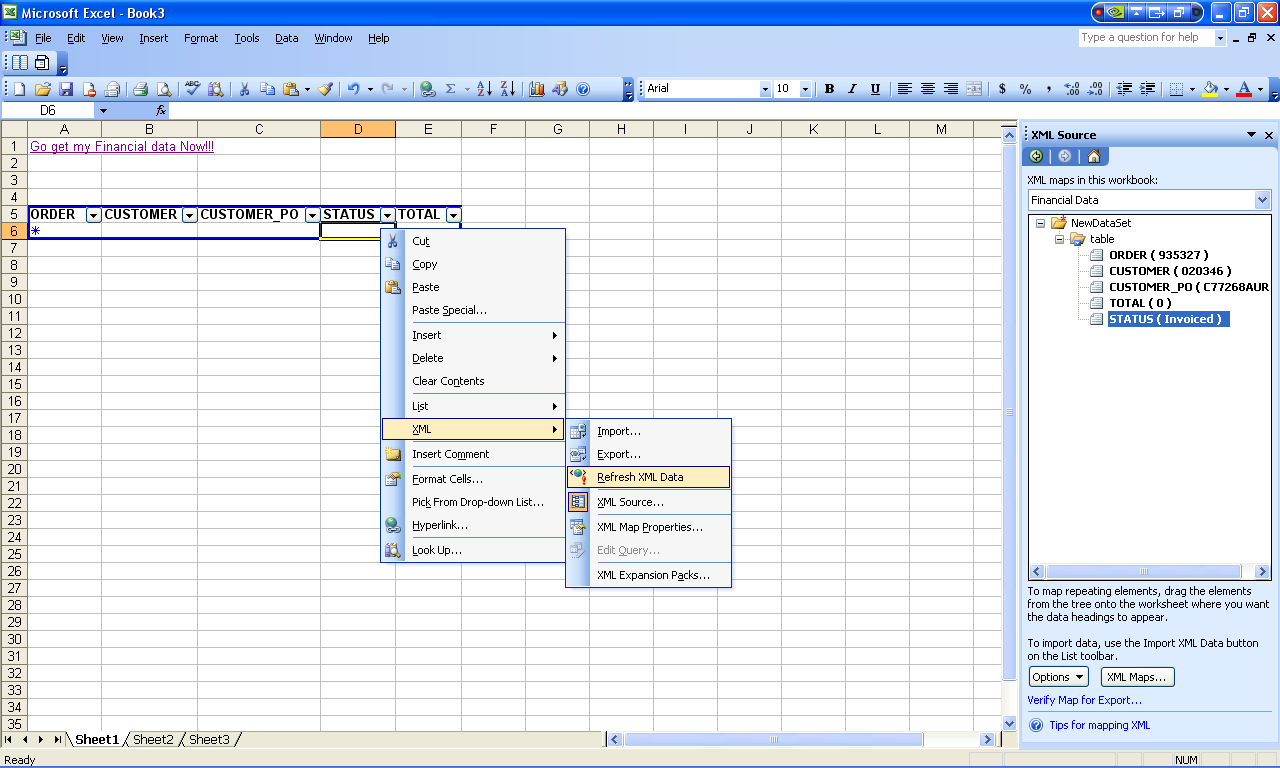
Figure 13: Retrieve your data now.
You are ready to receive data. Click on XML > Refresh XML Data. Your spreadsheet will pull in the data (Figure 14).
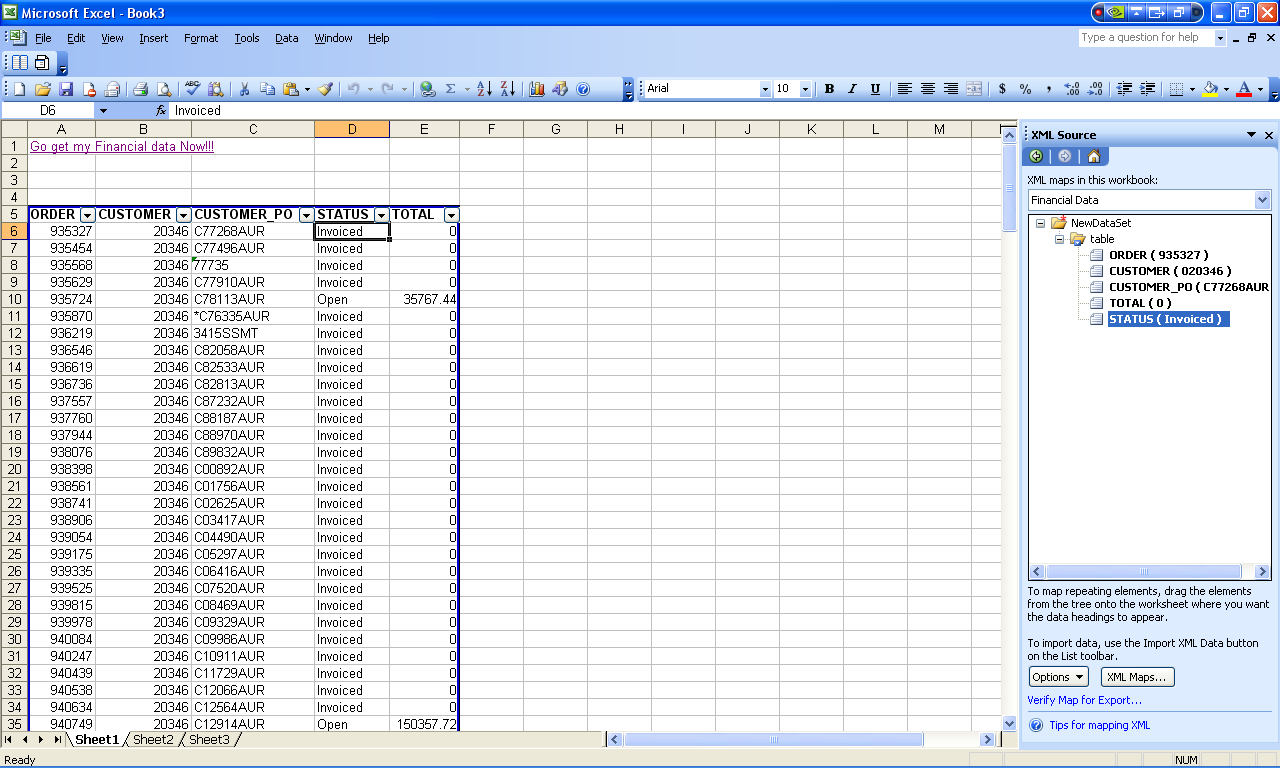
Figure 14: Your data is in your spreadsheet.
You will not have to do this process again. Mapping an XML file is a one-time setup. Once it's done, you can save and close the spreadsheet. The XML mapping stays with the spreadsheet. When you open the spreadsheet again, simply clicking on the hyperlink invokes the Web Service to replace the underlying .xml file and to use XML Refresh to refresh the data.
I will conclude by leaving you with an expanded view of the methodology I just demonstrated and its potential use in an organization (Figure 15).
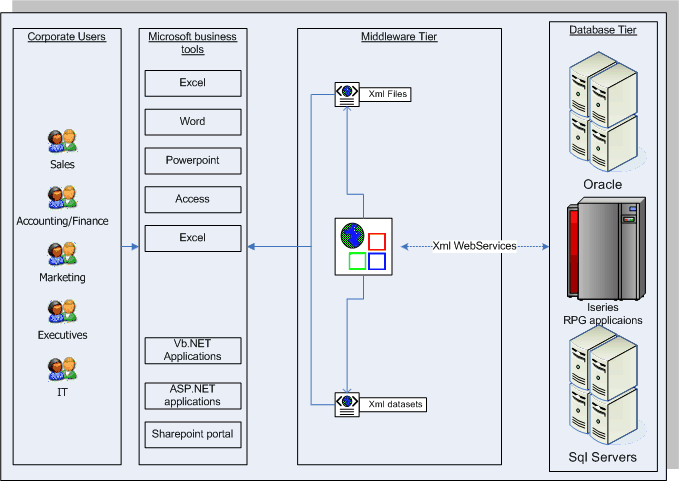
Figure 14: How can you use this process in your business?
You can create a real-time, on demand reporting infrastructure with very little investment while enjoying legendary iSeries performance and strength. This solution requires no additional hardware or software on your iSeries. It also takes advantage of your existing in-house development talent pool, leveraging and maximizing your investment in your iSeries. You will, however, require Visual Studio .NET, which was under $2,500 the last time I checked.
Tahir Malik is a senior iSeries programmer/analyst with Kos Pharmaceuticals, Inc. He has over a decade of iSeries development experience and has worked extensively with iSeries Web-enablement/cross-platform integration projects, including client/server programming and intranet/extranet Web development using .NET. He can be reached at


 Business users want new applications now. Market and regulatory pressures require faster application updates and delivery into production. Your IBM i developers may be approaching retirement, and you see no sure way to fill their positions with experienced developers. In addition, you may be caught between maintaining your existing applications and the uncertainty of moving to something new.
 IT managers hoping to find new IBM i talent are discovering that the pool of experienced RPG programmers and operators or administrators with intimate knowledge of the operating system and the applications that run on it is small. This begs the question: How will you manage the platform that supports such a big part of your business? This guide offers strategies and software suggestions to help you plan IT staffing and resources and smooth the transition after your AS/400 talent retires. Read on to learn:
LATEST COMMENTS
MC Press Online