Editor's note: This article is an excerpt from Mastering IBM i, published by MC Press.
An additional feature of the Run SQL Scripts interface is SQL Assist. This feature allows the user to create fairly sophisticated SQL statements with little or no knowledge of SQL. Although you should learn to write SQL statements without depending on a feature such as SQL Assist, this is a great tool to help you, as a new SQL programmer, to develop SQL statements while you learn the syntax. This tool can also be an asset to the seasoned SQL programmer who would like to develop templates for more sophisticated SQL statements without having to key in the complete statements. We will guide you through a short demonstration of how the SQL Assist tool works, and we encourage you to use it as a learning aid.
With Run SQL Scripts open and connected to a database, you can press F4, or, from the toolbar, click Edit, and then SQL Assist/Prompt CL, as in Figure 13.37.
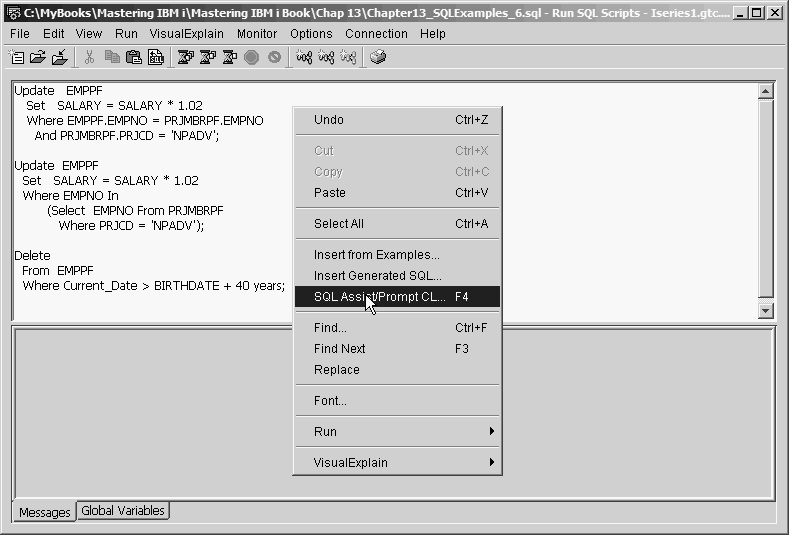
Figure 13.37: Starting SQL Assist/Prompt
The main SQL Assist window will open, as you see in Figure 13.38; we have numbered the three areas that we will be working with when using this product.
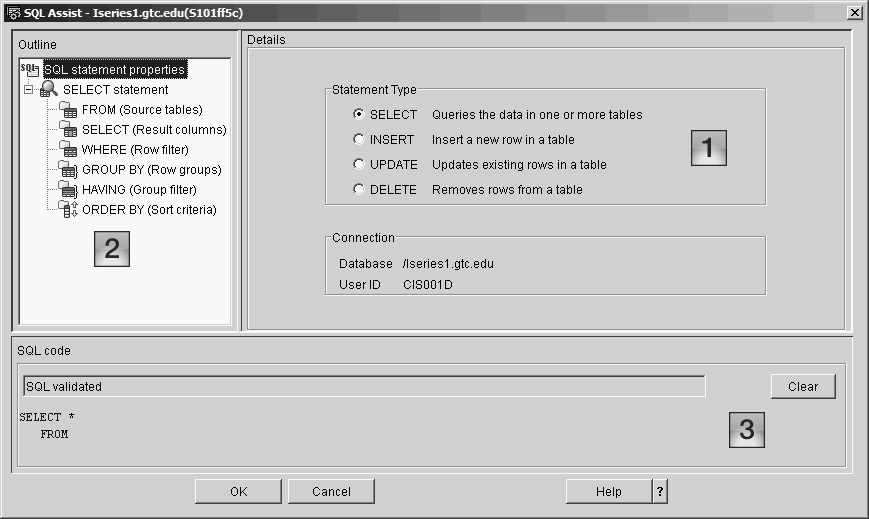
Figure 13.38: SQL Assist Main Window
An explanation of each area follows.
- 1.Details—After you select the type of statement you want to create, this area is where you fill in the options to create the SQL statement.
- 2.Outline—After you select the statement type from the Details view, you use this area to select additional functions for the selected SQL command.
- 3.SQL code—As you define the SQL statement, it is displayed in this area. You also have the option to Clear the statement.
In this example, we will create a simple SQL Select statement with a few designated fields. We first click the From icon in the outline view, as in Figure 13.39. The Details view then shows the schemas that are displayed in IBM i Navigator when we expand the Schemas icon. Notice that the SQL area has started to write the SQL statement.
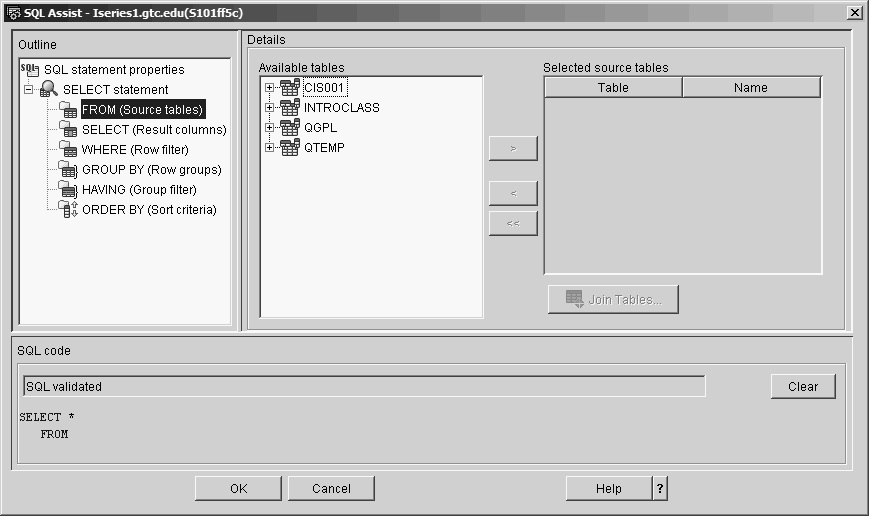
Figure 13.39: Starting an SQL Select Statement
We next expand the CIS001 student schema by clicking the + sign on the left of the icon. Then we navigate to and click the EMPPF table in the CIS001 schema. After we click the > button in the details area, we can see that this table has been selected for our Select statement, as Figure 13.40 shows.
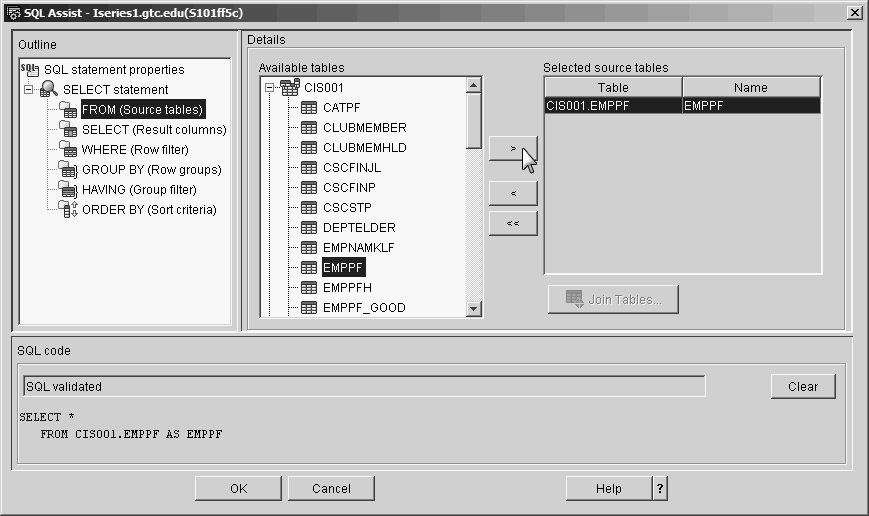
Figure 13.40: Selecting a Table
In Figure 13.41, you can see that we have clicked the SELECT icon and expanded the CIS001.EMPPF table in the Details view. We could have individually selected the columns we wanted displayed by highlighting each one and clicking the > button. Instead we chose to hold down the Ctrl key and select all the fields we wanted to display; then we clicked >.
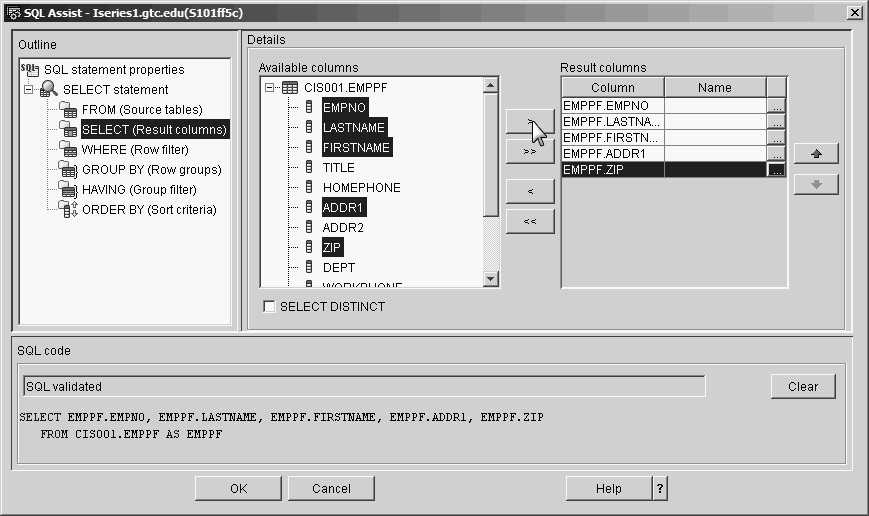
Figure 13.41: Selecting Fields
Our next task is to have our SQL result set (the results of an SQL Select statement) sorted by LASTNAME and then FIRSTNAME. In Figure 13.42, we have clicked the ORDER BY icon in the Outline view and then expanded the CIS001.EMPPF table. After selecting the fields we wanted to sort on, we clicked >. We could have changed the sort order from ASC to DESC after the fields had been moved to the Sort columns area. Notice that to limit the number of fields displayed, we selected the Show result columns only option.
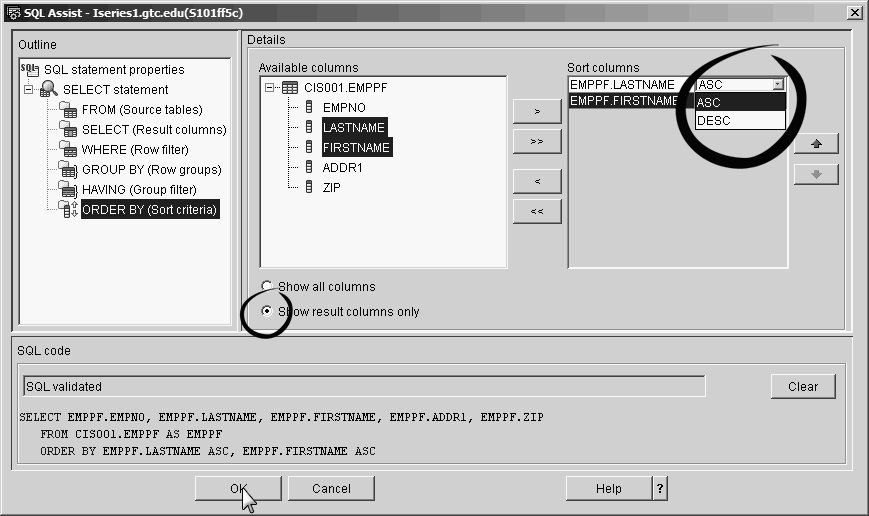
Figure 13.42: Sorting on LASTNAME and Then FIRSTNAME
We have completed our sample Select statement, and Figure 13.43 displays the results. We cannot run this SQL statement from SQL Assist. Instead, we would run it using the Run SQL Scripts interface, as in previous examples in this series (refer back to parts 1, 2, 3, and 4).
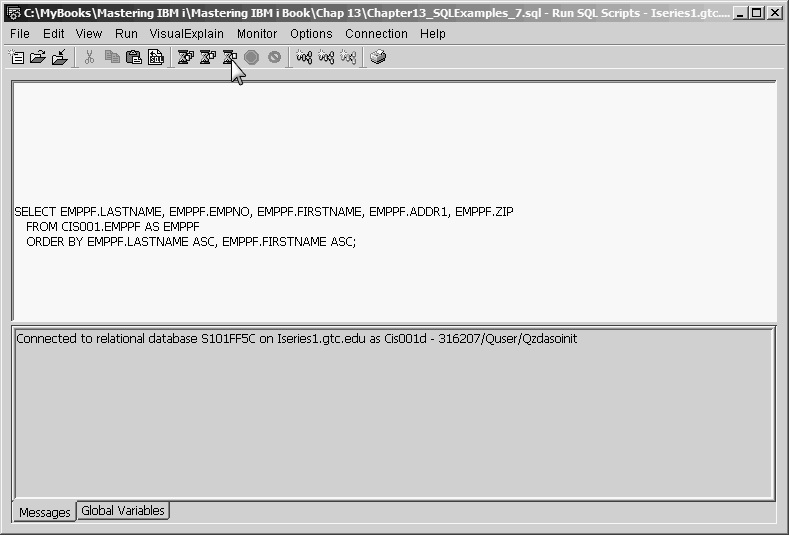
Figure 13.43: Completed Select Statement
Using SQL Assist, we can prompt our completed statement and add additional functionality. We will now prompt the Select statement we created, and then we will do an Inner Join with the ZIPPF table so that we can display the city and state columns in our SQL result set.
In Figure 13.43, we prompted the SQL Select statement that we created in the previous steps. We then expanded the CIS001 schema, navigated to the ZIPPF table, and added it to the Selected source tables window, as you can see in Figure 13.44. The Join Tables button is now available for use, and we have clicked it.
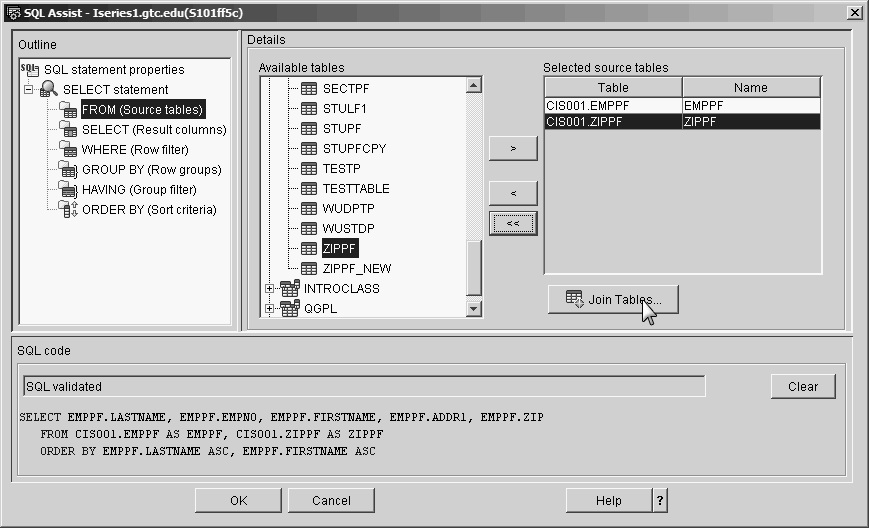
Figure 13.44: Completed Select Statement, Next Screen
We are presented with the information message in Figure 13.45. This is not an error message, but a message telling us that the ZIP column in the EMPPF table is not defined as a foreign key. A discussion of foreign keys is beyond the scope of this text. For now, we will need to manually link the ZIP column in the EMPPF table to the ZIP column in the ZIPPF table without the help of SQL Assist.
After we click OK, as in Figure 13.45, the Join Tables window in Figure 13.46 is displayed.

Figure 13.45: "OK" Verification Window
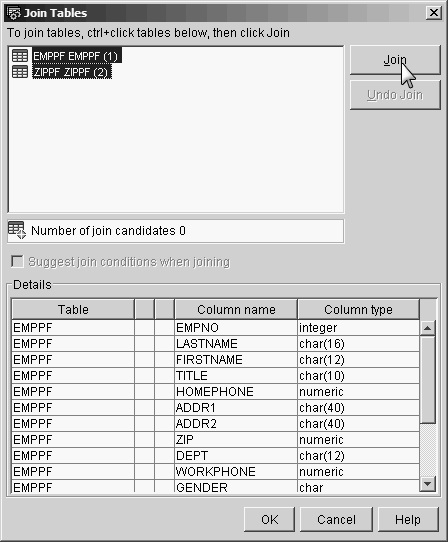
Figure 13.46: Add Tables to Join
This window let us tell SQL Assist which tables to join. We have highlighted the EMPPF and ZIPPF tables; if we were to use the scroll bar to look at the fields in the details window, we would see that all the fields in both tables are available. Next, we click Join.
After we click Join, the Join Tables window changes, as you can see in Figure 13.47. We can now describe the relationship between the columns that will create the join and then select the Join Type from the drop-down box. We will leave the choice as Inner Join because we want to include all the EMPPF records that have matching records in the ZIPPF table.
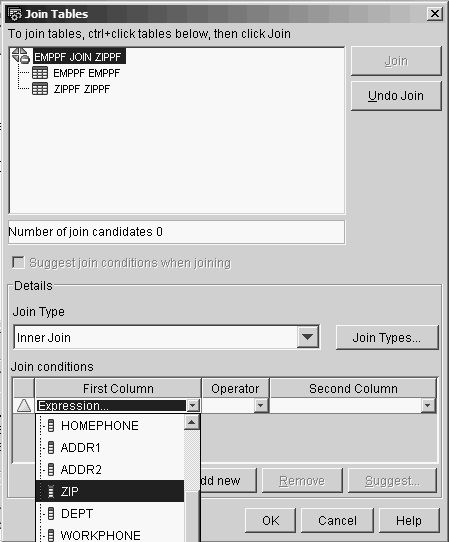
Figure 13.47: Select Criteria for the Inner Join
In the figure, we have selected the First Column drop-down box and navigated to the ZIP column for the EMPPF table. The next step is to select the Operator drop-down box, select the equal sign (=), and finally select the Second Column drop-down box, where we then select the ZIP column from the ZIPPF table. After that, we click OK to complete the join and close the window.
Now that we have completed our Inner Join, we need to add the CITY and STATE columns from the ZIPPF table to our SQL result set. Figure 13.48 shows the main window, in which we have selected the SELECT icon in the Outline view.
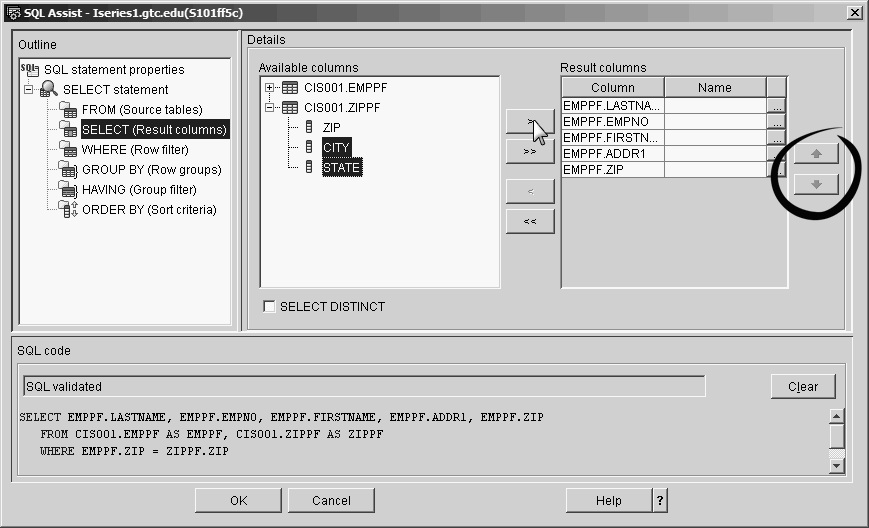
Figure 13.48: Add the CITY and STATE Fields to the SQL Statement
In the figure, you can see the CIS001.ZIPPF table is shown in the Available columns window. We have expanded this table and selected the CITY and STATE columns. You can see that we are in the process of clicking > to add the columns to the Result columns view. Once all the columns we want to display have been added, we can adjust the order of the columns by selecting a column and moving it up or down in the Result columns view by using the up or down arrows (which are circled in the figure). Once we are satisfied with the order of the columns, we click OK.
This action returns us to the Run SQL Scripts main window, where we can run the SQL statement (Figure 13.49).
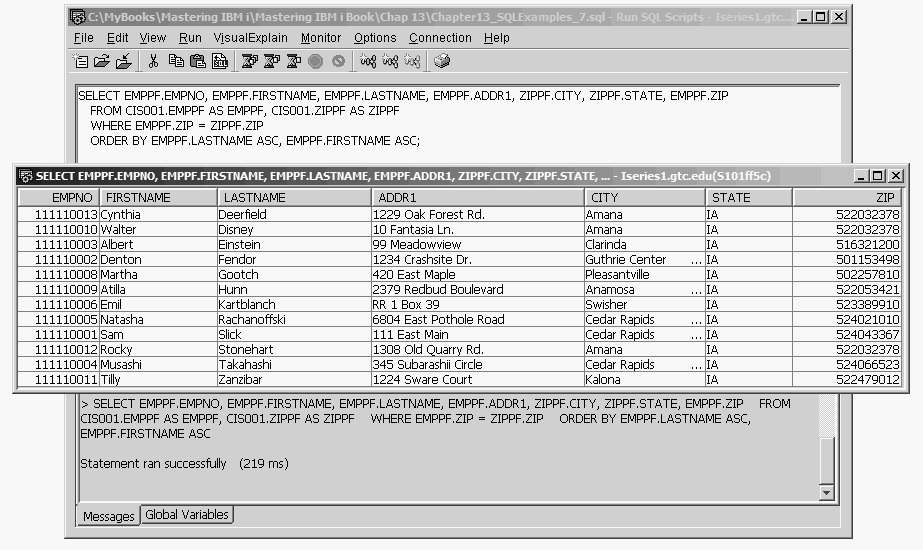
Figure 13.49: Output from Our SELECT Statement
This short introduction should demonstrate to you that SQL Assist can help you quickly create SQL statements.
In Summary
This brief introductory series on SQL (refer back to parts 1, 2, 3, and 4) has focused both on some useful techniques for getting information from a relational database and on the SQL file-maintenance statements Insert, Update, and Delete. Although this short tour is not a comprehensive introduction to SQL, it should help you understand the usefulness of the language, particularly the code-efficient capability it offers to query databases.
It is no wonder that SQL has become the standard database language. When you use SQL within HLL programs, you can combine the power and ease of coding SQL data access with the screen- or report-formatting flexibility of the HLL to create programs that are faster to design, code, and test, and whose maintenance costs will be far less over time.
This series has covered many of the SQL statements that are used in today's programming environment. In addition to covering the Select, Insert, and Delete statements, we discussed how to code different SQL join statements. We cannot overemphasize the importance of developing strong SQL skills. With this foundation, and the tools you've learned about in these articles, you should be able to enhance your skills to meet the demands of today's programming environment.


 Business users want new applications now. Market and regulatory pressures require faster application updates and delivery into production. Your IBM i developers may be approaching retirement, and you see no sure way to fill their positions with experienced developers. In addition, you may be caught between maintaining your existing applications and the uncertainty of moving to something new.
 IT managers hoping to find new IBM i talent are discovering that the pool of experienced RPG programmers and operators or administrators with intimate knowledge of the operating system and the applications that run on it is small. This begs the question: How will you manage the platform that supports such a big part of your business? This guide offers strategies and software suggestions to help you plan IT staffing and resources and smooth the transition after your AS/400 talent retires. Read on to learn:
LATEST COMMENTS
MC Press Online