We're going to disrupt your comfort zone. RPG in the IFS. Browser-based development environments. T-shirts with tags that line the collar.
The April announcement of V7.3 by IBM was a great time to receive new goodies for IBM i. You can gain a full perspective at Steve Will's blog. In this article, I will be focusing on the Orion addition, which is option 8 of 5733OPS. I will also dive into a little bit of Git, which IBM is also now delivering with 5733OPS.
First things first: What is Orion?
You can gain some initial insight by heading over to orionhub.org. As quoted from the website, the concept is "A modern, open source software development environment that runs in the cloud." The topic of using browser-based development tools has been of great interest to me the past few years. Six years ago, I would have said, "There’s no way I can use a browser-based development environment." However, my perception has changed a lot. To put it into perspective, how much time did you spend updating SEU back in the day? Exactly! It was installed once for all developers. Browser-based tools afford us similar efficiencies. The kicker: SEU is a server-side editor. So we've come full circle and now have a new server-side (browser-based) source code editor. Its name is Orion.
Orion goes further than just an editor. It wasn't created for IBM i. Rather, it’s existed for a number of years. Orion was developed by the Eclipse Foundation, among a few other browser-based development environments.
It’s important to understand that Orion does not replace RDi. RDi is very feature-rich and very "IBM i aware." Orion not so much. In some ways, that's OK, although I do hope it grows in IBM i capabilities. Check out the Orion docs to learn about the full set of features.
Sometimes, the best way to introduce a new tool is to run through a scenario. Our goal for this article is to edit RPG code stored in the IFS and use Git to change manage it, all from the browser-based Orion tooling. We won't be covering the install or startup of Orion on IBM i. Instead, that can be learned from the Orion developerWorks page.
"What is this RPG-in-the-IFS you speak of, Aaron?"
Yes, you heard me correctly. RPG can be stored in the IFS. Commands like CRTBNDRPG have been "IFS-capable" for a while now. With Git being easy to install, well, it's time we use the free open-source tooling to our advantage.
Figure 1 shows the Orion home page being run on my IBM i. Click the Register link.
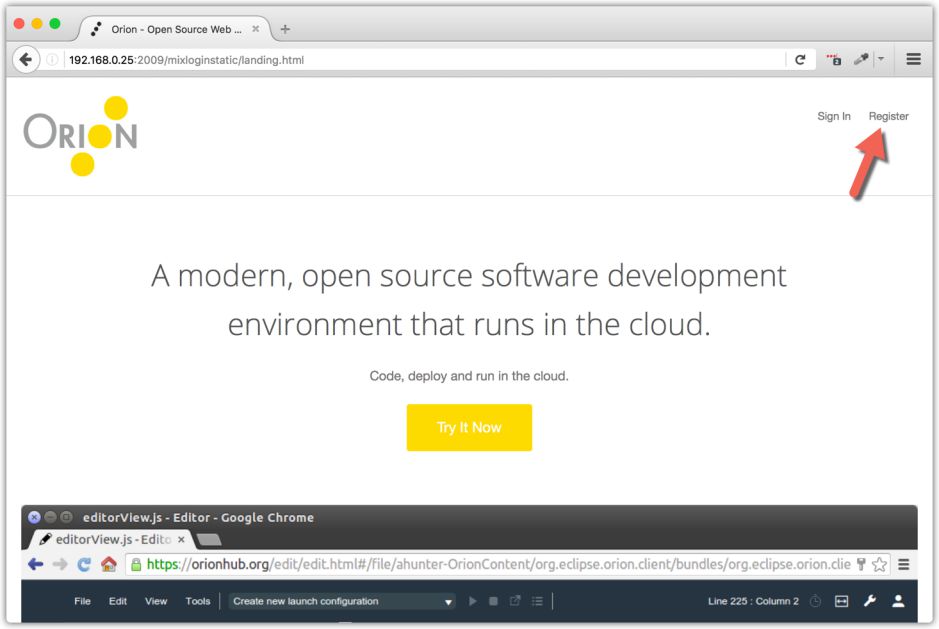
Figure 1: Orion home page
Figure 2 shows the registration page. You can configure Orion to use social media authentication or use the included authentication mechanism by specifying the profile and password of your choice. Note this is not an IBM i profile, although you can name it the same as an IBM i profile. Just know there isn't any direct correlation between Orion and IBM i profiles.
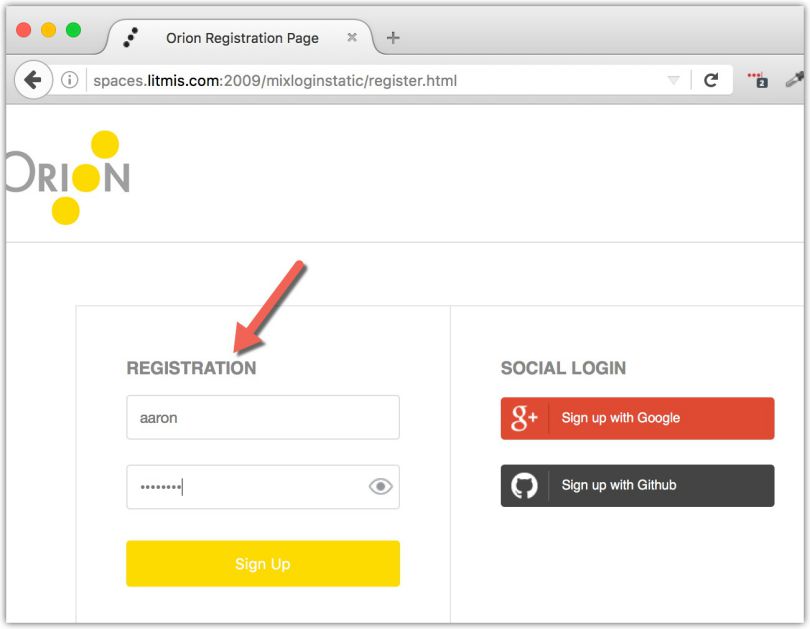
Figure 2: Orion registration
Figure 3 shows the initial Orion workspace. As you can see, there aren't any files or projects in existence yet, so it's time to create some.
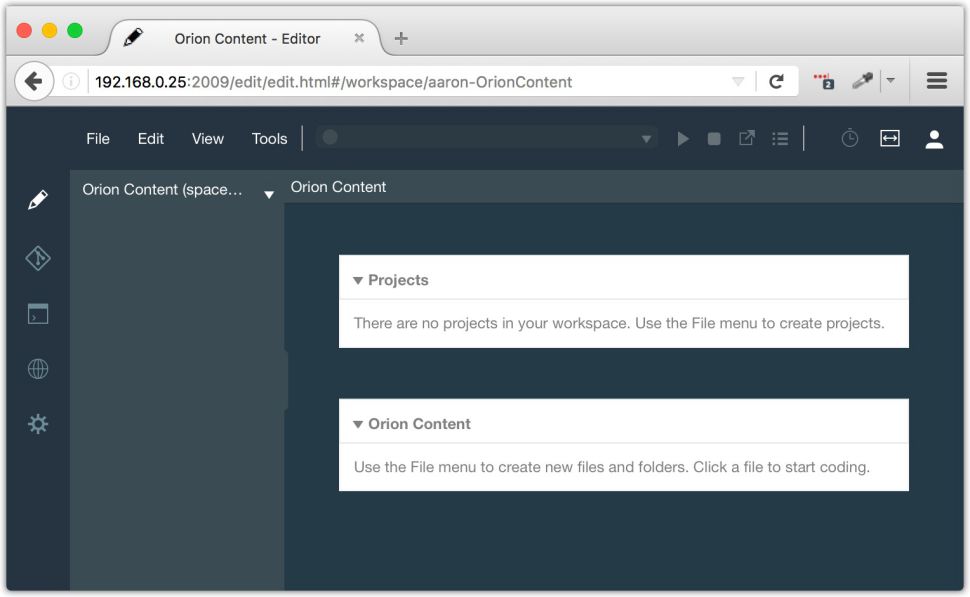
Figure 3: Orion workspace
Figure 4 shows how to create a new "Basic" project. Under the covers, this will create a new directory in the IFS where you will store your source code.
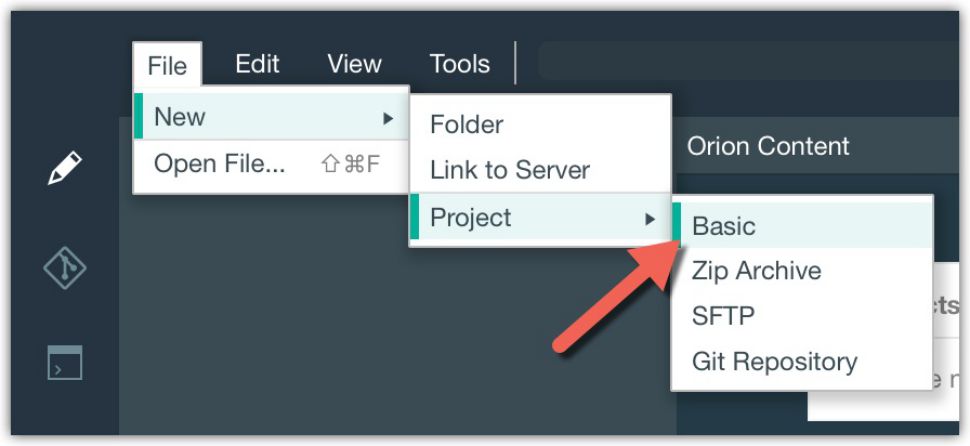
Figure 4: Create a new Basic project
It will prompt you for a project name. I specified p1 and was presented with the screen in Figure 5.
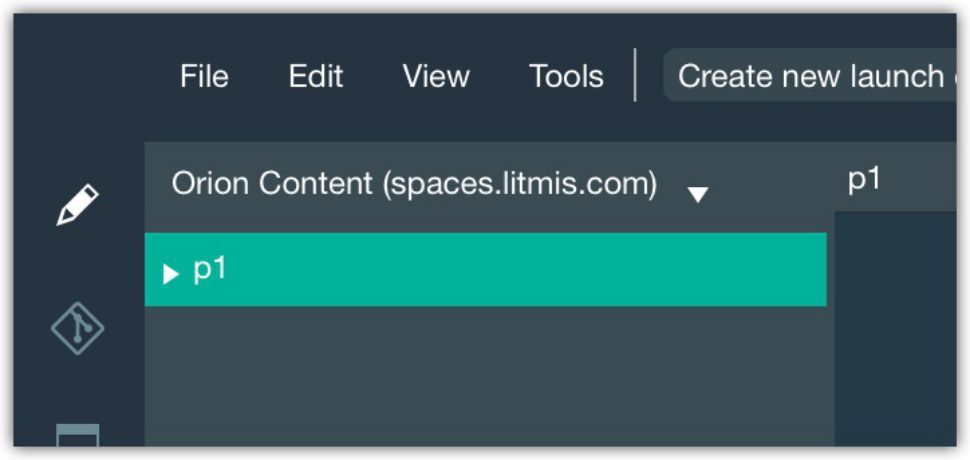
Figure 5: Project p1 now exists
Next create a new file named pgm1.rpgle, as shown in Figure 6.
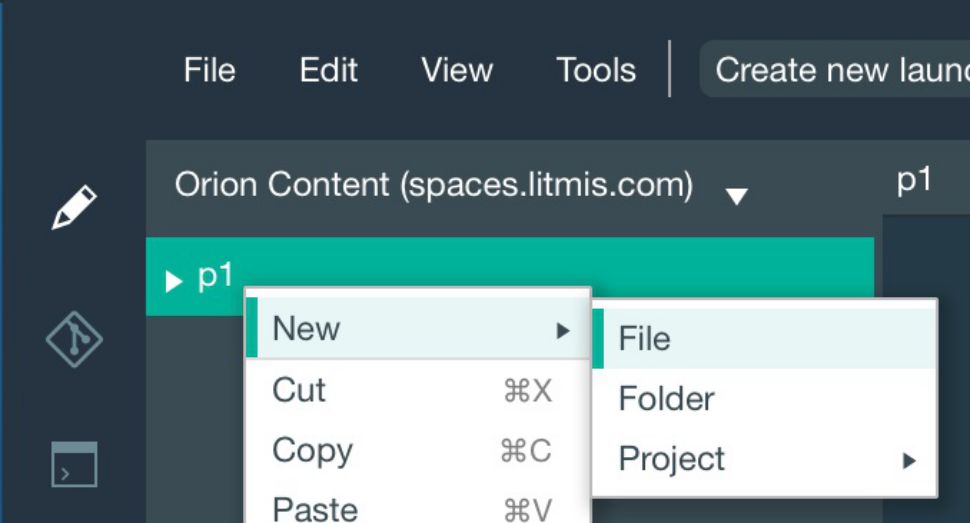
Figure 6: Create a new file
Paste some code in pgm1.rpgle. As you can see in Figure 7, there is RPG syntax coloring. Hurray!
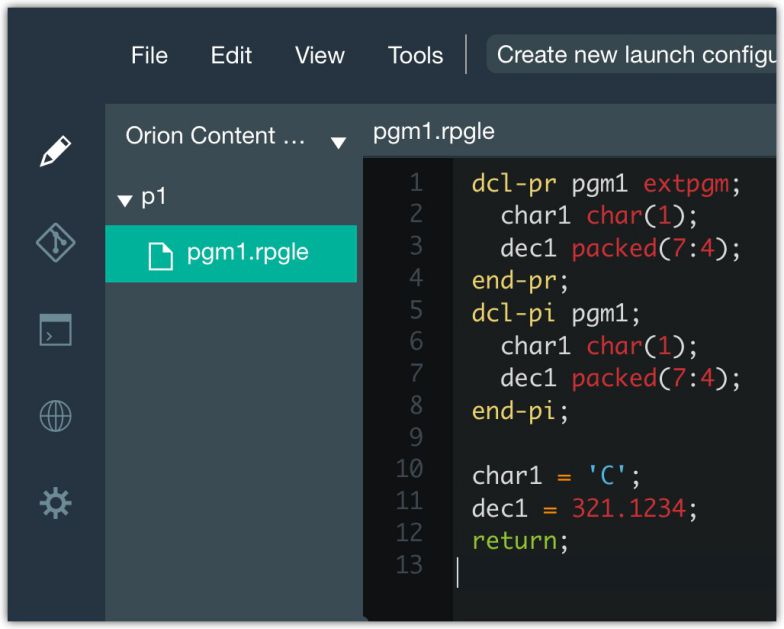
Figure 7: Orion has RPG syntax highlighting
Note it is auto-saving after each change you make. I really like this feature for a browser-based editor because it means losing work will be minimal.
Next question: Where is code stored in the IFS? Open a shell prompt and run the following command:
$ ls /QOpenSys/QIBM/UserData/OPS/Orion/serverworkspace
aa an at metastore.json
As you can see, there are many workspaces. The one created for this tutorial is 'aa'. From there, I kept running additional ls commands until I made it to the location of pgm1.rpgle, as shown below.
$ ls /QOpenSys/QIBM/UserData/OPS/Orion/serverworkspace/aa/
aaron
$ ls /QOpenSys/QIBM/UserData/OPS/Orion/serverworkspace/aa/aaron
OrionContent aaron-OrionContent.json p1.json user.json
$ ls /QOpenSys/QIBM/UserData/OPS/Orion/serverworkspace/aa/aaron/OrionContent
p1
$ ls /QOpenSys/QIBM/UserData/OPS/Orion/serverworkspace/aa/aaron/OrionContent/p1
pgm1.rpgle
Sometimes, when I've navigated to a file, I will use the cat command to display its contents, as shown below.
$ cat /QOpenSys/QIBM/UserData/OPS/Orion/serverworkspace/aa/aaron/OrionContent/p1/pgm1.rpgle
dcl-pr pgm1 extpgm;
char1 char(1);
dec1 packed(7:4);
end-pr;
dcl-pi pgm1;
char1 char(1);
dec1 packed(7:4);
end-pi;
char1 = 'C';
dec1 = 321.1234;
return;
OK, now that we've got some code, the next logical step is to compile. We can do that with the below CRTBNDRPG command and make use of the SRCSTMF parameter.
CRTBNDRPG PGM(MYLIB/PGM1) SRCSTMF('/QOpenSys/QIBM/UserData/OPS/Orion/serverworkspace/aa/aaron/OrionContent/p1/pgm1.rpgle')
At this point, our programming is complete and we should save the code in history using Git. Git is a source change-management (SCM) tool very popular in the open-source community. I use Git on a daily basis and like it a lot, although it took some time to learn the ins and outs.
Figure 8 shows the Orion Git page. We need to initialize the previously created directory as a Git repository (repo for short). To do that, we need to be on the Orion Git page (left nav button), select Repositories, select Init Repository, and select More so we can point it at the p1 directory.
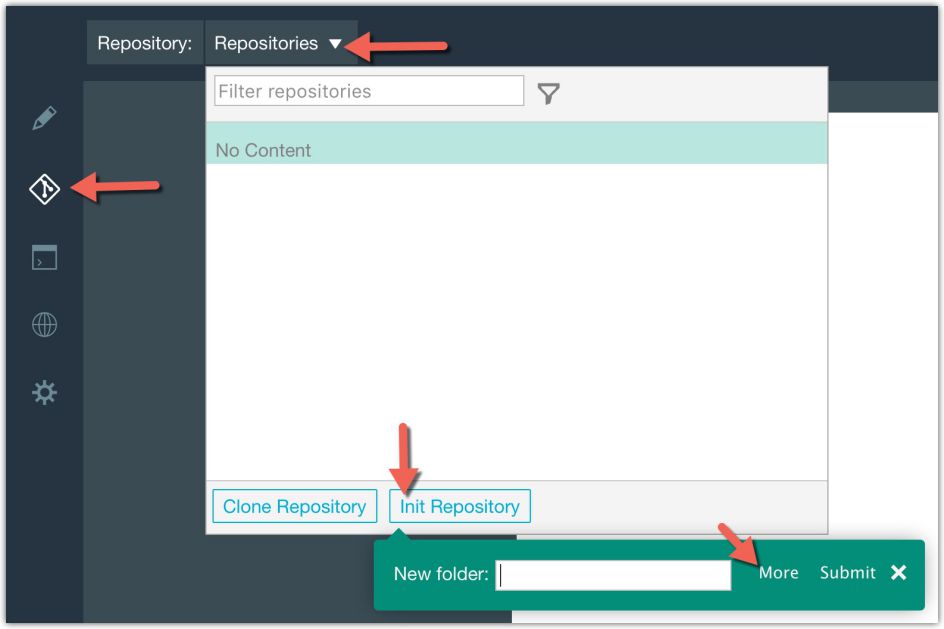
Figure 8: Orion git init
Select "Existing folder" on the pop-up, as shown in Figure 9.
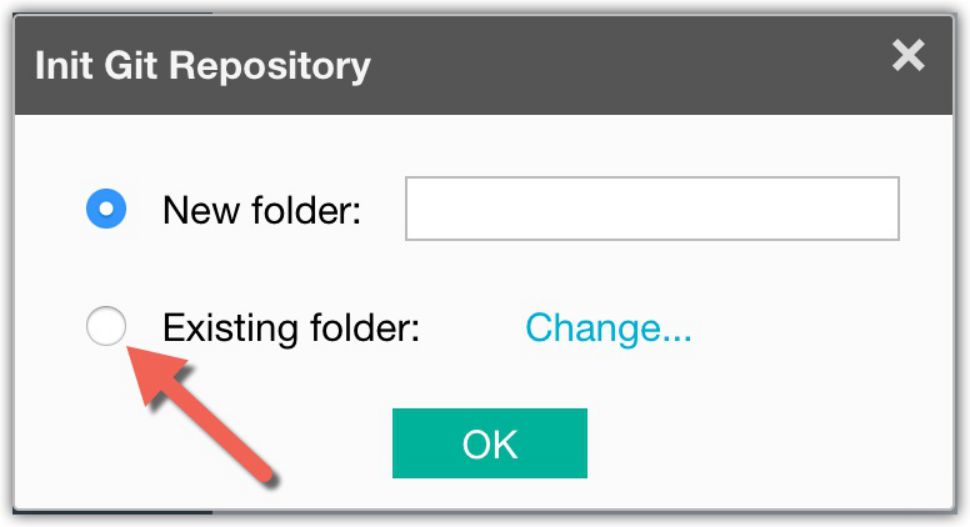
Figure 9: Git init existing directory
Expand Orion Content and select the p1 directory, as shown in Figure 10.
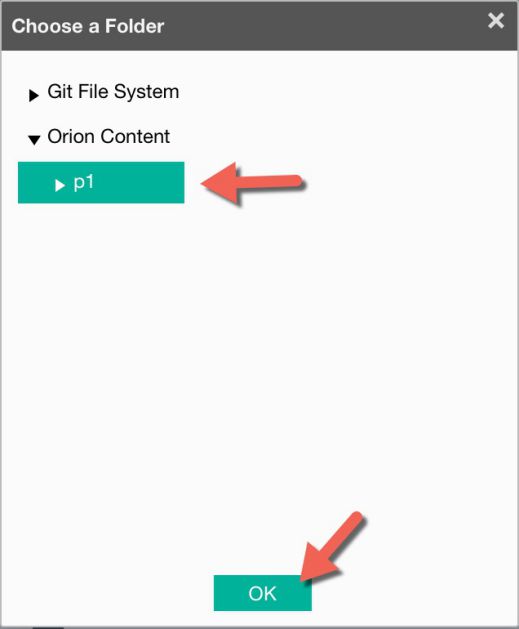
Figure 10: Select existing Orion project directory for Git init
You will be brought back to a confirmation dialog where the "Existing folder" will be occupied. You should select OK, as shown in Figure 11.
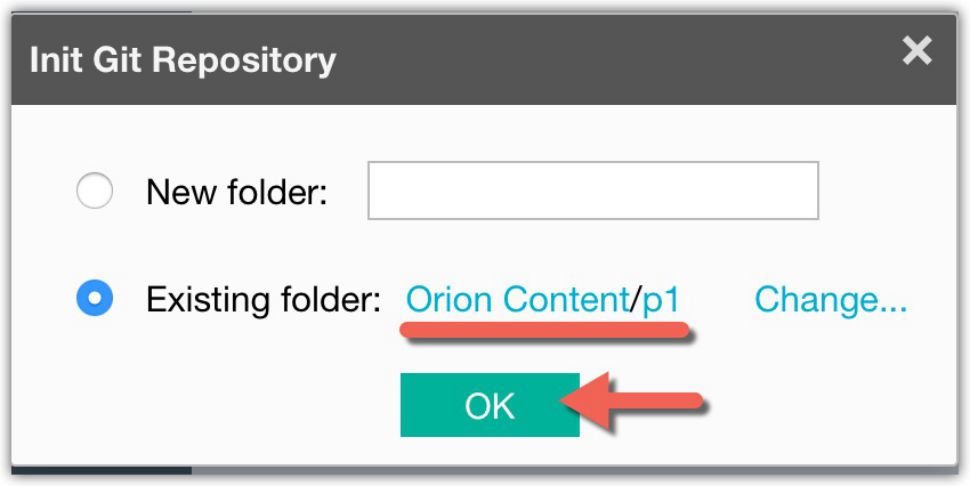
Figure 11: Confirm Git init of existing directory
Now the Orion Git page will convey the changes that have been made to the p1 directory, as shown in Figure 12. These are the changes needing to be committed to history, basically storing the version of source as it exists at this point in time.
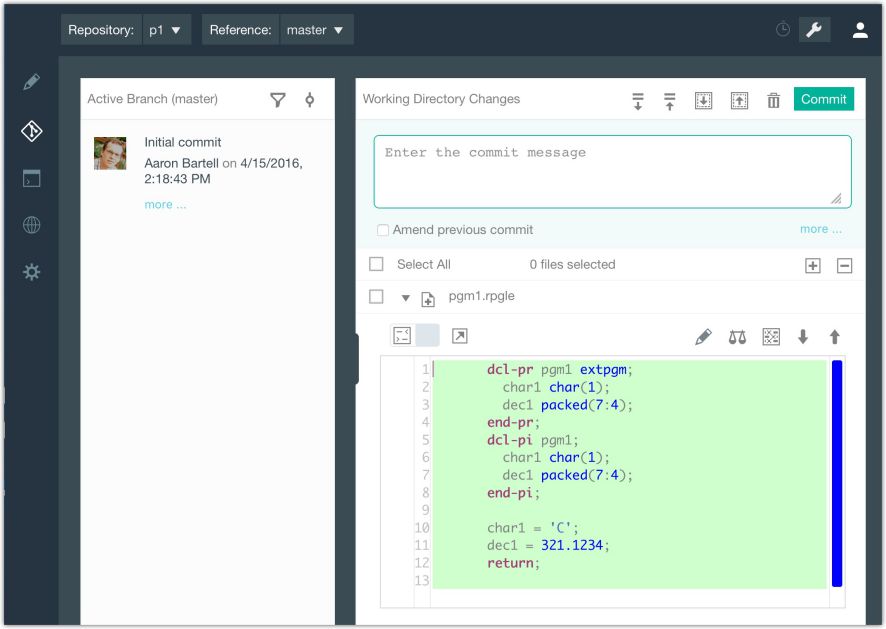
Figure 12: Git changes for p1 directory
To commit the changes to pgm1.rpgle, we need to add a short message, select the pgm1.rpgle program from the list, and select the Commit button, as shown in Figure 13.
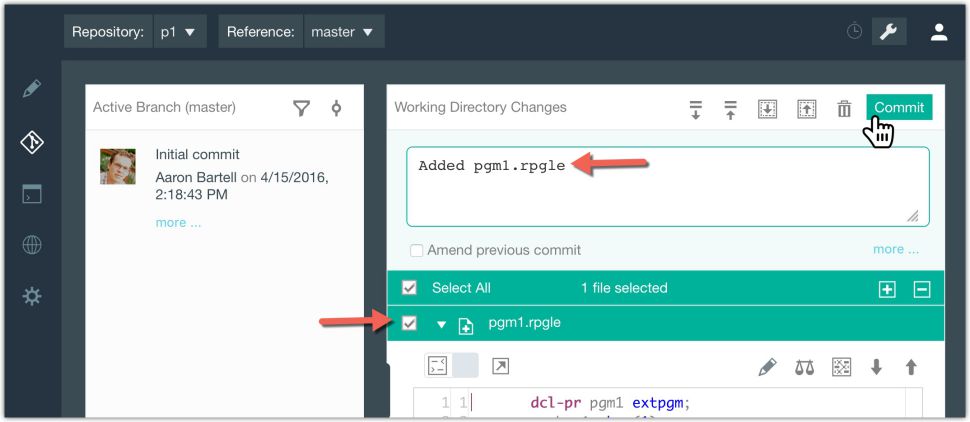
Figure 13: Commit pgm1.rpgle program changes
False alarm on being able to commit on the last screen. It will recognize you haven't yet configured Git with your personal information, and you will be presented with the following Author and Committer prompts. Fill those out and select the Commit button again, as shown in Figure 14.
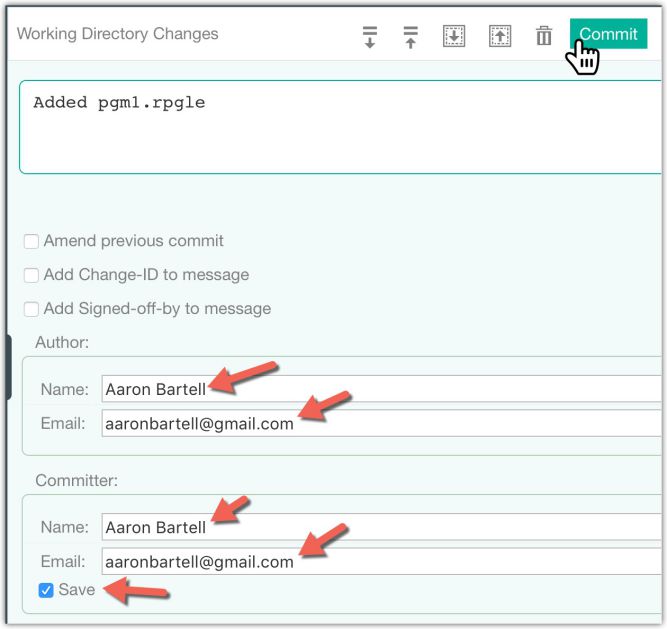
Figure 14: Specify your personal information
This time the commit was a success, as shown in Figure 15.
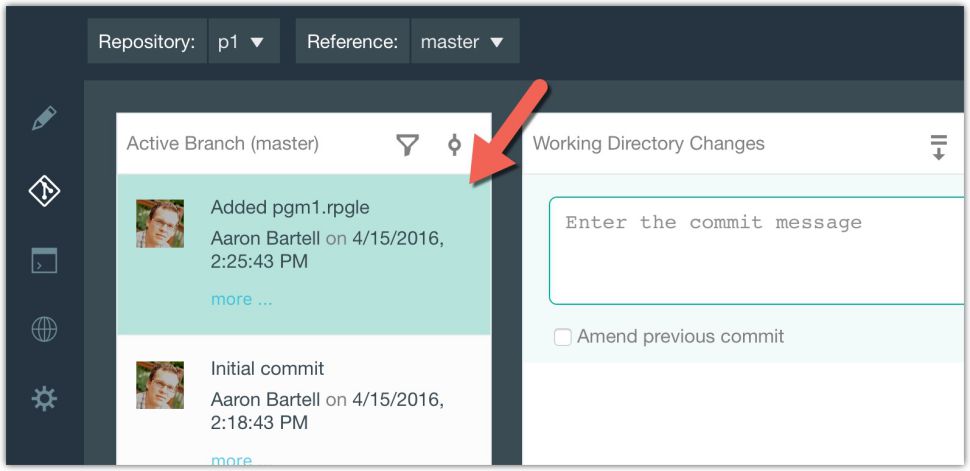
Figure 15: Git Commit is a success
What does this mean? Well, when you commit something with Git, it will store a snapshot in the .git directory of the entire directory at this point in time. What ".git" directory? If you navigate back to the Orion editor page and expand the p1 project directory, you will see a .git directory, as shown in Figure 16.
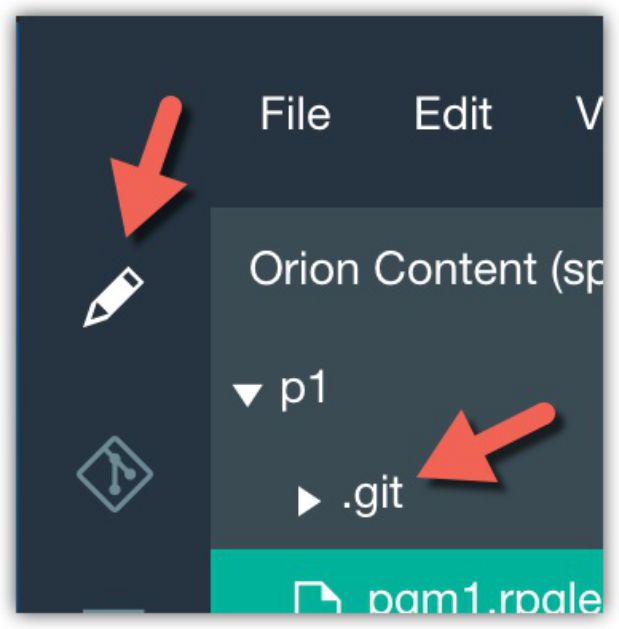
Figure 16: Orion .git directory
OK, so you're now tracking your changes with Git and want to share these with another developer. To do this, you need to push your changes to a central repository so another developer can pull the source. The IBM i can act as a central repository, but I prefer to store my source, both public and private, on BitBucket (GitHub works too). The following steps detail how to create and sync your p1 directory with BitBucket.
First sign up for a free BitBucket account. Then navigate to the Create Repo URL, as shown in Figure 17.
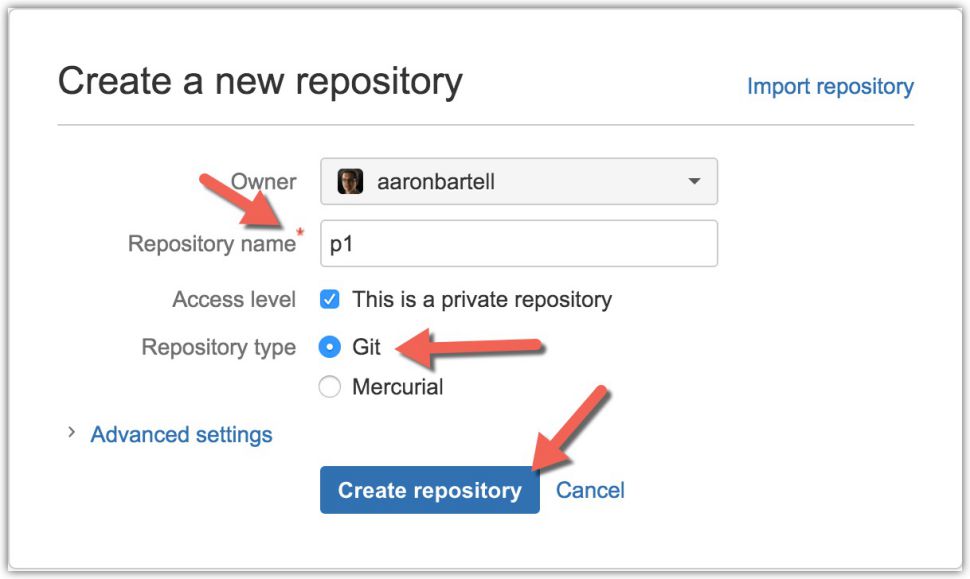
Figure 17: Create BitBucket Git repository
After clicking the "Create repository" button, you will be redirected to the repository's page. We need to obtain the HTTP repository URL so we can plug it into Orion. Figure 18 shows how to obtain this information.
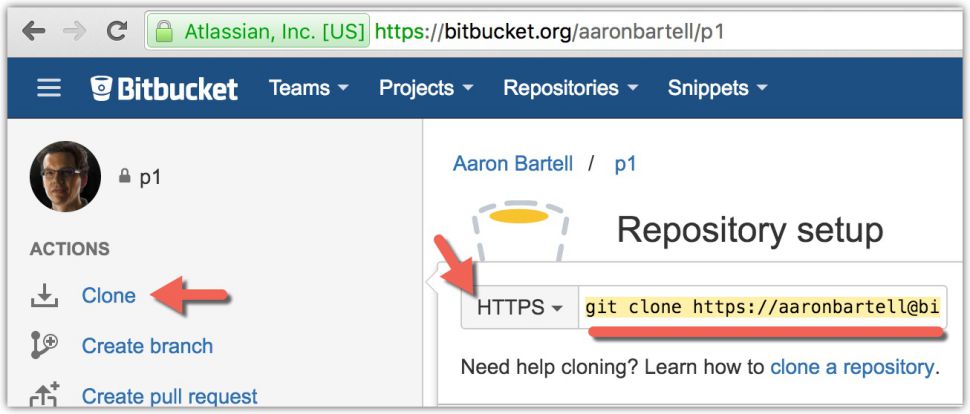
Figure 18: Obtain the repository URL
In my case, I now have URL //
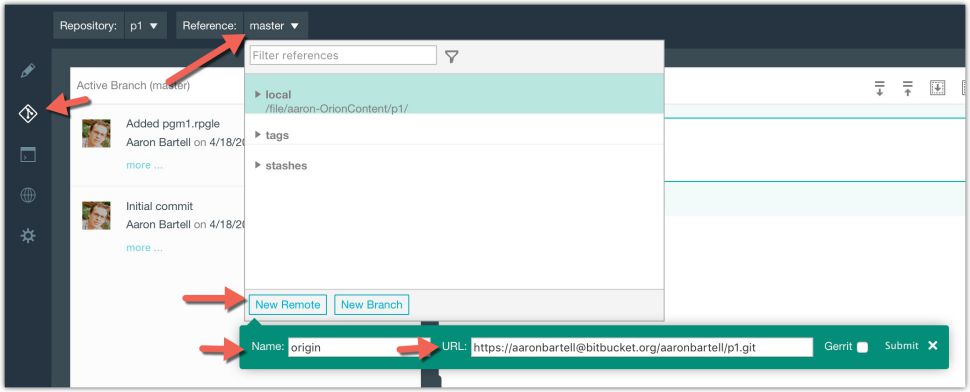
Figure 19: Add new Git remote to p1 repository
Now refresh the Git Orion page so it recognizes there is an attached remote repository.
The next step is to get the local commits onto BitBucket. Select the "Sync" button. When prompted, enter your Bitbucket password, as shown in Figure 20.

Figure 20: Sync local changes to remote BitBucket repository
Orion will now communicate the changes to Bitbucket. Once complete, it will convey there are no outgoing changes, as shown in Figure 21.
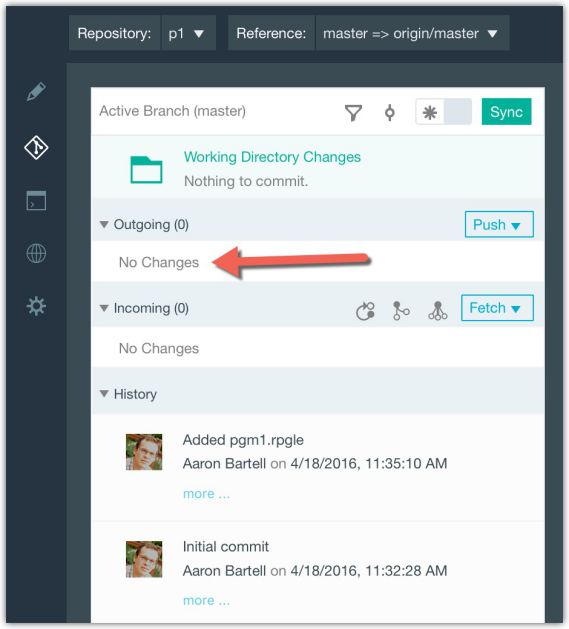
Figure 21: Orion Git page shows local environment is synced with remote
Go to the Bitbucket "Commit" page for the repository, and you can now see the recent commits, as shown in Figure 22.
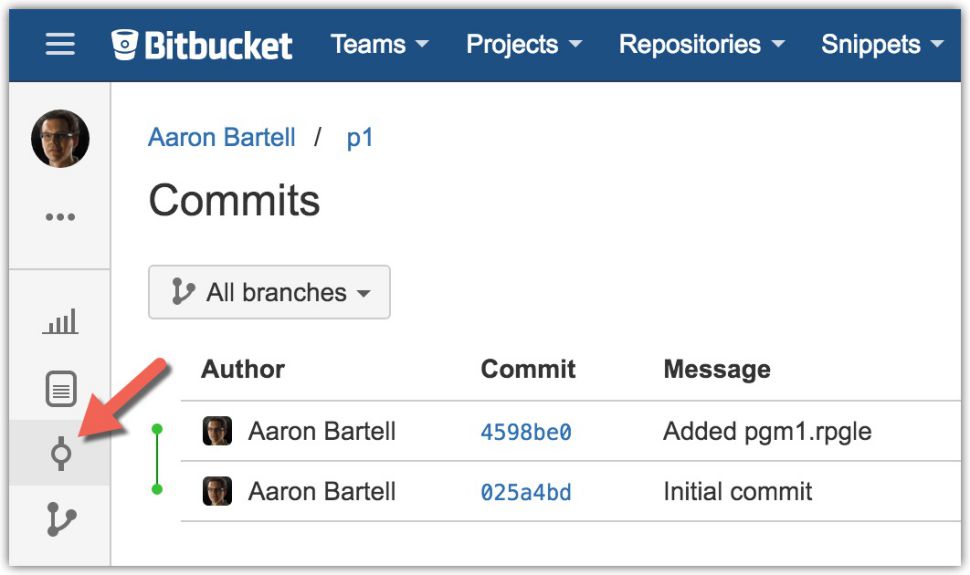
Figure 22: BitBucket commits of IBM i project
A repo only needs to be created once by the first developer. Subsequent developers simply have to clone the existing repo. To do this, you navigate to the Orion Git page, select the Repository drop-down, select Clone Repository, specify the repository URL, and click Submit, as shown in Figure 23.
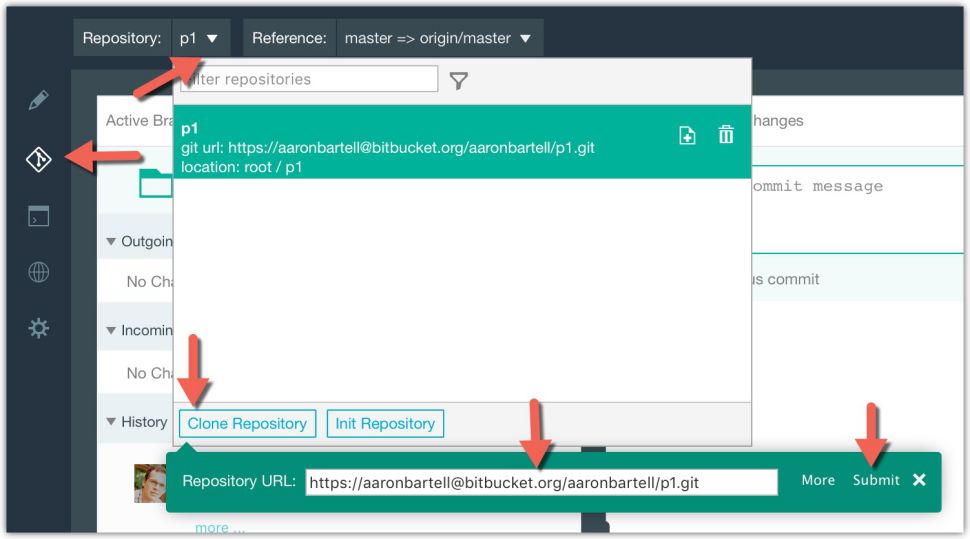
Figure 23: Subsequent developer's clone of p1 repository
At this point, you're set for doing development of your RPG with Orion. Developing RPG in the IFS is different on a number of fronts. It's not necessarily a quick change because we haven't yet addressed a solid build solution. One I am fond of is how Mihael Schmidt of RPGNextGen.com does with his projects. For example, check out his JSON project and see how it uses the "make" utility to copy files from the IFS to a temporary library for compilation. That's one of many options.
Hopefully, this article gives you a taste for Orion and what it can do. You can head over to planetorion.org to get news and updates about what is going on with Orion. As always, if you have any questions you can leave a comment below or contact me via email at


 Business users want new applications now. Market and regulatory pressures require faster application updates and delivery into production. Your IBM i developers may be approaching retirement, and you see no sure way to fill their positions with experienced developers. In addition, you may be caught between maintaining your existing applications and the uncertainty of moving to something new.
 IT managers hoping to find new IBM i talent are discovering that the pool of experienced RPG programmers and operators or administrators with intimate knowledge of the operating system and the applications that run on it is small. This begs the question: How will you manage the platform that supports such a big part of your business? This guide offers strategies and software suggestions to help you plan IT staffing and resources and smooth the transition after your AS/400 talent retires. Read on to learn:
LATEST COMMENTS
MC Press Online