


"Labels! I need labels! We're sending a mailing to Kentucky, and we need a label for every customer there!"
"Okeydoke!"
Ever have a conversation like that? I'll bet you have. But your customer master is on the iSeries, and you don't have a printer file set up to handle the new Avery label format, and all your printers are run from Client Access workstations, which means printing is a pain in the... well, you know what it's a pain in.
This is why integration can be so important. Microsoft's Office products offer some nice features and provide you with an easy way to format a document that isn't available directly on the iSeries. Wizards, like the downloadable Avery wizard, can help you format labels and include a merge data source--all in one step. While it isn't necessary to use the Avery wizard to format labels, it does make life a lot easier.
In this column, I'll walk you step by step through a mail merge using Microsoft Word (2000 in the example, but the procedure is the same for 97 and 2002). You'll set up a data source, create a merge file, and run your mail merge. In my next column, I'll walk you through automating this procedure with VBA so that your users can have some control over the selection criteria.
In this example, you'll send some form letters to customers in a specific ZIP code. The example assumes that you have Client Access Express and Microsoft Office
Holy Data Source!
To create a mail merge from an iSeries table, the easiest method to use is MSQuery, which is supplied with Microsoft Office. If you haven't installed MSQuery, you'll want to do so from the Office CD. (On 2000, if MSQuery isn't installed, you'll be prompted to insert the CD for installation.)
You'll also need to set up an ODBC data source that points to the library where your tables reside. On Windows 2000/NT, ODBC data sources are found under the control panel's administrative tools window. On 95/98, you'll find them in the control panel's main window. While it isn't necessary to do it this way, I like to create different data sources for each library. On the Client Access Express ODBC Setup dialog's server tab, I clear the library list and put the library name in the default library field. This gives me a way of limiting the list of files that link dialogs will present and controlling the contents of the list. See Figure 1 for a look at the setup dialog.
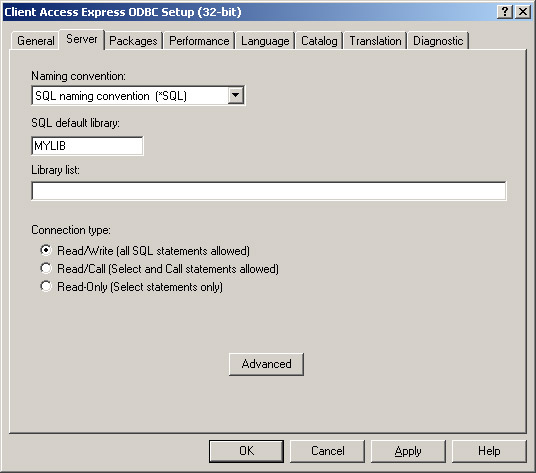
Figure 1: The ODBC Setup dialog box
I've found that the defaults for the other values in this dialog box work just fine, so I don't usually change them. However, I do recommend that you explore the ODBC Setup dialog and understand the various settings and their impacts. For example, you may want to set your DSN to Read-Only to prevent accidental modification of data.
Through Traffic, Merge Left!
With a data source defined, it's now possible to create a mail merge in Word.
Let's start with a new document. From the Tools menu, select the Mail Merge option. This brings up the Mail Merge Helper dialog shown in Figure 2. Click on the Create button and, for purposes of this example, choose Form Letters. A button labeled Edit will appear to the right of the Create button, but ignore that for now.
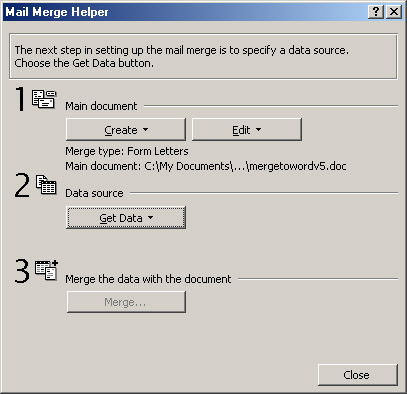
Figure 2: The Mail Merge Helper dialog box
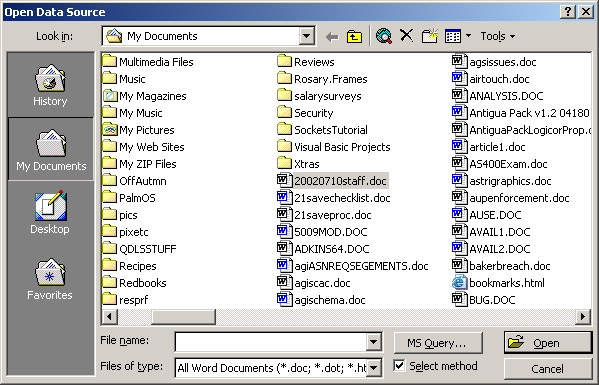
Clicking on the Get Data button drops down another menu with several options. Choosing Open Data Source brings up the Open Data Source dialog box (see Figure 3). At the bottom is a checkbox labeled Select Method. Make sure this checkbox is checked, and click the MS Query button. (If you don't have MS Query installed, this is when you'll be prompted to insert your Office CD to install MS Query.)
Clicking on the MS Query button brings up MS Query with the Choose Data Source dialog box open (see Figure 4). This lets you select the data source you created earlier.
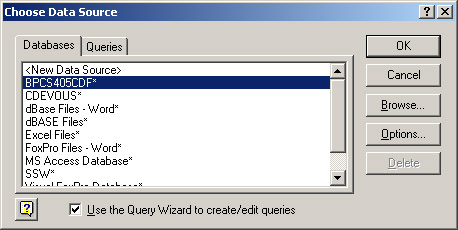
Figure 4: The Choose Data Source dialog box
Note that the Use the Query Wizard... checkbox is checked. This will bring up the wizard to build data selections. (If you want to use SQL, uncheck this box so that you can key in your own select statement.) When you press the OK button here, you get the next dialog, which shows you the wizard and asks you to select a file and fields.
Clicking on a table in the Choose Columns dialog (see Figure 5) shows you a list of the columns, or fields, in that table (or file, to us old guys). You can select all or just some of the fields.
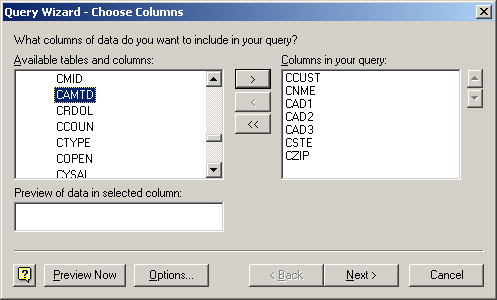
For this example, select the customer number, name, and address fields from the customer master file. Then, click on the Next button to bring up the Filter Data dialog (Figure 6), which allows you to select the criteria that the query will use to return data.
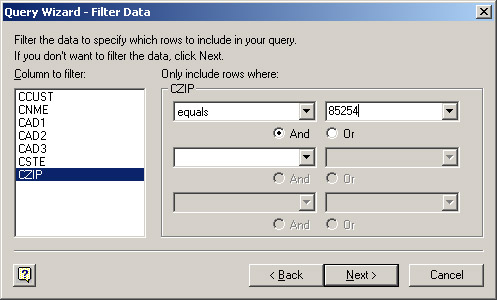
Here, you pick the field you want to filter on, choose the condition for selection from the drop-down list, and key in the criteria. Pressing the drop-down list on criteria (the rightmost field) will show all the values in the table for that field. This might take a few minutes. I think it's easier to just key in what you want. In this dialog, you can also choose multiple criteria and join them using "And" or "Or." For this example, I've chosen customers whose ZIP code is 85254, although I might want to choose customers whose ZIP code is like 85254 so that I can get those records that have the ZIP+4 (in that case, key in 85254%) .
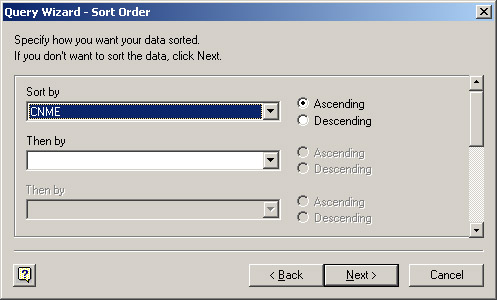
Pressing Next on the Filter Data dialog takes us to the Sort Order dialog (see Figure 7). It isn't necessary to specify a sort order, but it's easy to do. Just choose the field (or fields) you want to sort on and specify ascending or descending.
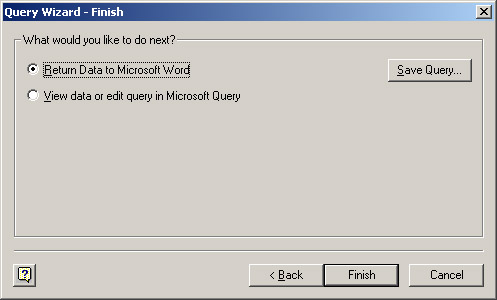
Pressing Next here takes you to the final step in the data selection process, where you get the chance to bring the data on home!
The Finish dialog (Figure 8) offers the opportunity to return the data, view or edit the query, and save the query. If you think you'd re-use the query, you should save it. This will save future steps, as you can go straight to selection and choose a different set of records.
When you click Finish, you are returned to Microsoft Word. At this point, Word will warn you that you have no fields in your primary document and offer you the chance to set some up. If you had selected Mailing Labels in the Mail Merge Helper dialog (Figure 2), this is where you would be prompted to choose the label type.
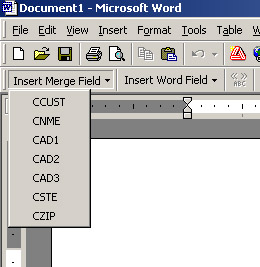
Clicking on Insert Merge Field on the Merge toolbar (upper left corner of Word) will bring up a list of the fields available from your query. For this example, select CNME (customer name), CAD1 and CAD2 (address lines 1 and 2), CAD3 (city), CSTE (state), and CZIP (ZIP code), as shown in Figure 9.
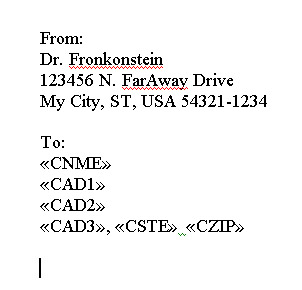
When you put them in the document, they look like the image in Figure 10.
In Figure 11, press the Merge to New Document button. The result will be one page per record for each record in the record set.
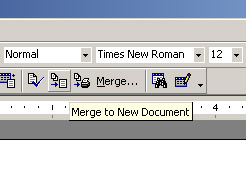
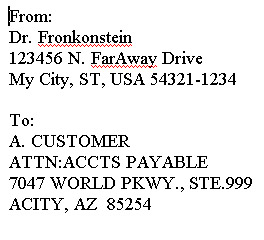
Figure 12 shows the first page of the merged document.
As you can see, merging directly to Word involves a number of steps. However, the steps are easy and many of the choices can be saved. You really don't need to set up a data source more than once, and you can save queries you use repetitively.
The steps are all pretty sensible and orderly, and it doesn't take a lot to go through them, but the results can be pretty powerful. I encourage you to work with this as much as you can. In my next column, I'll show you how to use VBA to automate the merge function and the selection of data. This would give you a macro-based solution to present to end users so that they don't have to get into the mechanics of a query.
Chris Devous is the Director of IT Systems Development at The Antigua Group, Inc., a Peoria, Arizona, garment manufacturer. Chris has been in IT since '82 and lives Arizona with his wife, three children, a bird, two dogs, a cat, and various marine life forms. He can be reached by email at
 IT managers hoping to find new IBM i talent are discovering that the pool of experienced RPG programmers and operators or administrators with intimate knowledge of the operating system and the applications that run on it is small. This begs the question: How will you manage the platform that supports such a big part of your business? This guide offers strategies and software suggestions to help you plan IT staffing and resources and smooth the transition after your AS/400 talent retires. Read on to learn:
 Business users want new applications now. Market and regulatory pressures require faster application updates and delivery into production. Your IBM i developers may be approaching retirement, and you see no sure way to fill their positions with experienced developers. In addition, you may be caught between maintaining your existing applications and the uncertainty of moving to something new.
LATEST COMMENTS
MC Press Online