Sometimes, I just get in a rut with certain programs. I may use these programs every day, but since they're simply tools to get the day's missions accomplished, I don't really pay attention to them. iSeries Access PC5250 (from the product family formerly known as Client Access) is one of those programs. Aside from the excitement of a name change, PC5250 is often little more than a means to an end. However, over time it has evolved into quite a flexible program whose features can save you time and trouble.
With that in mind, here are eight iSeries Access PC5250 tips. These are collected from usage and observation. Although some of them may seem obvious to some of you, I hope you find them useful. If you have any tips you'd like to share, hit the link at the end of this article to post 'em. Share and share alike!
Record and Replay Repetitive Input Tasks
You can record repetitive input tasks in a macro for easy, rapid playback. iSeries Access will record your keystrokes and create a macro file as either a "Macro File" or a "VBScript File." Both file types are standard text files that can be edited with Notepad or your favorite text editor. The VBScript option records files in standard Visual Basic Script, which opens up a lot of possibilities for complex logic and interaction with the user and other aspects of the system, if you feel like delving into code. Even if you don't, playing back recorded macros can save you time on things you do over and over. To record, hit Actions/Start Recording Macro, or hit the Record button on the toolbar. In the following dialog box (Figure 1), enter the file name to record to, adjust any other settings you might want, and click the OK button.
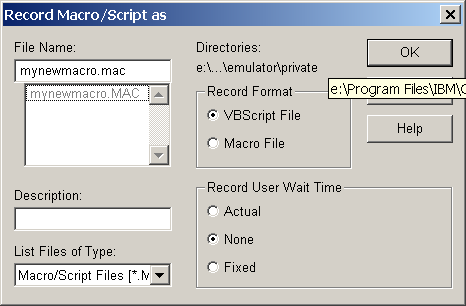
Figure 1: Choose your options for recording a macro. (Click images to enlarge.)
With the settings shown above, iSeries Access will record keyboard input as a VBScript program with the name of mynewmacro.mac. When you are finished with your recorded actions, hit Actions/Stop Recording Macro.
Once a macro is recorded, you can assign it to hotspots or keystrokes. Note that it's full VBScript, so you should be able to do all kinds things. (If anybody can point to some current docs on this on the IBM site, please hit the "Discuss this article" link below and post a message).
Customize the Toolbar
You can tweak the 5250 toolbar to make it more functional for you. iSeries Access offers some useful buttons that aren't included on the default toolbar. In addition, you can remove buttons that you don't use and change the appearance of the toolbar to match your tastes. You can even create your own custom buttons to call your macros.
To customize the toolbar, right-click anywhere in the toolbar to bring up the menu shown in Figure 2. The Tool Bar Style menu item brings up a screen where you can change the size and appearance of the toolbar. The menu items below that allow you to manage the items (buttons) on the toolbar.
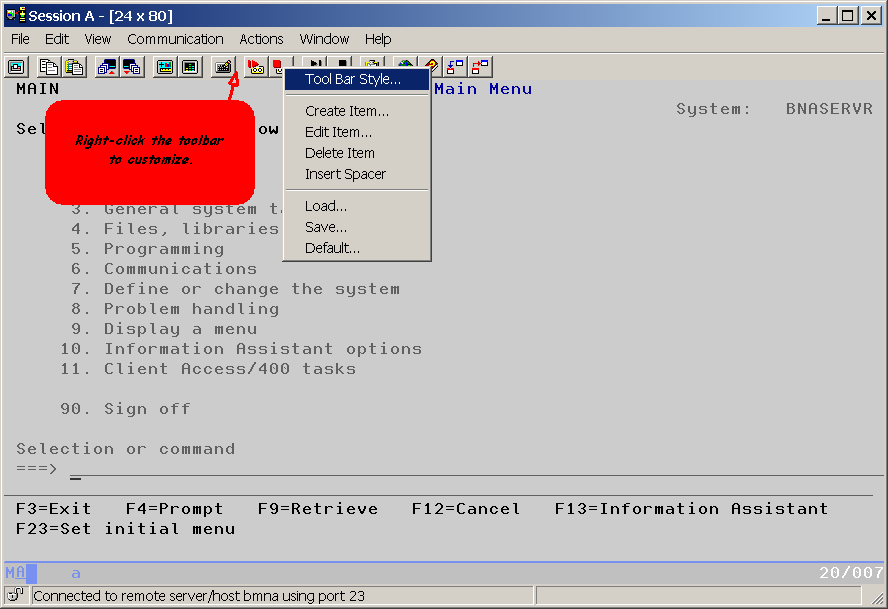
Figure 2: Right-click to customize the toolbar.
Select the Create Item option and click the Window tab to bring up the screen shown in Figure 3. Click the JumpNxt button to add, and then click OK. Repeat for the JumpPrv button. Clicking these buttons on the toolbar will quickly jump between your open sessions.
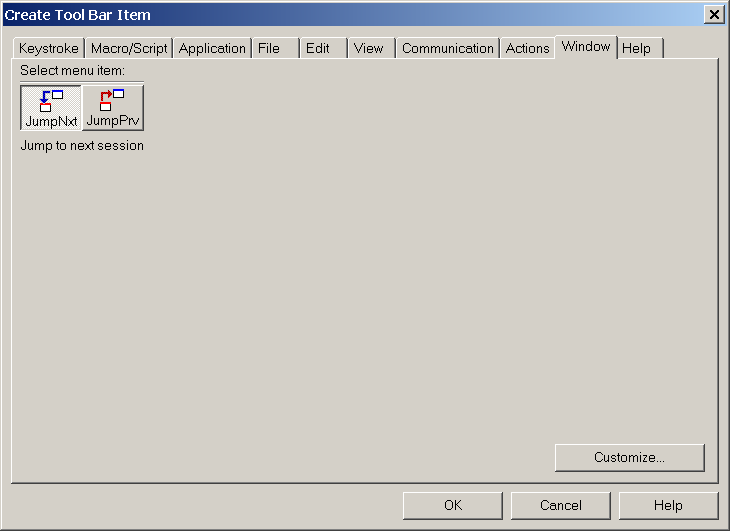
Figure 3: Add the JumpNxt and JumpPrv buttons to jump between multiple session windows quickly.
If you want to remove a button from the toolbar, simply right-click the toolbar and select Delete Item (Figure 2).
After you modify the toolbar, when you save the session settings, your settings will be saved in a file with the .BAR extension in the directory you specify. The default is IBMClient AccessEmulatorprivate, which is the same place other customization files are stored.
Keep Up with Service Packs
This is, of course, the most obvious tip, but it's also the easiest way to save you some frustration, and it's the first thing support will ask you to do when you encounter problems. If there's something that's not working right with iSeries Access, hit the Client Access Properties icon to see what service level you are at. Then, jump to IBM's iSeries Access Web page and compare the service level with the latest service pack PTF number for your version (Figure 4). If they're different, download the PTF and install it to see if the problem is corrected.

Figure 4: Check the service pack level and compare it with the service packs available on IBM's site.
You can keep up with PTFs on all your iSeries Access PCs by installing the appropriate PTF on your iSeries and then selecting Check Service Level. This is the easiest way to automatically distribute PTFs to all your clients, because iSeries Access is configured to automatically check for new versions periodically. You can change the location where the files are checked from by clicking the iSeries Access Properties icon in the iSeries Access program folder and selecting the Service tab. When a new version is encountered, it can even be installed "silently" (i.e., without user intervention) if that option is selected.
Start Multiple Sessions All at Once
You can open multiple sessions (displays and/or printers) with a single click and even automatically sign on to them all. When you connect to the iSeries, you configure and connect with a session. Session settings are stored in Workstation Profile with the extension .WS, and they determine things like your device name and type and other aspects of the emulator session.
To start multiple sessions at once, first create your sessions as you want them to be, or use one or more of your existing sessions. Provided your device names are unique (which you can control when configuring the session), you can load multiple instances of the same session. Save the session settings in a location you can remember (the default is IBMClient AccessEmulatorprivate).
iSeries Access provides a tool called Multiple Sessions that lets you create a batch file that, when executed, will launch the workstation profile files you specify. To use this tool, from the Start menu, select /Programs/IBM Client Access Express/Emulator/Multiple Sessions. That brings up the screen shown in Figure 5.
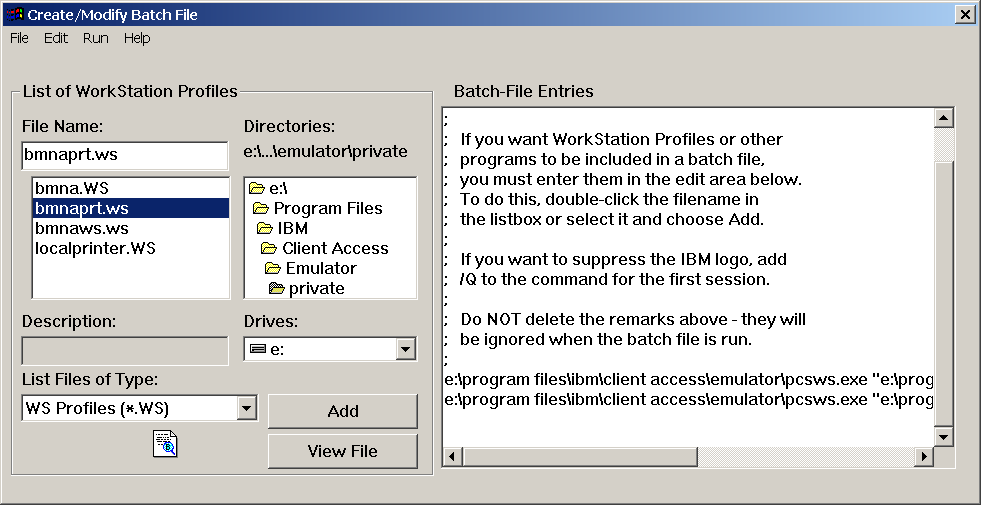
Figure 5: Configure multiple sessions to open at the same time.
Double-click the workstation profile (.WS) files that you want, and they will be added to the Batch File Entries list. As mentioned, you can add the same one multiple times, as long as the device names are unique. When you are finished adding the session you want, hit File/Save. When you do that, it will ask you if you want to save the file to a folder. Click on Yes and then select your desktop in the folder browser that subsequently appears; an icon will be placed on the desktop. Double-click that icon to launch the sessions you've set up.
If you've specified Bypass Signon when configuring your display session settings and your iSeries is configured to allow it, you'll be signed on to the sessions automatically after the connection is established (which may cause a password prompt). This can represent a security issue (if, for example, an unauthorized person double-clicked on the icon), so if you do allow the signon to be bypassed, be sure to take the appropriate steps to keep your workstation settings secure.
Secure Your Communications
When you sign on from home "just to check that job real quick," how do you know your password isn't being intercepted? Can you afford to take that risk? When you're on the Internet, it's practically impossible to know who might be listening in between you and your destination. What could someone do with your user ID and password? If you don't encrypt your communications, you might find out the hard way!
Fortunately, the iSeries, iSeries Access, and Windows 2000/XP have good support for securing your communications so that, even if they are intercepted, they will be encrypted and therefore virtually useless. The two main types of secure communications are Secure Sockets Layer (SSL) and virtual private network (VPN).
SSL is a widely used secure transmission. SSL-enabled applications talk to SSL-enabled servers, which usually means that both sides must explicitly support SSL communications. SSL support has been included in OS/400 and iSeries Access for most server applications for a long time now. This includes the big ones: the HTTP server, the Telnet server, the FTP server, and the other iSeries Access for Windows applications like iSeries Navigator (formerly Operations Navigator), and ODBC (click here for the list).
In contrast with SSL, traffic on a VPN is secured at the network level, so most (if not all) applications will work without any specific configuration. This includes iSeries Access, of course. Network-level security is an advantage because all traffic is secured automatically, and your applications behave the same as if they were on the LAN (performance differences notwithstanding).
The process of securing network communications is beyond the scope of this tip, but there are some good resources out there to assist. Below are a few that I know of. Post a comment to this article if you know of any others.
--IBM Info Center: Virtual private networking
--IBM Info Center: SSL
--Apar: II11791
--Redbook: Set Up a VPN (Virtual Private Network) to Securely Manage Your AS/400 Across the Internet
--"Configuring SSL for Use With Client Access"
Change Your Screen Colors
Many people (myself included) still rather like the good ole green-on-black screen colors, but those colors don't look so good when screens are captured as bitmaps for printing or documentation. (For more information on screen capture, see "Screen Capture Software For Windows." Luckily, it's easy to change the colors of your emulation sessions.
To change your colors, change the default colors for your setting by hitting Edit/Preferences/Appearance/Color Mapping (as shown in Figure 6), or by hitting the Setup Display Colors button ( ![]() ) on the iSeries Access Toolbar. That button brings up a dialog that allows you to click on various areas of the screen to change the colors. Changing the background to a light color and the text to a dark color improves the appearance of captured screens in print.
) on the iSeries Access Toolbar. That button brings up a dialog that allows you to click on various areas of the screen to change the colors. Changing the background to a light color and the text to a dark color improves the appearance of captured screens in print.
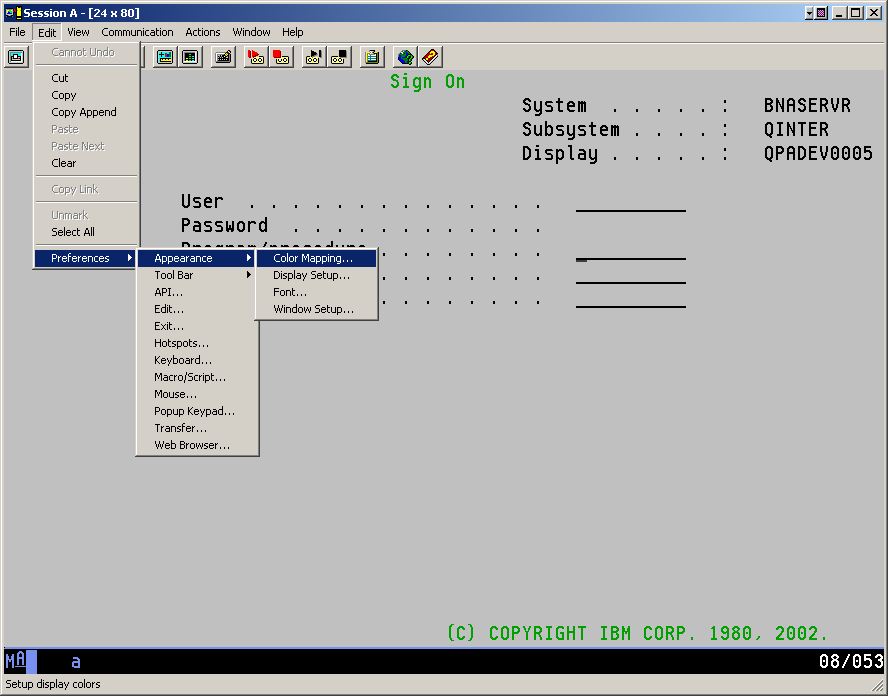
Figure 6: Changing your sessions makes the screens easier to read and capture for printing.
Pop-Up Email Clients
I could never get Chris Tickner, the IT manager at Midrange Computing, to write about a neat trick he used in Client Access, but he gets the credit for showing me this technique. He had a macro and hotspots that made an email address shown on screen into a clickable button that popped up users' email programs. This is a cool trick for those who need to be able to quickly send email to people.
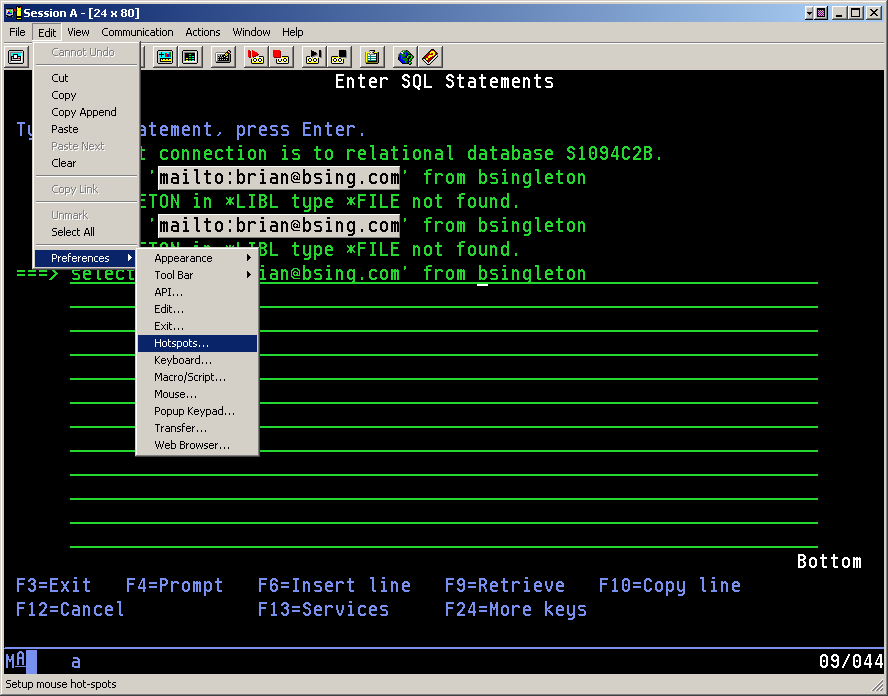
Figure 7: You can make email addresses shown on the screen into clickable buttons.
This trick is easy--all you have to do is hit Edit/Preferences/HotSpots (Figure 7), which brings up the screen shown in Figure 8. Then, select Execute URL and 3-D Buttons, and all URLs will be displayed as clickable buttons.
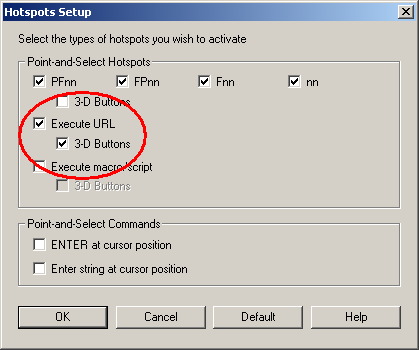
Figure 8: Select Execute URL and 3-D Buttons to make URLs into buttons.
One type of URL it will recognize is a "mailto:" URL. To make a clickable button that launches users' email clients, all you have to do is get the URL on the screen somewhere in the form "mailto:email address." When users click the button, their default email clients will pop up.
The Final Tip: Take Advantage of MC Press's Free Resources
Adding original content to the large pool of information available online from IBM and others, MCPressOnline.com has a ton of great Web resources available for iSeries Access. MC Press's Client Access Section hosts all the current articles from MC Mag Online and other items related to iSeries/Client Access. Also online are all the articles that were published in Midrange Computing and Midrange Network Expert.
I hope these tips prove useful and save you some time. Do you have a tip to share? If so, hit the "Discuss this article" link and share it!
When he's not riding across the desert or blogging, Brian Singleton is busy helping organizations make the best use of their ever-more-complex IT investments.


 Business users want new applications now. Market and regulatory pressures require faster application updates and delivery into production. Your IBM i developers may be approaching retirement, and you see no sure way to fill their positions with experienced developers. In addition, you may be caught between maintaining your existing applications and the uncertainty of moving to something new.
 IT managers hoping to find new IBM i talent are discovering that the pool of experienced RPG programmers and operators or administrators with intimate knowledge of the operating system and the applications that run on it is small. This begs the question: How will you manage the platform that supports such a big part of your business? This guide offers strategies and software suggestions to help you plan IT staffing and resources and smooth the transition after your AS/400 talent retires. Read on to learn:
LATEST COMMENTS
MC Press Online