Microsoft Excel is probably the most powerful data-access and analysis tool in Microsoft Office. Excel allows for the easy creation of lists, graphs, and reports, and it provides many exceptional features to help make advanced data analysis simple. This excerpt from i5/OS and Microsoft Office Integration Handbook, Third Edition explores using Excel to accept and analyze iSeries data.
The method used to access iSeries data in this example is perhaps the simplest available. Nevertheless, this method can be very handy for both ad hoc data transfers and for saved transfers that can be run repeatedly.
Using the iSeries Access Excel Add-In
If you had Microsoft Excel installed on your PC when you installed iSeries Access, you automatically added an extension to the standard Excel application environment. This extension, called an "Excel add-in," is a feature that allows you to invoke an iSeries data-transfer request directly from inside Excel.
The iSeries Access Excel add-in appears in the form of a new Excel toolbar, as shown in Figure 1. As you can see, there is only one button on this toolbar.

Figure 1: The iSeries Access add-in has its own single-button toolbar. (Click images to enlarge.)
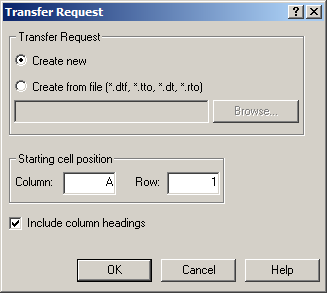
To begin using the add-in, click the Transfer Data button (the only button on the add-in's toolbar). This brings up the Transfer Request dialog box, as shown in Figure 2.
Figure 2: Create or recall transfer requests in the Transfer Request dialog box.
In the dialog box in Figure 2, you must supply the name of the transfer request and the location where you want the data to be placed. You can also select whether or not to include column headings.
If you have a transfer request already built, select it by clicking the second Transfer Request option, Create from file (*.tto, *.dt, *.rto). The next step is to locate the existing transfer request. Click the Browse button to find it. If, on the other hand, you are building a new transfer request, select the Create new option.
Enter the column and row where you want the data to be placed, choose whether or not you want to include column headings, and click the OK button. If you are using an existing request, it will be loaded, and you can perform the transfer without having to specify the transfer options again.
If you are creating a new request, the Data Transfer from iSeries dialog box will appear. On this screen, select the iSeries from which you want to retrieve the data and click the Next button.
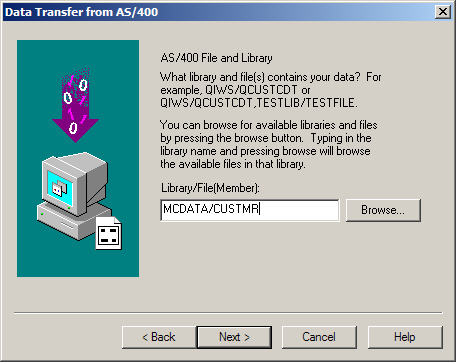
On the next screen, shown in Figure 3, select the library, file, and (optionally) the member from which you want data to be transferred.
Note: If you want to specify more than one file, separate each entry with a comma. The format of the entry is LIBRARY/FILE(MEMBER).
Figure 3: Specify the library, file, and member from which to transfer.
If you click the Browse button, the screen shown in Figure 4 is displayed. On this screen, you can visually find the files from which you want to obtain your data. You can also select more than one file from your iSeries if you need to retrieve data from multiple files.
Note: If you want to select from a particular library, and that library doesn't show up when you click the Browse button, type the name of the library in the screen shown in Figure 3, and then click the Browse button.
Figure 4: Choose files to retrieve from a list.
To complete this example, choose the Customer (custmr) table from the sample data and click the Next button. The next screen allows you to set options for your data-transfer request.
The Data Options screen brings up the data-transfer function's filter screen, where you can refine your query further by filtering data and specifying how multiple files are joined. The Format Options button brings up a screen where you can set the appearance options for your data. The Properties button brings up the data-transfer screen, where you specify the options for the transfer. (All of these screens are covered in detail in chapter 9.)
Once you have the options set according to your preferences, click the Next button. In the next screen, you can save your transfer request to use it again. If you want to save the request, enter the file name and path where it should be saved.
The last step is to click the Finish button. The iSeries Access "waiting" animation will play for a moment, and the data will appear in your spreadsheet as shown in Figure 5.
Figure 5: The data is transferred into the spreadsheet.
At this point, the data is completely separated from the iSeries. There is no way to refresh it except to run the request again by going through the previous steps (which are shortened considerably if you saved the transfer request).
As you can see, the wizard functionality of the iSeries Access Excel add-in makes it easy to use. With just a few moves, you can create and save file transfer requests that your users can invoke directly from Excel. Users have to perform only one step, and the confusion of exporting to a delimited file and then importing that file into an Excel spreadsheet is completely avoided. All in all, this is a handy solution for many circumstances.
Chris Peters has 27 years of experience in the IBM midrange and PC platforms. Chris is president of Evergreen Interactive Systems, a software development firm and creators of the iSeries Report Downloader. Chris is the author of The i5/OS and Microsoft Office Integration Handbook, The AS/400 TCP/IP Handbook, AS/400 Client/Server Programming with Visual Basic, and Peer Networking on the AS/400 (MC Press). He is also a nationally recognized seminar instructor and lecturer at Eastern Washington University. Chris can be reached at


 Business users want new applications now. Market and regulatory pressures require faster application updates and delivery into production. Your IBM i developers may be approaching retirement, and you see no sure way to fill their positions with experienced developers. In addition, you may be caught between maintaining your existing applications and the uncertainty of moving to something new.
 IT managers hoping to find new IBM i talent are discovering that the pool of experienced RPG programmers and operators or administrators with intimate knowledge of the operating system and the applications that run on it is small. This begs the question: How will you manage the platform that supports such a big part of your business? This guide offers strategies and software suggestions to help you plan IT staffing and resources and smooth the transition after your AS/400 talent retires. Read on to learn:
LATEST COMMENTS
MC Press Online