In Part 1 of this article, I discussed some of the main components of Web services. In this article, I will show you how you can use WDSC to generate a Web service, even if you have no knowledge of Java, XML, or WebSphere Application Server (WAS).
Creating a Web Service
These are the requirements for creating and testing a Web service for an RPG program or subprocedure:
- An RPG program or subprocedure to be called from the Web service
- WebSphere Development Studio Client (WDSC) (V6.0.1 or later) with a couple of additional components installed
- Web Service Developer enabled within WDSC
- A local version of WebSphere Application Server running on your PC (Don't panic: You don't have to configure an application server; it is all done from within WDSC.)
- The Create Web Service wizard to generate a Web service
Let's look at each of these components in more detail.
The Back-End
The first step is to have a program or subprocedure to make available as a Web service. Assuming that you have modularized your back-end application using all the benefits of RPG IV and ILE, most of the application functionality will likely be provided by subprocedures as opposed to programs. So let's see how you can make an RPG subprocedure in a service program available as a Web service.
Figure 1 shows the DDS source for a Currency Rate file (CurrFile) and the RPG IV source for a subprocedure named ConvertCurrency. The subprocedure converts the provided value (ValueIn) between the requested currencies (FromCurrency, ToCurrency) using currency rates stored in the currency rate file. The subprocedure returns the converted value (ValueOut) and sets the text (Text) to indicate what the procedure did.
|
Figure 1: This is the code you'll use for this example.
There are a couple of interesting points to note about the code:
- The first three parameters are defined with the Const keyword; this has a bearing on the interface created by the Web service wizard.
- If you follow the logic of the subprocedure, you will note that the ValueOut parameter is set only if the requested currency codes are valid: Because this subprocedure will be called from Java, the ValueOut parameter must be explicitly set to zero at the start of the subprocedure.
The subprocedure is coded in a module named CONVERT, which is placed in a service program named CURRENCY. The prototype would normally be included via a copy member (of course), but I have hard-coded it here for clarity.
With the subprocedure in place, the next step is to make sure you have all the components necessary to create a Web service.
The Right Components
You will need WebSphere Development Studio Client (WDSC) V6.0.1 (or later) with the latest fixes applied. The example in this article was developed using V6.0.1, but there are only minor differences in some of the screens in V7.0. You will also need to ensure that two optional features are installed: "IBM WebSphere Application Server Test Environment" and "Java SDK Update for WebSphere Application Server Integrated Test Environment." The easiest way to do this is to start the Rational Product Updater (Start -> All Programs -> IBM Rational -> Rational Program Updater). If either of the required features is not listed under the installed products, select the Find Optional Features button and select to install the missing products from the resulting list.
Enable Web Services Development
Start WDSC. Since you are playing around with new features, it might be a good idea to create a new workspace.
Make sure that Web services development is enabled by selecting Window -> Preferences from the menu. Expand Workbench, select Capabilities, and ensure that Web Service Developer is selected, as shown in Figure 2. Ensure that all of the subcomponents are selected (i.e., a dark tick as opposed to a light tick). Click OK to continue.
Figure 2: Ensure that Web Service Developer is selected. (Click images to enlarge.)
Start WebSphere Application Server
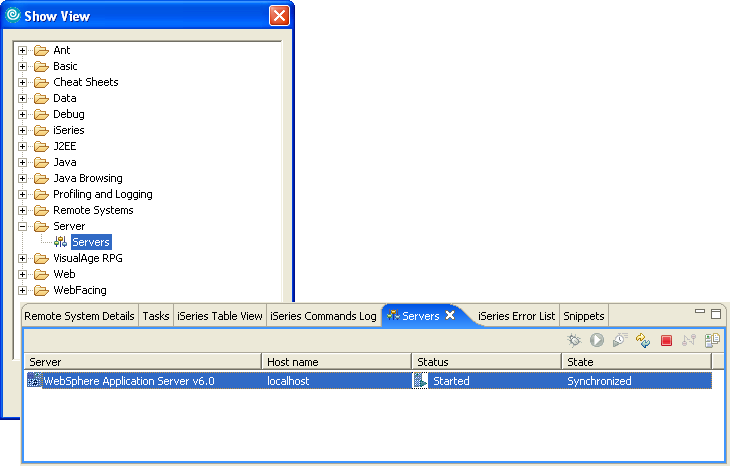
In order to create and test a Web service, you must be running an instance of WebSphere Application Server (WAS) on your PC (not on your iSeries). Don't worry; this is really very simple. Open a servers view by selecting Window -> Show View -> Other from the menu. Then, expand Server and select Servers, as shown in Figure 3. This results in the Servers view, listing a local host server for WAS being displayed, also shown in Figure 3.
Figure 3: Expand Server and select Servers.
If the WAS local host server is not listed, you can create it by right-clicking in the Servers view and selecting New -> Server from the context menu. Select WebSphere V6.0 (or V6.1) Server (this is the WebSphere Test Environment) from the list and click Finish to create the server.
In the Servers view, right-click on the local host server and select Start from the context menu.
It's possible to start the server from within the Web Service wizard, but, since the server may take a few minutes to start, it depends on the speed of your PC as to whether or not the server will be started and ready by the time the wizard needs it.
Get the Library List Right
Before attempting to start the Web wizard, connect to your iSeries and ensure that the library list for the connection contains all of the libraries necessary to verify the source member to be used. The Web Service wizard will verify the source in order to determine the required parameters: It does not re-create the module or program.
Web Service Wizard
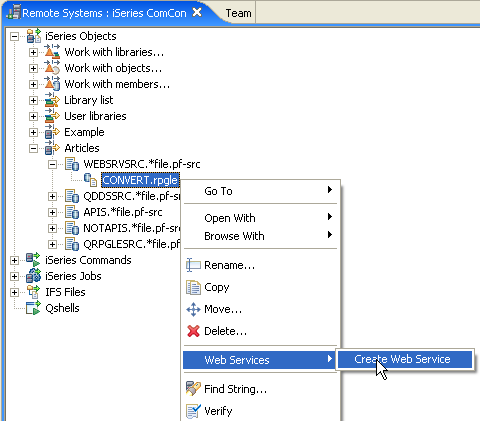
Navigate your way to the source member containing the subprocedure to be made available as a Web service, right-click on it, and select Web Services -> Create Web Service from the context menu, as shown in Figure 4.
Figure 4: Select Web Services -> Create Web Service from the context menu.
The Web Services options is the first window displayed by the wizard, as shown in Figure 5.
Figure 5: The wizard displays the Web Services options window.
You need to select the following options (other options should not be selected):
- The "Web service type" is iSeries Program Web Service (the default).
- "Start Web service in Web project" is selected in case you forgot to start the WAS server.
- Select "Generate a proxy" and a "Client proxy type" of Java proxy to have the wizard generate a client-side proxy through which you can test the Web service.
- Select "Test the Web service" to have the wizard generate a test application to call the Web service.
- Select "Create folders when necessary" to have the wizard create all necessary folders without prompting.
Click Next to continue to the Object Selection Page. This may take a moment as it is at this point that the wizard verifies the source member. The source member is opened in an editor window, and an error list is generated. You will receive a warning if the member did not verify correctly.
Figure 6 shows the Object Selection Page. The Program Call Definitions pane shows the ConvertCurrency subprocedure along with the required parameters. Select the ConvertCurrency subprocedure and change the name of the Program Object to the name of the service program containing the subprocedure (CURRENCY in this example).
Figure 6: Select your object.
If the run-time environment (log on or library list) is different from the current connection in WDSC, select the Edit button for the runtime configuration and change the runtime environment.
You now need to identify whether each parameter is input, output, or both. The current status for each parameter is indicated by the in and out arrows on the icon next to the parameter. Select a parameter in the Program Call Definitions list and select the required Usage, as shown in Figure 7. Since the first three parameters were identified with the Const keyword, they are automatically identified as input only, so you only need to change the usage to output for the value out and text parameters.
Figure 7: Select a parameter in the Program Call Definitions list and select the required Usage.
Click Next to continue to the Service Deployment Configuration. This is where you name the server and client projects. The application server defaults to the local host WAS test environment.
Figure 8 shows the Service Deployment Configuration window, where I have named the server-side projects to CONVERT and CONVERTEAR and the client-side projects to CONVERTClient and CONVERTClientEAR. I could accept the default values for the project names, but I prefer to provide a unique name so I know what it is when I come back to it six months later.
Figure 8: In the Service Deployment Configuration window, name the server-side projects.
If you want to see the other steps involved in the wizard, you can continue clicking the Next button, but since you have provided all the necessary information, you can click Finish to complete the wizard. Click Yes if you are prompted to replace any files.
The wizard will now generate all the code (Java servlets, WSDL, JSPs) required for the Web server and the client (for testing purposes). This is where you must be patient because this appears to be quite a process; it took nearly five minutes on my machine for the process to complete.
But you should now be ready to test the Web service.
Testing the Web Service
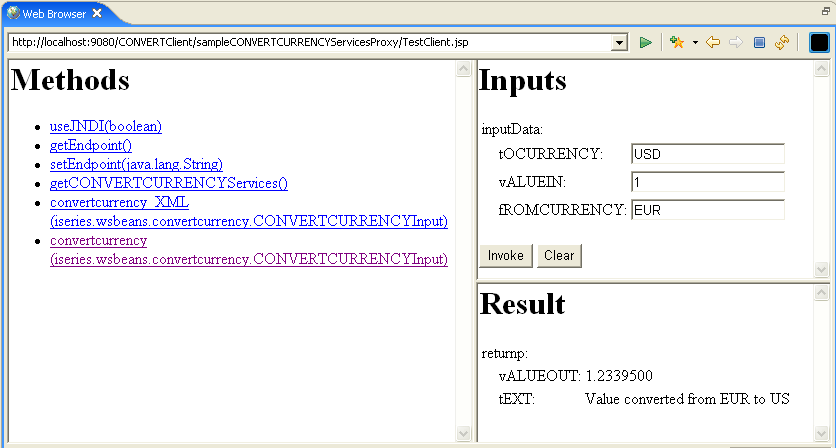
Upon completion of the wizard, a Web browser view is opened containing three sections: Methods, Inputs, and Results. Select the convertcurrency(iseries.wsbeans.convertcurrency.CONVERTCURRENCYInput) method, and the Inputs section will list the input parameters. Enter values for the parameters and click Invoke (this invokes the Web service, which calls the RPG subprocedure), and the Result section will display the values returned from the subprocedure.
Figure 9 shows the results of converting a euro to U.S. dollars.
Figure 9: As a test, here are the results of converting a euro to U.S. dollars.
If you want to see what the test page looks like in a true Web browser, simply copy and paste the URL to your favorite browser and view the results there. Regardless of where you view it, it will not get any prettier; the parameter names will still start with a lowercase character followed by all uppercase characters, and the sequence of the input parameters will not necessarily match those in the RPG subprocedure (the sequence is correct for the call; it's just out of sequence on the Web page). But this is for test purposes only, so who cares how pretty it looks?
But what did the Web Services wizard just create?
Show Me the Code
Like all good programmers, you want to see all of the code that the Web Services wizard generated. Open the Web Perspective by selecting Window -> Open Perspective -> Other from the menu and selecting Web from the list of perspectives.
Expand Dynamic Web Projects, as shown in Figure 10, and continue to expand the components of the Web server and client projects to view any of the generated items.
Figure 10: Expand Dynamic Web Projects.
Of particular interest is the WSDL source, located in the wsdl/iseries/wsbeans/convertcurrency directory, which describes the Web service, where it is located, how it is called, and how information is passed to it and from it. This is the file that a Web service/application server guru is mostly interested in. It also provides you with a starting point if you want to delve into the world of servlets, JSPs, and XML.
Easily Create a Web Service
There you have it. WDSC and the Web Services wizard makes it possible for you to create a Web service without having to know anything about application servers, Java, or XML.
Although the Web Service wizard is extremely easy to use, it has two disadvantages: First is the length of time it takes for the wizard to generate everything. Second, if you make a mistake, it is nearly impossible to figure out what you have done wrong without having a knowledge of Java. That said, it is really difficult to make a mistake!
Even if you have no immediate use for Web services, the Web Service wizard provides an easy means of generating interfaces that you can use to call and test your subprocedures.
Go on; give it a try.
Paul Tuohy has worked in the development of IBM midrange applications since the '70s. He has been IT manager for Kodak Ireland Ltd. and Technical Director of Precision Software Ltd. and is currently CEO of ComCon, a midrange consultancy company based in Dublin, Ireland. He has been teaching and lecturing since the mid-'80s.
Paul writes articles for many publications and is one of the quoted industry experts in the IBM Redbook Who Knew You Could Do That with RPG IV? He is the author of the books The Programmer's Guide to iSeries Navigator and Re-engineering RPG Legacy Applications as well as the self-teach course “iSeries Navigator for Programmers.”
He is also an award-winning speaker who speaks regularly at COMMON conferences, the renowned RPG and DB2 Summit, and other conferences throughout the world.


 Business users want new applications now. Market and regulatory pressures require faster application updates and delivery into production. Your IBM i developers may be approaching retirement, and you see no sure way to fill their positions with experienced developers. In addition, you may be caught between maintaining your existing applications and the uncertainty of moving to something new.
 IT managers hoping to find new IBM i talent are discovering that the pool of experienced RPG programmers and operators or administrators with intimate knowledge of the operating system and the applications that run on it is small. This begs the question: How will you manage the platform that supports such a big part of your business? This guide offers strategies and software suggestions to help you plan IT staffing and resources and smooth the transition after your AS/400 talent retires. Read on to learn:
LATEST COMMENTS
MC Press Online