Editor’s note: This article is the fourth installment in a series exploring ways you can utilize the AS/400 Integrated File System (AS/400 IFS) to provide additional capabilities for your AS/400-centric network.
Accessing the AS/400 Integrated File System (AS/400 IFS) gets easier with each release, but V4R4’s AS/400 Client Access Express for Windows (Express client) offers an especially large and useful batch of functions for accessing and managing the AS/400 IFS from your PC client. In this article, I’m going to look at some additional AS/400 IFS functions that the Express client AS/400 Operations Navigator (OpsNav) program offers to help you manage your files, folders, User-defined File Systems, and AS/400 NetServer file shares. Express client’s OpsNav opens up a number of new possibilities for getting the most out of your AS/400 IFS.
Prior to Express client, there were many ways to access the AS/400 IFS. Client Access for Windows 95/NT (the Windows 95/NT client) allowed you to map AS/400 IFS folders to network drives or to use the Windows Find Computer function to access AS/400 IFS folders. AS/400 Support for Windows Network Neighborhood (AS/400 NetServer) offers similar Windows drive mapping support without the overhead of the Windows 95/NT client. The Windows 95/NT Operations Navigator program also has a File System icon that allows you to access the AS/400 IFS.
However, with the new Express client program, the Windows 95/NT client support for mapping network drives and Find Computer is removed because AS/400 NetServer allows you to do the same thing without requiring you to install Client Access. Express client OpsNav also adds a whole new world of GUI functions that make accessing the AS/400 IFS from the PC client easier than ever.
OpsNav to AS/400 IFS—Getting Started
To get started, open the Express client Operations Navigator tree for your target AS/400. If you need to add your AS/400 connection to Operations Navigator, click on File from the Operations Navigator pull-down menu, choose the Add AS/400 Connection option, and follow the prompts to add your AS/400 to Operations Navigator. Once it’s
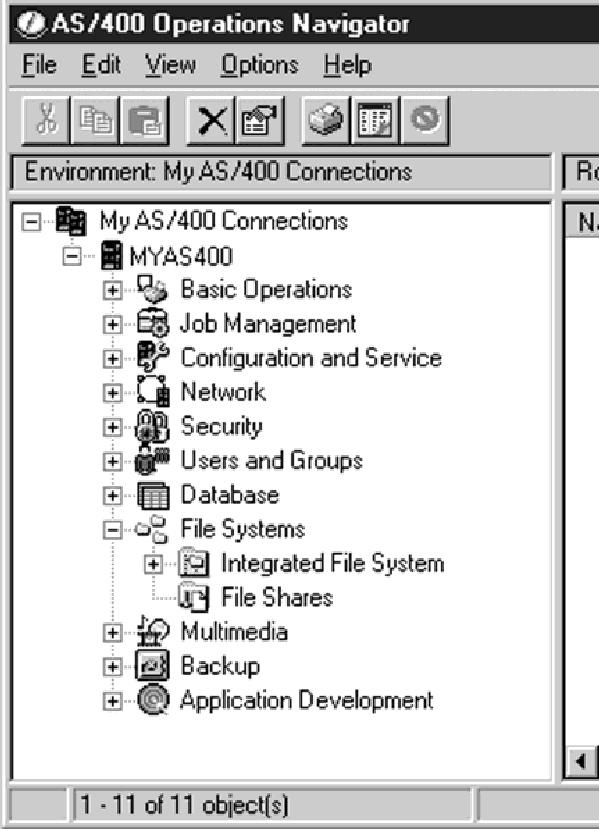
added, open the icon for your target AS/400 and expand the File Systems icon in the Operations Navigator tree view. You’ll see there are two additional icons under the File Systems branch: Integrated File System and File Shares (Figure 1).
Express client’s Operations Navigator GUI provides many new menu options for both files and folders (directories) listed under the Integrated File System icon. These new options are contained in the pop-up menus that are accessed by right-clicking on the object you want to act upon.
For both files and folders, you will find that the Cut and Copy options are new to the menu. These options are self-explanatory, but once you use them, you will wonder how you lived without them! After you Cut or Copy a file or folder, the Paste menu option then becomes available in other folders. In addition to performing these actions by choosing a pop-up menu item, you can also drag and drop an object’s icon to copy it to the desktop or move it to another folder. There is one exception: you can’t drag and drop an object from or into the QSYS.LIB file system (where your DB2/400 files reside). The Cut, Copy, and Paste options are not presented in the pop-up menu that appears for QSYS.LIB objects.
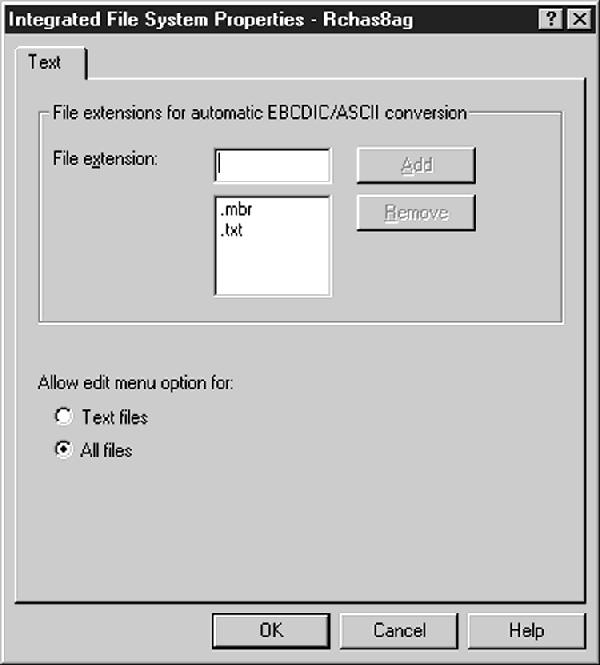
Another new pop-up option is Edit. Operations Navigator provides a full function editor that edits the file directly from the AS/400, so there’s no need to make a copy to your desktop. By default, the Edit option is only active for files that are registered to Notepad on your PC, such as those with a .txt extension. You can change the default by right-clicking on the Integrated File System icon and selecting Properties. On the bottom of the Integrated File System Properties screen that appears (Figure 2), you can select All Files or Text Files. Be aware, however, that choosing Edit on a file that is not really a text file may produce garbage on the editor screen (and in your file if you save it!) if it does not contain true text. For example, a program file does not contain true text so you wouldn’t want to automatically send a program file to the editor. Also, the editor expects ASCII text, so you must also enter any file extensions of files to be converted automatically from EBCDIC to ASCII for best results. You enter the file extensions for automatic conversion in the File extension box on the Integrated File System Properties screen (Figure 2) and then click on the Add button to add them to the conversion list. By default, Operations Navigator will convert files ending in the .mbr extension (such as DB2/400 files), but you may also want to add other common ASCII text files extensions, such as .txt or .bat, to this list. EBCDIC- to-ASCII data conversion is performed per AS/400 connection and per client. For more information on EBCDIC-to-ASCII data conversions inside Operations Navigator, see “NetServer Satisfies Express Client File Sharing Needs,” Midrange Computing, April
1999.
You may also be interested in the Send menu option, a Management Central function. This option allows you to send selected AS/400 IFS objects to one or more endpoint systems or groups of systems. Upon sending the AS/400 IFS objects, a Management Central task is created to allow you to track the progress of the object send. The task can be viewed in the Task Activity folder under Management Central. The name will be Send Files.
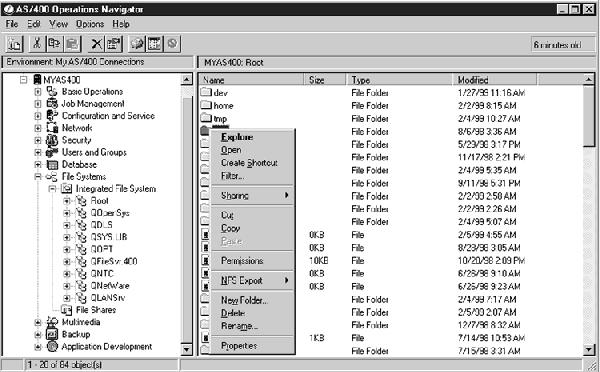
When you right-click on a particular AS/400 IFS folder, you’ll see that three new options have been added to the folder pop-up menu: the New Folder, Delete, and Rename options. (See figure 3.) The Delete is a recursive delete which means that it deletes not only the folder and the objects within it, but also folders within that folder and their objects. You will not find such a recursive delete natively inside OS/400. Operations Navigator is the only place it is available and there is no green-screen command or API equivalent. Recursive Copy and Move are also only currently available via Operations Navigator, and like the Recursive Delete, they are not available in a green-screen command or an API.
New File and Folder Properties
On a file’s Properties panel (right-click on an individual file under the Integrated File system icon and select Properties off the pop-up menu), the screen will now display
the code page attribute of the file. (This feature is only available for files on AS/400 systems running OS/400 V4R4.) When you right-click on a folder and select Properties off the pop-up menu, the Properties screen adds up the number of items and the space used within the folder so you can see how much AS/400 DASD is occupied by this folder. Also in the List View (on the right side of the Operations Navigator screen when you view an AS/400 IFS folder) there are some new informational columns. The new columns are Size (for files), and Modified (the date and time of last modification). The List View Type column has also been changed to be more specific. The type of file displayed is based on the filename extension (Text file for .txt, GIF Image for .gif, etc.). Files without an extension on the name are just labeled as a File.
User-defined File Systems
User-defined File Systems (UDFS) were provided in OS/400 beginning in V3R7. A UDFS allows you to create a file system that resides on a user Auxiliary Storage Pool (ASP), whereas files and folders in other file systems—such as the root file system or the QSYS.LIB system—reside in the System ASP. User-defined File Systems reside in a special folder under the root file system called /dev/qaspXX (where XX is the ASP number). A UDFS can then be dynamically mounted into the local AS/400 IFS name space and accessed from the AS/400 IFS. For more information about UDFSs, see IBM’s OS/400 Network File System Support (SC41-5714).
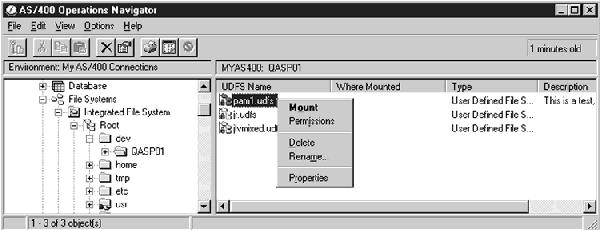
With OS/400 V4R4 and Express client’s Operations Navigator, there are more GUI functions available to create and manage these special file systems. A new UDFS can be created by right-clicking on the root->dev->qaspxx folder and selecting the New UDFS option from the pop-up menu. After a UDFS is created, there are new options to show the UDFS Properties and to mount the UDFS folder over an existing AS/400 IFS folder. See Figure 4, which is accessible by right-clicking on the individual UDFS icon under the root- >dev->qaspxx folder.
Similar to the Mount command in UNIX, the Mount option specifies that a UDFS can be accessed through an existing AS/400 IFS folder name. When you mount your UDFS over an AS/400 IFS folder (the mount point), any commands performed to that folder name will be redirected to your UDFS instead, covering up any file systems, folders, or objects that exist beneath your mount point. You can mount a UDFS by using the Mount option on the UDFS pop-up menu or you can simply drag and drop the UDFS over an AS/400 IFS folder in the list view. Once mounted, the UDFS Properties Status tab, as well as the Where Mounted column of the list view for that UDFS on the right side of the AS/400 Operations Navigator window (this column is also shown in Figure 4), will indicate the name of the folder the UDFS is mounted over. Right-clicking on a mounted UDFS will display an Unmount option to allow the UDFS to be unmounted (disconnected) from the mount point.
Integration of NetServer Shares
When I first started discussing the AS/400 Operations Navigator File Systems icon, I mentioned that there were two icons displayed beneath it (Figure 1). The second icon, File Shares (Figure 5), shows the folders that have been shared via AS/400 Support for Windows Network Neighborhood (AS/400 NetServer). These shares define the subset of the AS/400 IFS that is available to Windows desktop clients who are using AS/400 NetServer.
To create a new share, right-click on the folder you want to share under the Integrated File System icon. Choose Sharing, New Share and fill out the information in the pop-up window. Right-clicking after the share is created allows you to modify the existing share or create an additional share for that same folder. The hand icon will now appear under that folder in the Integrated File System icon and the new share will also appear under the File Shares icon. Under the File Shares, right-clicking on any existing file share allows you to map a network drive to that share and perform other user tasks from the popup menu. (See figure 5 for the pop-up menu options.)
Express Yourself
I think you’ll be impressed with the new AS/400 IFS function available in the Express client. Give it a try! Managing integrated file system files and folders, UDFSs, and AS/400 NetServer file shares merely takes a point and click, or a drag and drop with the V4R4 Client Access Express Operations Navigator interface.

Figure 1: With the Express client, Operations Navigator has added more AS/400 IFS functionality under the File Systems icons.

Figure 2: You can change the Edit options for your files or specify files that will undergo automatic EBCDIC-to-ASCII conversion by modifying your Integrated File System Properties.

Figure 3: The New Folder, Delete, and Rename options have been added to the pop-up menu for AS/400 IFS folders.
Figure 4: There are new options to Mount a UDFS over an existing AS/400 IFS mount point and to display the UDFS’ properties.


Figure 5: Right-clicking on an individual File Share allows you to map a network drive or to change the share’s properties.


 Business users want new applications now. Market and regulatory pressures require faster application updates and delivery into production. Your IBM i developers may be approaching retirement, and you see no sure way to fill their positions with experienced developers. In addition, you may be caught between maintaining your existing applications and the uncertainty of moving to something new.
 IT managers hoping to find new IBM i talent are discovering that the pool of experienced RPG programmers and operators or administrators with intimate knowledge of the operating system and the applications that run on it is small. This begs the question: How will you manage the platform that supports such a big part of your business? This guide offers strategies and software suggestions to help you plan IT staffing and resources and smooth the transition after your AS/400 talent retires. Read on to learn:
LATEST COMMENTS
MC Press Online