Once upon a time, life was simple when it came to determining dependencies in a database: You simply ran a Display Database Relationships (DSPDBR) command to see all of the logical files that were built over a physical file. Of course, you had to run the DSPDBR command for all the files in your database and then spend some time perusing the reports.
But that was when life was simple. Today, our databases are more complex, given the extra dependencies with such things as referential constraints, check constraints, and triggers. You still use of DSPDBR, but you also have to use the Display File Description (DSPFD) command to see the extra dependencies. You have my infinite admiration if you can easily decipher all of these reports and get a clear view of how a database hangs together.
The good news is that the Database feature in iSeries Navigator offers a couple of alternatives that make it very easy to get a clear picture (and I do mean picture) of the interdependencies in a database: Database Relations and Database Navigator. Please note that although iSeries Navigator uses SQL terminology (table, view, and index) to refer to database objects, you can still use it to access your traditional physical and logical files.
Database Relations
First, select Show Related from the context menu of any table, as shown in Figure 1, to get a list of its dependents.
Figure 1: Select Database Relationships from a context menu. (Click images to enlarge.)
Figure 2 shows the resulting Objects Related window, which lists the dependencies for the SAMPLE_EMPLOYEE table. But this is not just a list of related objects; it is also a means of maintaining the related objects. The context menu of any object in the list is the same as the context menu you would get for the object in the main iSeries Navigator window.
Figure 2: This is the context menu for a related object.
Database Navigator
Although Database Relations may provide an easier-to-interpret interface than the 5250 command equivalent, it is nothing compared to Database Navigator. Database Navigator draws a map of your database that not only provides a picture of your database and its dependencies, but also allows you to maintain the database.
To create a new map, select New -> Map from the context menu of Database Navigator Maps, as shown in Figure 3.
Figure 3: Take the option to create a new map.
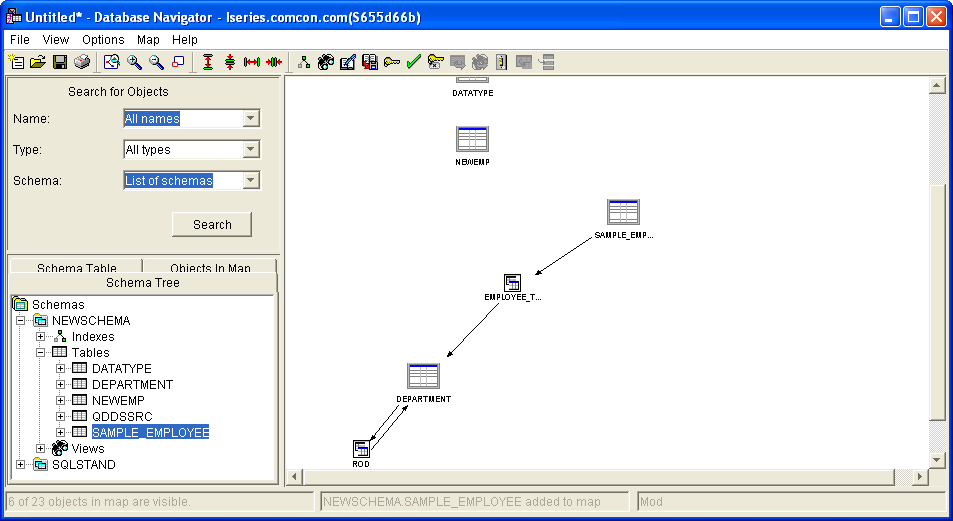
The left side of the resulting map window, shown in Figure 4, allows you to specify the database objects that you wish to select for the map. The top pane allows you to search for specific objects, while the bottom pane provides three tabs for selecting database objects: a Schema Tree similar to that shown in the main Databases window, a Schema Table that lists all tables in all schema in the schema list, and an Objects in Map tab that lists all the objects that are in the map. You can change the list of schema by selecting Options -> Change List of Schemas from the menu, but be warned that this also will change the list of schemas displayed for the Databases option in the main iSeries Navigator window.
The easiest way to generate a map is to add tables to it. Adding a table to a map adds the table and all of its dependents. Figure 4 shows the option to Add to Map being taken from the context menu of the SAMPLE_EMPLOYEE table. The context menu also has the usual options that are available for a table in the main iSeries Navigator window.
Figure 4: Add the Employee table to the map.
When the option is taken to add an item to the map, Database Navigator displays a Finding Relationships status window that indicates the progress of the operation. After a couple of moments, you will have a generated map, as shown in Figure 5. The minimum of information is shown, but it is interesting to note that other tables are included in the map due to foreign key constraints, views that join the selected table to other tables, or the fact that other tables are journaled to the same journal as the selected table.
Figure 5: Now you've generated a map for the Employee table.
To see more details in the map, you must select the relevant icons on the right side of the toolbar or the equivalent options from View -> Show Objects of Type from the menu. If an icon or option is grayed out, it means that no objects of that type are included in the map. By clicking the corresponding icon, you can select to show or hide the following:
- Indexes
- Views
- Journals
- Journal receivers
- Primary key constraints
- Check constraints
- Unique key constraints
- Table aliases
- View aliases
- Triggers
- Materialized query tables
- Table partitions
If you are not sure what an icon represents, simply point at it and a pop-up box will explain it.
Figure 6 shows the result of selecting all icons for the generated map. Isn't it interesting to see the amount of information that is placed in the map from just selecting the Employee table? And it is also a little difficult to read.
Figure 6: View all objects in the map.
You can use the Zoom icons on the toolbar (or View -> Zoom from the menu) to zoom in and out on the map. Then, use the horizontal and vertical bars to position the map to the required position. Figure 7 shows the result of zooming in on the map.
To see exactly where you are on the map, select the Show Overview Window icon from the toolbar (or View -> Show Overview Window from the menu) to display an overview window similar to that shown in Figure 8. Dragging the outline in the overview window repositions the image shown in the main map window accordingly, and you can resize the viewing window (zoom in/zoom out) by resizing the outline window.
Figure 8: Here's a symmetric view of the Map Overview Window.
These are some of the other features available in Database Navigator:
- You can change your preferences as to what should be included in the map by selecting Options -> User Preferences from the menu.
- You can change the position of any item in the map by using the mouse to drag and drop it to the required position; connections to other objects are maintained.
- You can change the style of the generated map by selecting View -> Arrange -> Circular or selecting View -> Arrange -> Hierarchic from the menu.
- Flyover help is displayed when you leave the cursor on an object in the window (this can be disabled in user preferences).
- All objects in the map have a context menu similar to that available in the main iSeries Navigator window.
- You can change the representation of an object in the map to a more-detailed view by selecting Expand from the context menu of the object.
- You can add user-defined relationships.
- It is possible to have an item included in the map but not displayed by selecting Hide from the context menu of the object.
- You can save the Database Navigator map by selecting the Save icon from the toolbar or by selecting File -> Save or File -> Save As from the menu. A Database Navigator map is actually stored as a table (i.e., a *FILE object). Thus, any maps you create are stored in a library on the iSeries and are not specific to your PC or profile. The list of available maps is shown when you select Database Navigator Maps.
Got the Picture?
Whether through Database Relations or through Database Navigator Maps, iSeries Navigator's ability to show the relationships of database objects far outweighs the 5250 equivalent.
Remember that the use of Database Relations and Database Navigator is not in any way dependent on the database being defined with DDL. You can try it now on one of your traditional databases defined using DDS.
Database Relations and Database Navigator are two of the features that have long been missing from the database. With the advent of triggers and referential integrity, they have become a necessity. You will find it nigh on impossible to track all the relationships and dependencies unless you can see a meaningful overview. And these features are not just a view that shows you the construct of the database, but rather an interface that allows you to directly manipulate it, just as you would from the main Navigator window.
Using Database Relations, you get a view of the database that might be possible to emulate in a 5250 session. But using Database Navigator, you get a true GUI interface that far exceeds anything provided on green-screen.
Editor's Note: This article represents the type of information you'll find in the author's new best-selling book, The Programmer's Guide to iSeries Navigator.
Paul Tuohy has worked in the development of IBM midrange applications since the ‘70s. He has been IT manager for Kodak Ireland Ltd. and Technical Director of Precision Software Ltd., and he’s currently CEO of ComCon, a midrange consultancy company based in Dublin, Ireland. He has been involved in lecturing and training since the mid-‘80s.Paul is the author of Re-engineering RPG Legacy Applications and The Programmer's Guide to iSeries Navigator as well as the self-teach course “iSeries Navigator for Programmers.” He is also one of the quoted industry experts in the IBM Redbook Who Knew You Could Do That with RPG IV? He regularly contributes to a number of midrange publications and is an award-winning speaker who frequently appears at U.S. COMMON conferences and at the renowned RPG World conferences.


 Business users want new applications now. Market and regulatory pressures require faster application updates and delivery into production. Your IBM i developers may be approaching retirement, and you see no sure way to fill their positions with experienced developers. In addition, you may be caught between maintaining your existing applications and the uncertainty of moving to something new.
 IT managers hoping to find new IBM i talent are discovering that the pool of experienced RPG programmers and operators or administrators with intimate knowledge of the operating system and the applications that run on it is small. This begs the question: How will you manage the platform that supports such a big part of your business? This guide offers strategies and software suggestions to help you plan IT staffing and resources and smooth the transition after your AS/400 talent retires. Read on to learn:
LATEST COMMENTS
MC Press Online