Do you want to send network printouts to your AS/400 printers without using Client Access or any other commercial software? Do you want to share your office PC printer with your coworkers on the LAN even though your PC may be low on the disk space needed for spooling printouts? If so, you may want to take advantage of the AS/400 Support for Windows Network Neighborhood (AS/400 NetServer) to handle your print- serving needs. With OS/400 V4R2 or later and the print-sharing capabilities in your Microsoft Windows desktops—Windows for Workgroups (WFW), Windows 95, Windows 98, and Windows NT—you can use AS/400 NetServer to seamlessly integrate AS/400 output queues with your network. AS/400 NetServer allows you to use your AS/400 output queues for network print serving, redirecting PC and network printouts to any available printer on the network, regardless of whether that printer is attached to your AS/400.
AS/400 NetServer takes advantage of the print-sharing capability in a Windows desktop environment by enabling the industry-standard Server Message Block (SMB) protocol inside OS/400.
To use your AS/400 to route network printouts to PC printers using SMB, you only need to have two things configured in your network:
• The PCs must use the Client for Microsoft Networks component in their Windows desktop Network setup.
• Both your AS/400 and the PCs the printers are attached to must use TCP/IP. On the client, TCP/IP and the Client for Microsoft Networks component are both included with Windows 95, Windows 98, Windows NT, and Windows for Workgroups. (For more information on configuring PCs to use AS/400 NetServer, see “Client Access without Client Access,” Client Access/400 Expert, July/August 1998.) Once this basic configuration is in place, you can begin using AS/400 NetServer to route network printouts from your network to your AS/400 output queues, which may be configured for a directly attached AS/400 printer or a PC printer attached to a networked PC.
OS/400’s Native Print Server Software
The AS/400 Network Print Server is used by AS/400 NetServer to spool print jobs to AS/400 output queues. AS/400 output queues can be configured for printers that are
directly attached to an AS/400, a LAN-attached printer, or a printer attached to a PC in the network. The Network Print Server has been handling the print serving needs for the AS/400 since the first OS/400 release in June 1988. Once AS/400 NetServer has spooled a print job onto an AS/400 output queue (with the help of the Network Print Server), the Network Print Server independently handles routing the spooled file to the destination printer based on the configuration of the writer. The IBM AS/400 Printing IV (GG24- 4389-00) Redbook has more information about printing on the AS/400. This manual can be accessed at the IBM Redbook Web page at http://www.redbooks.ibm.com.
While there are many ways to set up AS/400 NetServer in combination with the Network Print Server to handle your network print serving needs, I will only examine two possible AS/400 NetServer printing scenarios in this article:
• Sending Windows printouts via NetServer to an Advanced Function Printing (AFP) printer directly attached to the AS/400
• Sending Windows printouts via NetServer to a remote ASCII printer (such as a Hewlett-Packard LaserJet) attached to a PC in the network
Using AS/400 NetServer to share these printers with Windows desktop clients requires three steps:
1. Create an AS/400 output queue to direct spooled-file output to your directly attached AFP or PC-attached printer. For printers attached to a TCP/IP PC, you must also have a Line Printer Daemon (LPD) output queue configured and running on the printer PC. The LPD output queue accepts spooled-file output from the network and prints it on an attached printer.
2. Use AS/400 Operations Navigator to create an AS/400 NetServer network print share for the AS/400 output queue you created in step one. This allows your networked PCs to access the output queue.
3. Configure your client PCs to use AS/400 NetServer to send printer output to the target printer via your AS/400 output queue.
Setting Up Your AS/400-to-Network Output Queues
For AFP, use the Create Output Queue (CRTOUTQ) command to create an AS/400 output queue for the directly attached printer. Because your AFP printer is directly attached to your AS/400, OS/400 will already contain a printer device with specific parameters such as device type, class, and model. Therefore, the command to create the output queue could be as simple as the following:
CRTOUTQ OUTQ(QUSRSYS/AFP)
For ASCII printers (such as Hewlett-Packard LaserJet printers) attached to a networked PC for LPD/Line Printer Requester (LPR) printing over TCP/IP, you also use the CRTOUTQ command, but the parameters are different. Because this is a remote printer, you need to specify the remote location, the name of the remote printer queue, the protocol to use for connectivity, and some other information. The remote PC must have a TCP/IP LPD set up to handle the incoming print-serving requests. This is an example of what the command to create the output queue might look like if you were using the TCP/IP LPR for printing to a remote system:
CRTOUTQ OUTQ(QUSRSYS/ASCII) + RMTSYS(‘remotePC’) + RMTPRTQ(‘PCprinter’) +
AUTOSTRWTR(1) CNNTYPE(*IP) + DESTTYPE(*OTHER) TRANSFORM(*NO)
In this example, the remote system is the name of the PC with the attached printer. You can also create this output queue so that it sends spooled files to the TCP/IP address of the networked PC by entering the command as follows:
CRTOUTQ OUTQ(QUSRSYS/ASCII) + RMTSYS(*INTNETADR) + RMTPRTQ(‘PCprinter’) +
AUTOSTRWTR(1) CNNTYPE(*IP) +
DESTTYPE(*OTHER) TRANSFORM(*NO) +
INTNETADR(‘127.0.0.1’)
By specifying *INTNETADR (Inter-net Address) in the Remote System (RMTSYS) parameter, you specify that the remote output sends files directly to an Internet Protocol (IP) address specified in the INTNETADR parameter.
The remote print queue, PCprinter in the RMTPRTQ parameter, is the name of the LPD/LPR print queue on the PC to which the remote writer sends spooled files. A remote writer is used to send spooled files to the remote system. Setting the Autostart Writers parameters to 1 indicates that a remote writer should automatically be started whenever your AS/400 is IPLed. The destination type *OTHER in the DESTTYPE parameter specifies that the remote system is not OS/400-based, and the connection type *IP in the CNNTYPE parameter indicates that TCP/IP will be used to make a connection to the remote system. Because you will be printing from networked PCs to a printer attached to another networked PC, you don’t need to use the host print transform function (*NO in the TRANSFORM parameter), which converts SNA Character String (SCS) spooled files to a User ASCII format.
Sharing the Output Queue with the Network
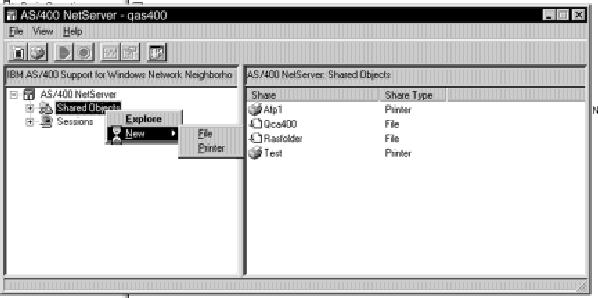
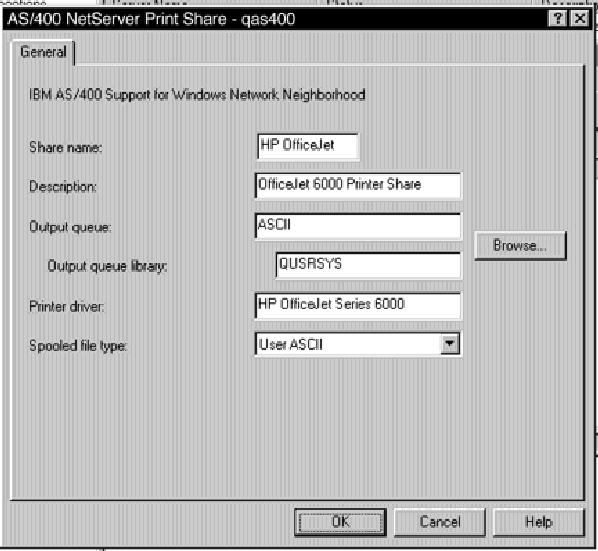
A share is a unique name assigned to an AS/400 output queue that lets remote network users and applications access it. Using AS/400 Operations Navigator V3R2M0 and later (as well as the up-coming IBM Client Access Express for Windows product), the AS/400 administrator can find the Shared Object icon by following the Network/Servers/TCP/IP/AS/400 NetServer path. In V3R1M3, the Shared Object icon is found in the Network-Servers-NetServer path. This brings you to the screen shown in Figure 1. Right-click on the Shared Object icon, and select New and Printer to access the AS/400 NetServer Print Share dialog panel shown in Figure 2. You will need *IOSYSCFG authority to add or change print share information. Changes take effect immediately.
The administrator must enter the print share name of the output queue along with a description of that output queue. The share name is used by network users to set up the remote printer on their PCs. The printer driver name and a spool type must also be entered. The PC client will automatically define the printer using the printer driver specified here. The spool file type determines how the spooled files are created on the AS/400. In this case, the spooled files are created as User ASCII files. Other options include AFP files and SCS files.
Accessing the Print Share from the Client PC
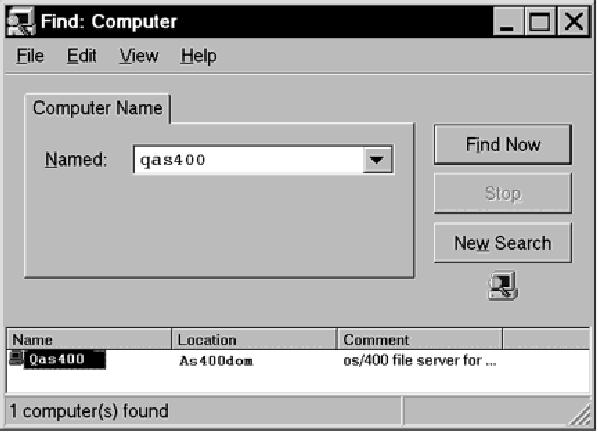
You will need to add a printer for the shared output queue on the PC client. From the client desktop, left-click on Start, Find, and then Computer. On the Find screen, enter the AS/400 NetServer name (usually your AS/400 system name preceded by a Q, e.g., QMCRISC). Figure 3 shows the AS/400 NetServer icon once it is found in the network. Double-click on the AS/400 NetServer icon to list the shares currently configured for AS/400 NetServer. From this list, find the print share icon for the output queue you want to access, and double-click on it to install the printer at your PC. The Windows operating system will set up the printer automatically using the printer driver type specified in the AS/400 NetServer share. Windows will use the Add Printer Wizard to install your printer, so, if you don’t already have the printer driver installed on your computer, you must have the printer installation media to install this printer. If you’re installing drivers for AFP or SCS printers, some standalone printer drivers are available in the Client Access install image in the /QCA400 AS/400 Integrated File System (AS/400 IFS) directory. AS/400 NetServer automatically shares this directory with the network using a share name of QCA400.
Once you have added or installed the printer for the AS/400 print share, you can print to it and use Windows to work with the print jobs you have spooled to the AS/400
output queue. When you pause a print job for an AS/400 NetServer print share, you are really working with the spooled file on the AS/400 output queue. You can pause, resume, or purge a print job or a printer.
AS/400 NetServer names all jobs spooled to the AS/400 output queues QPZLSPRTF. The AS/400 administrator can use this name to immediately identify that AS/400 NetServer was used to spool the print job. Figure 4 shows a Windows PC view of an AS/400 output queue accessed via AS/400 NetServer.
AS/400 NetServer uses the user’s Windows ID and password for authentication when the user requests print services. If the user name matches a corresponding AS/400 user profile, AS/400 NetServer authenticates using this user profile and its password. If the passwords do not match, the user will be prompted with a pop-up window that allows the user to enter the correct AS/400 password.
Printing Tips
AS/400 NetServer can be enabled to support users without a corresponding AS/400 user profile through the use of a guest user profile. Since it is considered a nontrusted user, the guest user profile should have no special authorities. The AS/400 Network Print Server requires that the guest user profile be enabled and have a password, but AS/400 NetServer users will not be prompted for this password. By default, the guest user profile is not configured for AS/400 NetServer. The support can be added through Operations Navigator. Using AS/400 Operations Navigator V3R2M0 and later (as well as the upcoming IBM Client Access Express for Windows product), the AS/400 administrator can find the AS/400 NetServer icon by following the Network-Servers-TCP/IP-AS/400 NetServer path. In V3R1M3, the Shared Object icon is found in the Network-Servers- NetServer path. Right-click on the NetServer icon and select Properties to access the AS/400 NetServer Properties dialog shown in Figure 5. Click on the Next Start tab to specify a Guest user profile. (For the upcoming IBM Client Access Express for Windows product, click on the Advanced tab and the Next Start button.) You will need *IOSYSCFG and *SECADM special authority to change the guest user profile. Changes take effect the next time AS/400 NetServer is started.
If you are able to access the AS/400 NetServer print share but are unsuccessful getting the printer to work online, make sure the Network Print Server is active. Use the Work with Active Jobs (WRKACTJOB) command to verify that there is a QNPSERVD job in the QSYSWRK subsystem. If there is no job in the subsystem, start the Network Print Server with the Start Host Server (STRHOSTSVR *NETPRT) command.
While it is much easier to administer AS/400 NetServer using Operations Navigator, you can also use AS/400 APIs. These APIs can be implemented in CL, COBOL, RPG, C, and C++ programs. AS/400 System API Reference (SC41-5801) contains information about implementing AS/400 APIs. You can find this reference online along with an AS/400 command-line miniguide, which provides instructions for configuring AS/400 NetServer from the command entry line, at http://www.as400.ibm.com/netserver. Using the command-line interface to call the APIs can be cryptic and should only be used by those familiar with the AS/400. Whenever possible, you should use Operations Navigator because the configuration is much easier.
That’s It
With AS/400 NetServer, you no longer need additional proprietary PC software to handle basic print serving needs.
With TCP/IP and an LPD/LPR printer queue on your PC, you can take advantage of AS/400 DASD to spool print jobs for network print requests instead of on the disk drive of the PC with the attached printer. AS/400 NetServer is easy to configure and use and it helps integrate your AS/400 with your Windows clients

Figure 1: It’s simple to add an AS/400 NetServer print share through AS/400 Operations Navigator.

Figure 2: The AS/400 NetServer Print Share dialog panel allows you to share OS/400 output queues for ASCII, AFP, and SCS printers.

Figure 3: Once your NetServer name is found on the network, remote users can access your AS/400’s print shares.
Figure 4: This is a Windows PC view of an AS/400 output queue accessed via AS/400 NetServer.


Figure 5: In the AS/400 NetServer Properties dialog box, you can specify a nontrusted guest user profile to be used by non-AS/400 users for access to shared printers.


 Business users want new applications now. Market and regulatory pressures require faster application updates and delivery into production. Your IBM i developers may be approaching retirement, and you see no sure way to fill their positions with experienced developers. In addition, you may be caught between maintaining your existing applications and the uncertainty of moving to something new.
 IT managers hoping to find new IBM i talent are discovering that the pool of experienced RPG programmers and operators or administrators with intimate knowledge of the operating system and the applications that run on it is small. This begs the question: How will you manage the platform that supports such a big part of your business? This guide offers strategies and software suggestions to help you plan IT staffing and resources and smooth the transition after your AS/400 talent retires. Read on to learn:
LATEST COMMENTS
MC Press Online