How many times has this happened to you? A user comes to you with a Microsoft Excel spreadsheet and wants the data uploaded to your AS/400 in order to do some sort of update. You take the spreadsheet, upload it, and find that half the file is garbage. You then spend the next several hours beating your head on the keyboard because, no matter what you try, that darned spreadsheet won’t upload correctly. I went through this so many times that I finally took matters into my own hands and wrote a program that I affectionately call “The Uploader.”
What Makes Your Program So Different?
Ah, grasshopper, that’s a good question. The answer, plain and simple, is that I know what an AS/400 programmer wants in an uploaded file. The Uploader is a fairly simple yet extremely versatile Visual Basic (VB) program. Its function is to read an Excel spreadsheet, create a physical file on an AS/400 that corresponds to the spreadsheet, and then write the data to the physical file. The physical file that is created has the same field sizes as the spreadsheet. By using the Component Object Model (COM) controls that Excel exposes, The Uploader is able to determine the field sizes before transferring the data. The benefit of this is that you don’t end up with a “flat” file or arbitrary field lengths. Knowing the field sizes before uploading the file is a tremendous advantage. For example, it gives you the ability to call a program to process the data without recompiling it.
What Are the Prerequisites?
When I originally wrote the program, the user had to have Client Access and Windows installed on the PC in order to use it. The first version called several CL programs in order to create the physical file on the AS/400. This process had pros and cons. The nice part was that it allowed you to specify a unique record format. The bad part was that you had to have Client Access installed for it to work. The new version presented here requires only Windows, an ODBC provider, and Excel to run. By using SQL, I eliminated the need for Client Access, thus making this a much more portable application. The program now requires only that you have an ODBC driver that can communicate with your AS/400.
I wrote The Uploader using VB 5.0 (you can also use VB 6.0 to work with the project). However, you do not have to have VB on your PC for it to work properly unless you want to play around with the source code. The code I have provided is composed of two elements: the VB project that contains the VB source code and an executable file that can be installed on PCs not equipped with VB. If you don’t have VB, you need to create the ODBC data source name (DSN) MYAS400 on your PC that points to your AS/400. Finally, you will need a fast network if you are planning to transfer extremely large files. This is certainly not the fastest file transfer method out there, but it is very flexible.
How Does It Work?
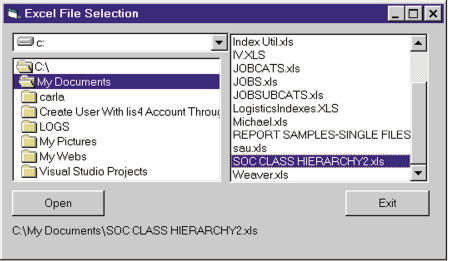
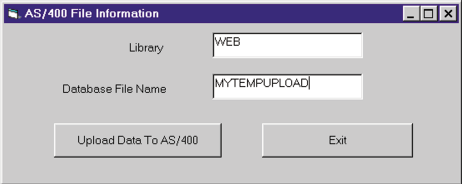
The code that powers The Uploader is actually very simple. First, The Uploader presents the screen shown in Figure 1. This screen is a VB form that allows you to choose which spreadsheet to upload. Once you have selected the spreadsheet to upload and clicked the Open button, The Uploader uses the Workbooks.Open method to open the Excel spreadsheet. Figure 2 shows the second form that appears, after the spreadsheet is opened, into which you input the name of the physical file you want to create and the library name. The final step is to press the Upload button; the spreadsheet is transported to your AS/400.
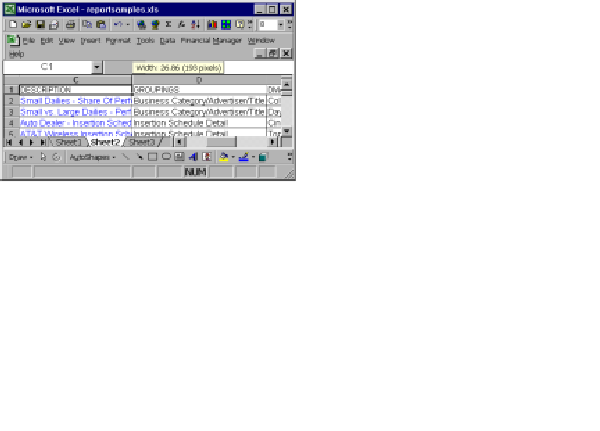
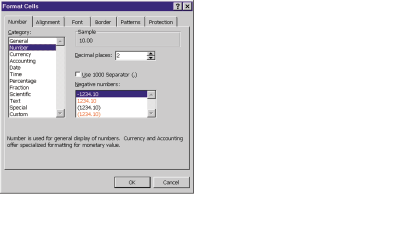
Before using The Uploader, it is important that you prepare your spreadsheet for import. First, make sure that the data you wish to upload is in the first sheet of the Excel spreadsheet, usually called Sheet1. Spreadsheets can have multiple data sheets in one spreadsheet; however, The Uploader will only access the first sheet. Next, make sure that all data is contiguous (that is, no blank cells in the first row of data to be imported) and that the cells are wide enough to hold all of the data. To make a column of cells wider, place your mouse pointer on the line between the cells, hold the left mouse button down, and drag the column divider until the column is as wide as the widest data you need to import. Finally, change the formatting of each column to reflect the data type of the column. To do this, click the column header to highlight the column and then select the Format Cells menu item. Select the Number tab from the resulting dialog box and choose General if the column contains text data or Numeric if the column contains numeric data. For numeric data, make sure you set the number of decimal places that The Uploader should use when transferring the data. Figure 3 and Figure 4 show how to set field sizes.
The Code Behind the Scenes
The code for The Uploader is available from the MC Web site (www.midrangecomputing.com/mc), so feel free to download it and follow along if you have Microsoft’s Visual Basic handy. Form 1 is an extremely basic VB form, so I’m not going to go into much detail on it. All it does is retrieve the proper path name for the spreadsheet and open it. This occurs via the Workbooks.Open and Workbooks.Application.Visible = True statements. Setting Workbooks.Application.Visible equal to true displays the selected spreadsheet. This is a good example of the functionality of the COM controls available in Excel. While this program uses VB, any language that is COM-compliant, such as Delphi or FoxPro, could perform the same operations.
The FileInfoFrm form and the DA400Links.cls file are where most of the “action” occurs. Most of the code behind the FileInfoFrm form lies behind the Upload Data button. When the user clicks this button, the subroutine CmdUpload_Click executes. The first thing the subroutine does is perform some rudimentary error checking, such as making sure that the file name and library name have been entered. If all the tests have been passed, the subroutine begins the process of determining the attributes of the spreadsheet. The Uploader scans across the columns of the spreadsheet until it finds a cell that has no value. This is how it determines how many fields to create in the physical file. While it is scanning, it also records the size and type (it supports general and numeric) of each field. The Uploader will read the width of the cell and use it for the field size when it creates the physical file on the AS/400. Fields described as general are considered alpha, while the
numeric tag is used to define numbers. The physical file created on the AS/400 will correspond exactly to what The Uploader has defined in the spreadsheet. The Uploader does not support data types, such as dates, but you could easily implement such data if necessary.
Once The Uploader knows all the properties of the Excel spreadsheet, it begins creating the AS/400 physical file. The first step is to build the SQL Create Table command that will create the physical file. The loop that builds the statement is somewhat complicated, so I’ll try to shed a little light on what it is doing. (The best way to see what is happening here is to run the program in debug mode and step through it.) First, The Uploader creates a field name by appending the cell number to the characters FLD to create names, such as FLD1 and FLD2. Next, The Uploader determines whether the field is alpha or numeric. If the field is alpha, it sets the width of the field to the width of the column as defined in the Excel spreadsheet. Make sure that you make each text column wide enough to hold all of the text data; otherwise, you will receive an error while loading your data. The Uploader gets access to the width of the column by interrogating the ColumnWidth property of the Range object. The program then concatenates a string such as CHAR(xx), in which xx is the column width.
Quantifying numeric columns is a little harder. The program uses the InStr (In String) function to calculate the number of decimal places required to hold the spreadsheet data. When The Uploader first scanned the spreadsheet, it determined the format of the cell and saved the NumberFormat property for each cell in an array called TypeArray. If the cell was formatted as a general number, the string in TypeArray for that cell would be GENERAL. If the cell was formatted as numeric with three decimal places, the format of the string would be 0.000, in which the number of zeros to the right of the decimal point indicates the decimal precision of the number. To find this number in code, first find the position of the decimal point in the string using the InStr function. If the position is greater than zero, subtract the position from the length of the string. Otherwise, set the number of decimal places to zero.
At this point, The Uploader begins executing subroutines in the DA400Links.cls file. The first step is to create the physical file. You accomplish this by executing the CreateTable subroutine in the class file. CreateTable simply executes the SQL Create Table statement you created in the previous section of the code.
Once you have created the file, it is time to load the data. The LoadFile subroutine reads the selected Excel spreadsheet row by row and maps the data to the fields in the newly created AS/400 physical file. It writes the data to the file using the Insert Into SQL command. Once the LoadFile subroutine has written all of the rows, it destroys the connections and displays a message box that indicates that the upload is complete.
At this point, you can either upload another spreadsheet or exit the program.
Surgeon General’s Warning
While The Uploader has never killed anyone, it can be a bit temperamental. The reason for this is that I never designed this application for distribution purposes. It only knows how to upload the first sheet in an Excel spreadsheet file. Also, you must format cells as either numeric or general, because The Uploader does not support any other types. Also, it doesn’t like macros. And you had better be sure that the columns are wide enough to hold the data of your largest cell in a column; otherwise, you will get errors during an upload. A final limitation is that the AS/400 field names become FLD1, FLD2, etc. However, you can overcome all of these limitations; I have just never found any need to do so. I’m sure that a creative programmer could overcome these limitations in a short period of time.
As with any program, there is always a way to make it better. The Uploader is certainly no different. While I specifically designed this program to upload spreadsheets to an AS/400, it is capable of uploading to any machine for which you can create a data source name. This would require some modification to the SQL statements, but it would be easy
enough to do. The Uploader could easily support more data types, such as dates and times. Also, you could add multiple sheet support. This would give you the ability to upload several files in one upload. You could add more sophisticated error checking; in the current implementation, for example, if you upload a file that already exists, an SQL error occurs. You could also check data before upload to make sure it is valid. For instance, all fields defined as numeric should contain numbers. And yet another improvement you could make is to allow the user to select the DSN at runtime. This would provide the flexibility to allow the program to access multiple machines. You would need to make the code that builds the SQL statements a little “smarter,” but you could do this easily.
Up, Up, Upload Away!
The Uploader incorporates quite a few client server concepts. If you are interested in doing client/server programming with VB, this is a good application for getting your feet wet. It shows you how to establish AS/400 connections, create tables, and execute database updates. It also shows you how to use COM, ActiveX Data Object (ADO), and SQL from a VB program. I’m sure you will find this a useful application for your business or personal use. In case you don’t find it useful, it also comes with a money-back guarantee!
References and Related Materials
Downloadable Code:
"Upload" code and/or
full setup without code for people who don't have VB.
• A Fast Path to AS/400 Client/Server Using AS/400 OLE DB Support: publib.boulder.ibm.com/pubs/pdfs/redbooks/sg245183.pdf
• About.com Visual Basic resources: www.about.com/compute/visualbasic/mbody.htm
• “Ask the SDK Wizard,” David Mayle, MC, September 1999

Figure 1: When The Uploader executes, Form 1 appears, prompting you to select the spreadsheet you wish to upload.

Figure 2: After you’ve opened the spreadsheet, you will use this form to input the information for the physical file that will be created on the AS/400.

Figure 3: To set the field size, left-click on the bar separating the columns and set the desired width.

Figure 4: To define a cell as alpha (general) or numeric, use the Format Cells dialog box.


 Business users want new applications now. Market and regulatory pressures require faster application updates and delivery into production. Your IBM i developers may be approaching retirement, and you see no sure way to fill their positions with experienced developers. In addition, you may be caught between maintaining your existing applications and the uncertainty of moving to something new.
 IT managers hoping to find new IBM i talent are discovering that the pool of experienced RPG programmers and operators or administrators with intimate knowledge of the operating system and the applications that run on it is small. This begs the question: How will you manage the platform that supports such a big part of your business? This guide offers strategies and software suggestions to help you plan IT staffing and resources and smooth the transition after your AS/400 talent retires. Read on to learn:
LATEST COMMENTS
MC Press Online