Do you have SNA Server? Do you have Client Access for Windows 3.1 (CA/400)? Are you frustrated with trying to achieve a stable CA/400 connection in your Windows for Workgroups (WFW) environment? Would you like to be able to use CA/400 remotely over a Windows Remote Access Service (RAS) dial-up connection? Do you like the functionality provided by CA/400? Well, now you can have it all.
For some time, it has been possible to run CA/400 in a WFW environment using Microsoft's DLC protocol driver (for more information, see "Client Access/400 Coexistence with Windows for Workgroups," MC, July 1995). The problem is that this solution works only for direct LAN connections (i.e., token-ring or Ethernet). It doesn't work over computers connected with RAS. It also means that you have to load yet another protocol into your WFW configuration, which just consumes more precious resources (albeit a nominal amount). With the release of the SNA Server 2.11 for Windows NT, Microsoft added the capability to use the SNA Server client for Windows 3.1 as the router for IBM's CA/400. This is good news to frustrated network administrators, because it means they can have the best of both worlds.
There's no doubt that IBM's CA/400 provides excellent client functionality for V3R1 machines. It includes two terminal emulation packages-RUMBA/400 and PC5250. It also includes other functionality, such as shared folders, file transfer, and application update. But what I really like about CA/400 is the ODBC driver. This ODBC driver is very flexible and very fast. I think it is one of the best drivers available for the AS/400.
It is theoretically possible to run CA/400 remotely using the Async and SDLC connection types supplied by IBM. However, these connection types won't allow you to use your WFW computer on your network at the same time, since CA/400 uses its own connectivity options rather than those built into WFW. This means that if I'm connected to MC's AS/400 and I want to check my mail on the server, I have to disconnect and dial the server. Fortunately, there is a better way.
The SNA Server client router is a very robust method for tying Windows clients to the IBM SNA architecture. SNA Server is a Microsoft Backoffice application that runs on a Windows NT server (for more information on SNA Server, see "LAN Gateways and Microsoft's SNA Server," MC, March 1995). As detailed in that article, SNA Server's many benefits include providing a single point through which your clients connect to your AS/400 and offering flexible networking protocols, hot backup, load balancing, and others.
Connecting to SNA Server from a Windows client is very easy. The software sits on top of whatever supported networking protocol-NetBEUI, IPX, or TCP/IP-you are using and does the translation between your SNA applications and the network. It doesn't require you to configure any special networking protocols. As mentioned before, it also works over RAS. This is especially important to me, since I frequently telecommute.
The steps to getting these two systems to interact are detailed in Microsoft Knowledge Base article ID Q135318. This article explains in step-by-step detail how to get the two working together and can be obtained from the Internet at http://www.microsoft.com/ kb/bussys/sna/q135318.htm.
Two files supplied with the SNA Server 2.11 Windows 3.X client allow CA/400 to work over an SNA Server connection. These files, EHNAPPC.DLL and EHNRTRW.DLL, replace their IBM counterparts of the same name. The steps in the configuration process ensure that you use these files instead of the IBM-supplied files.
The first step in the installation process is to use the SNA Server 2.11 CD to install the SNA Server Windows 3.X client software. You do this by running the Setup program in the clientswin3x directory. For more information on installing the SNA Server client in a Windows environment, see "Implementing Microsoft's SNA Server in the AS/400 Environment," MC, April 1995.
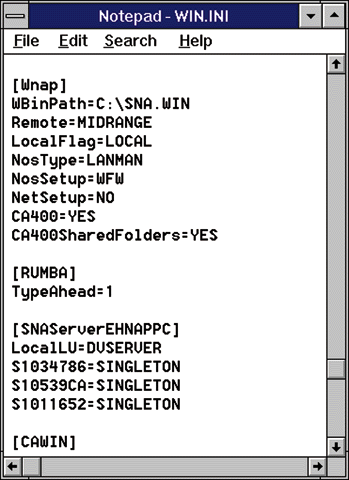
Once you've installed and configured the client software correctly, you need to make a couple of changes to your WIN.INI file (see 1). Use Notepad to edit this file. In the [Wnap] section, change the CA400 and the CA400SharedFolders entries to YES. Also add the [SNAServerEHNAPPC] section. Set the LocalLU entry to the name of your local Advanced Program-to-Program Communications (APPC) LU alias. Make sure the LocalLU entry is in capital letters.
Once you've installed and configured the client software correctly, you need to make a couple of changes to your WIN.INI file (see Figure 1). Use Notepad to edit this file. In the [Wnap] section, change the CA400 and the CA400SharedFolders entries to YES. Also add the [SNAServerEHNAPPC] section. Set the LocalLU entry to the name of your local Advanced Program-to-Program Communications (APPC) LU alias. Make sure the LocalLU entry is in capital letters.
After making these changes to the WIN.INI file, install CA/400. Unfortunately, if you have already installed CA/400 and you haven't installed the Other Router option, you will have to reinstall. To reinstall, you need to delete or rename your existing Client Access directory (usually called CAWIN). You also need to delete or comment out any Client Access-related DEVICE statements from the [386Enh] section of the SYSTEM.INI file. Once you've done that, you're ready to reinstall.
Use the installation diskettes and run the Install program. When the Router Selection dialog box comes up, be sure to select Other Router as one of the routers to load. Continue with the installation process until you get a message saying that Windows will be restarted. Do not press OK! Instead, leave the CA/400 installation program running and return to the program manager by pressing Alt+Tab. Then use the file manager to rename the EHNAPPC.DLL file in the CAWIN directory to EHNAPPC.IBM. Also rename the EHNRTRW.DLL file in the same directory to EHNRTRW.IBM. Doing this ensures that the SNA Server version of these files is used instead of the IBM version. Go back to the CA/400 installation screen and press OK to restart Windows.
Once Windows is restarted, the CA/400 setup program will continue. When asked for the connection type, if you are on V3R1M1, choose Other Router. If you are using V3R1M0, choose None. On the next screen, enter the name of the AS/400 that you defined as the Remote LU Name in the SNA Server's setup. Continue the installation and Windows will restart.
When Windows has finished restar-ting, go to the CA/400 for Windows program group and run the Setup program by double-clicking on its icon. At this point, you get the SNA Server sign-on screen. After completing the sign-on, you can install the applications you want just like a standard CA/400 installation.
Since I was eager to use the ODBC driver, I installed it and the Database Access program. I also installed RUMBA. When I tested everything, I found that everything worked except for the ODBC driver. A few calls to Microsoft got me the information I needed to get the ODBC driver working. The ODBC driver requires that you partner the QSERVER mode with the remote LU on SNA Server for the machine you want to connect to.
Before defining the QSERVER mode to SNA Server, you need to verify that it exists on your AS/400. Do this by entering the Work with Mode Descriptions (WRKMODD) command:
WRKMODD MODD(QSERVER)
If you get a screen allowing you to work with the mode, the mode is defined on your system. If you get a screen saying No Mode Descriptions Selected, you need to define it. Use the Create Mode Description (CRTMODD) command to create the mode. (For more information on modes, see "What's in a Mode?" MC, August 1995.)
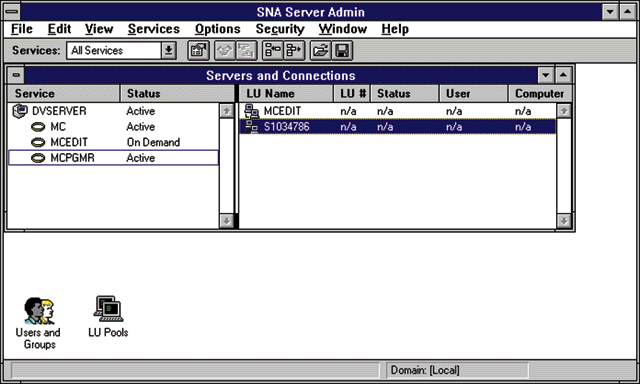
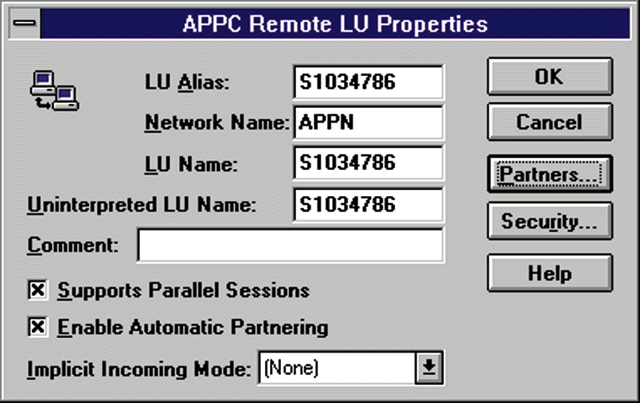
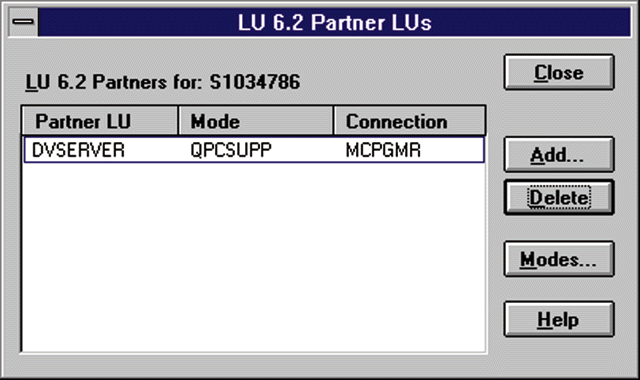
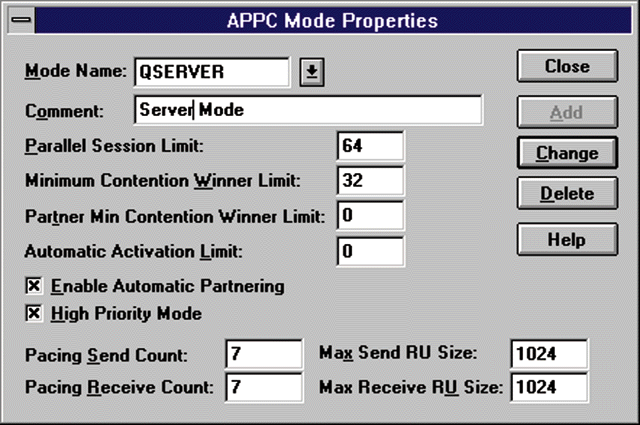
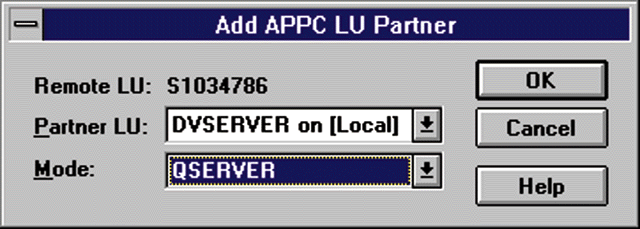
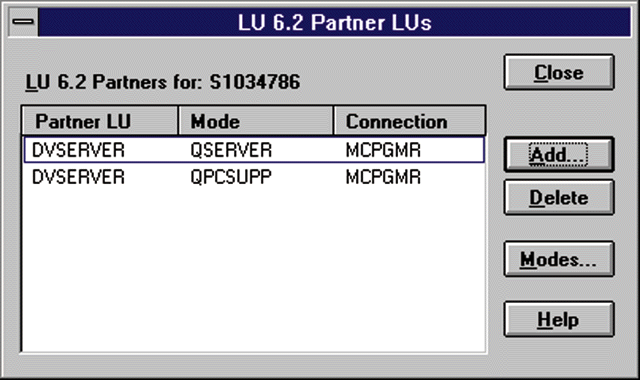
To define the QSERVER mode within SNA Server, use the SNA Server Administration program (see 2). Select the LU and then select Properties from the Service menu. This brings up the APPC Remote LU Properties dialog, as shown in 3. Select the Partners... button to bring up the list of available partners (see 4). If you don't see a partner with the QSERVER mode in the list, you need to add one. Press the Modes... button to bring up the dialog in which you can edit the modes (see 5). On this screen, enter the parameters for the QSERVER mode. I left the parameters that came up with this screen at their default values. Make sure the Enable Automatic Partnering option is selected and press the Add button. You'll be returned to the LU 6.2 Partner LUs screen (see 4), where you select the Add... button. This brings up the Add APPC LU Partner dialog (see 6). Select the partner LU and the mode to be added (QSERVER), and select the OK button. You are returned to the LU 6.2 Partner LUs screen, where you should see the partner LU with the QSERVER mode listed (see 7). This completes the configuration changes. You'll have to stop and restart SNA Server to have the new configuration recognized.
To define the QSERVER mode within SNA Server, use the SNA Server Administration program (see Figure 2). Select the LU and then select Properties from the Service menu. This brings up the APPC Remote LU Properties dialog, as shown in Figure 3. Select the Partners... button to bring up the list of available partners (see Figure 4). If you don't see a partner with the QSERVER mode in the list, you need to add one. Press the Modes... button to bring up the dialog in which you can edit the modes (see Figure 5). On this screen, enter the parameters for the QSERVER mode. I left the parameters that came up with this screen at their default values. Make sure the Enable Automatic Partnering option is selected and press the Add button. You'll be returned to the LU 6.2 Partner LUs screen (see Figure 4), where you select the Add... button. This brings up the Add APPC LU Partner dialog (see Figure 6). Select the partner LU and the mode to be added (QSERVER), and select the OK button. You are returned to the LU 6.2 Partner LUs screen, where you should see the partner LU with the QSERVER mode listed (see Figure 7). This completes the configuration changes. You'll have to stop and restart SNA Server to have the new configuration recognized.
Now, I'm in hog heaven. I can easily connect to our AS/400s using the Client Access ODBC driver. I can integrate with our network easily at the same time. And I can do it remotely. All from Windows for Workgroups 3.11. Life is good.
Brian Singleton is an associate technical editor for Midrange Computing. He can be reached by E-mail at
Integrating SNA Server with Client Access
Figure 1: The WIN.INI File
Integrating SNA Server with Client Access
Figure 2: The SNA Server Administration Screen
Integrating SNA Server with Client Access
Figure 3: The APPC Remote LU Properties Dialog
Integrating SNA Server with Client Access
Figure 4: The List Of LU Partners
Integrating SNA Server with Client Access
Figure 5: Adding the QSERVER Mode
Integrating SNA Server with Client Access
Figure 6: Adding the Mode to the Partner LU
Integrating SNA Server with Client Access
Figure 7: The QSERVER Mode on the LU 6.2 Partner LUs Screen


 Business users want new applications now. Market and regulatory pressures require faster application updates and delivery into production. Your IBM i developers may be approaching retirement, and you see no sure way to fill their positions with experienced developers. In addition, you may be caught between maintaining your existing applications and the uncertainty of moving to something new.
 IT managers hoping to find new IBM i talent are discovering that the pool of experienced RPG programmers and operators or administrators with intimate knowledge of the operating system and the applications that run on it is small. This begs the question: How will you manage the platform that supports such a big part of your business? This guide offers strategies and software suggestions to help you plan IT staffing and resources and smooth the transition after your AS/400 talent retires. Read on to learn:
LATEST COMMENTS
MC Press Online