I was working with a client a while back when we found a bug in a well-known software package. We called tech support and told them we needed a fix right away. Their solution was to fax us 30 pages of code changes. YEESH! It took longer to find all the programs and key in the fixes by hand than it would have taken FedEx to arrive with a magnetic tape the next day. What a mess that turned out to be, and it’s not an experience I ever want to repeat.
Thankfully, I don’t have to, and neither do you. If you need to get code or any other kind of electronic data to a client in a hurry, there’s a much better way than faxing it. Why not use your AS/400 to connect to an ISP and send your data as an email attachment? I’d like to show you how to create a Point-to-Point Protocol (PPP) user profile connection that will get your AS/400 connected to your local ISP. Once you’ve done so, you’ll want to learn how to use your AS/400 as an email client so you can actually send those updates and everything else to other folks on the Internet. However, using AS/400 email is a complete topic in itself; for that information, I recommend Chris Peters’ article “Email: The AS/400’s Unsung Hero” (MC, November 1999).
What’s Required
What do you need to connect your AS/400 to the Internet? Not much. Here’s the complete list:
• V.24 communications card in your AS/400 for communicating with the modem
• Asynchronous modem
• Account with an ISP
• OS/400 V3R7 or later
• Client Access/400 (CA/400) Operations Navigator (OpsNav)
Let me explain each of these items in a bit more detail. First, you need a V.24 communications card so your AS/400 can communicate with your modem. If your system came with an Electronic Customer Support (ECS) modem, then it most likely came with a
V.24 communications card. You can quickly find out by using the Work with Hardware
Resources (WRKHDWRSC) command and entering a value of *CMN for the Type
parameter. In the resulting list, you’ll see all the communication features on your system. You should see an entry for a V.24 port. You can also get this information by opening the Configuration menu under OpsNav and then clicking on Service/Hardware Inventory/Communications.
Your ECS modem should be capable of supporting the AT command set as well as asynchronous commands. If it’s one of the IBM 7852-400 modems that come with newer systems, then you’re safe. If it’s an older modem or a non-IBM modem, then you may need to check the owner’s manual to see if it supports the AT command set. You may also be able to use an external PC modem, but if you do, be aware that you may need a special cable from IBM. Check the IBM Knowledge Base (www.as400.ibm.com) first for documents containing information on this.
You also need an account with a local ISP. Using the method described in this article, you will connect your AS/400 to the Internet by first connecting to a local ISP, just as you’d do with your home computer.
Your AS/400 needs to have TCP/IP services on it, and TCP/IP must be configured for all this to work, so you need to be at OS/400 V3R7 or above. Midrange Computing has published dozens of articles over the years on how to configure TCP/IP on your AS/400. Finally, you really should have a PC connected to your AS/400 via Client Access/400, which has Operations Navigator installed on it. You can configure a PPP user profile using a green-screen session, but it’s much easier doing it through OpsNav.
Your Configuration Choices
The first thing you need to do is configure a point-to-point line description, which the PPP user profile will use to connect to the ISP. After you accomplish this, you need to configure the PPP user profile. Now, if you were using a green-screen, this configuration would be two separate steps using the Create Line Description (PPP) (CRTLINPPP) and the Work with Point-to-Point TCP/IP (WRKTCPPTP) commands. You may choose to do it this way, but I’ll tell you right now that OpsNav is much easier!
Configuring PPP Using OpsNav
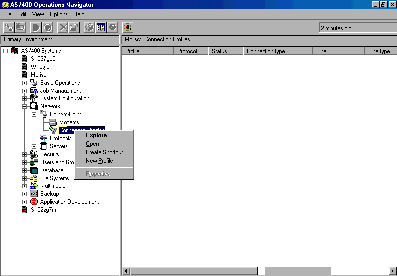
On a PC connected to your AS/400, open OpsNav and drill down to the Network entry. Now, double-click on Network, and you’ll see a list that includes entries for Point-to- Point, Protocols, and Servers. Double-click the Point-to-Point entry, and two more entries appear: Modems and Connection Profiles. Right-click on Connection Profiles, and a context menu displays as shown in Figure 1. Select New Profile, and you’re all set to create the PPP profile and the PPP line description.
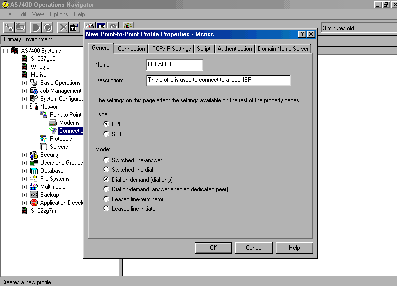
Now, you should see a panel like the Point-to-Point Profile Properties panel shown in Figure 2. If you don’t see this panel, click on the General tab on this panel. On this General panel, enter a name for your new PPP profile. In this example, I’ve called my profile LOCALISP so that I’d remember that I used this PPP profile to connect to my ISP. I also gave it an appropriate description.
For the Type parameter, you want to use a PPP connection. The other option, Mode, should be set to Switched Line Dial when you are using this PPP profile for periodic connections to your ISP. If, on the other hand, you wanted to maintain a permanent connection to your ISP, then you’d probably want to rent a lease line to cut down on expenses. Be aware that the Express client version of CA/400 uses a drop-down box rather than radio buttons for these options.
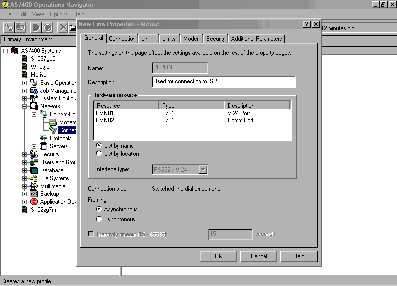
On the Connection panel (click the Connection tab to get here), add the telephone number of your local ISP. The Connection panel is also where you enter the information to create a new PPP line. To do this, enter a new, unique name in the Name box in the middle of the window for the PPP line and then click on the New button. This will open a window like the one shown in Figure 3.
On this panel, enter a description for the PPP line and select a communication resource it will use. Make sure you select the resource that your V.24 port uses. You may also need to select the modem, by clicking on the Modems tab, as well as ensure that the modem uses the AT command set. Do a little exploring on your own to see what is available. When you’re all done, click on the OK button to accept your changes. The new PPP line is created on your AS/400, and OpsNav returns you to your Point-to-Point Profile Properties panel.
Next, you need to configure the TCP/IP settings. When you click the TCP/IP Settings tab, a couple of dialog boxes labeled Local IP Address and Remote IP Address appear. If your ISP has assigned a specific IP address to your account (not very likely), you can enter that IP address in the Local IP Address dialog box. Otherwise, select the Dynamically Assign radio button. The Remote IP Address is the IP address of your ISP. In the Remote IP Address dialog box, enter the ISP’s IP address. An important final step remains. Click on the Routing button, and the Routing panel opens. Make sure you select the Add remote system as the default radio button. If it’s not selected, you’ll never be able to communicate with your ISP.
The only other tab you need to be concerned with here is the Authentication tab. If your ISP requires you to have a valid user ID and password on its system, which is probable, you’ll need to pass it to them each time you initiate a new connection. You’ll enter this information on the Authentication panel. To do this, select the Enable local system identification check box and then select the PAP only radio button. PAP stands for Password Authentication Profile. Most ISPs use PAP for login security. However, yours may use Challenge-Handshake Authentication Protocol (CHAP). If you’re not sure, try PAP first. It’s easier than calling your ISP and trying to explain to a PC nerd what you’re trying to do! Enter your valid ISP user ID and password.
That Was Painless
That’s all there is to it. If you run into problems, check out the AS/400 Knowledge Base. It contains quite a few documents on how to configure and use PPP. Now, just save your settings and make sure your modem is set to Asynchronous mode. Click on the PPP user profile you just created and then click on the big green Start Profile button in the tool bar to connect your AS/400 to your ISP. (Clicking on File, then Start from the OpsNav menu bar also starts the connection.) You should be connected to your ISP quickly. Now all you need to do is configure Simple Mail Transfer Protocol (SMTP) and POP3 on your AS/400 to start sending and receiving email via the Internet. What fun!
References and Related MaterialS
• AS/400 Electronic-Mail Capabilities, Redbook (SG24-4703-00)
• “AS/400 TCP/IP Configuration Is Easier Than You Think,” D. Ellis Green, AS/400 Network Expert, May/June 1999
• “Configuring TCP/IP on the AS/400,” Kris Neely, MC, August 1995
• “Email: The AS/400’s Unsung Hero,” Chris Peters, MC, November 1999
• IBM Intro to PPP and SLIP Web page: www.as400.ibm.com/tstudio/tech_ref/ tcp/ppp/indexfr.htm
• IBM TCP/IP for AS/400 Web page: www.as400.ibm.com/tcpip
• “OfficeVision/400 and Green-screen Users’ Participation in AS/400 Email,” Chris Peters, MC (Web Edition), November 1999, www.midrangecomputing.com/mc/ article.cfm?titleid=a211&md+199911

Figure 1: Create a new PPP profile by selecting New Profile from the OpsNav context menu.

Figure 2: The parameters you need to enter to create a PPP profile are pretty basic.

Figure 3: Configuring a PPP line description is a snap with OpsNav.


 Business users want new applications now. Market and regulatory pressures require faster application updates and delivery into production. Your IBM i developers may be approaching retirement, and you see no sure way to fill their positions with experienced developers. In addition, you may be caught between maintaining your existing applications and the uncertainty of moving to something new.
 IT managers hoping to find new IBM i talent are discovering that the pool of experienced RPG programmers and operators or administrators with intimate knowledge of the operating system and the applications that run on it is small. This begs the question: How will you manage the platform that supports such a big part of your business? This guide offers strategies and software suggestions to help you plan IT staffing and resources and smooth the transition after your AS/400 talent retires. Read on to learn:
LATEST COMMENTS
MC Press Online