How easy is it to configure a PC5250 printer session to redirect AS/400 printouts to desktop PC printers attached to your network workstations? While most people can configure a standard PC5250 printer session, a number of finer points are involved in formatting output, selecting a printer emulation method, and gaining tighter control over the PC5250 printing process. The easy-to-understand techniques in this article can help you improve the quality of your PC5250 printouts, reduce the workload on your AS/400 or PC, and help you quickly set up and maintain your PC-based AS/400 printers.
In this article, we take a look at AS/400 printer emulation using the PC5250 emulator that comes standard with Client Access for Windows 95/NT (an updated version of PC5250 will be available with the new Express Client product, but the basics in this document still apply). We’ll examine the different types of printer emulation you can select with PC5250, list the pros and cons of each one, and pass on some other tips for flawlessly printing AS/400 reports on a PC printer.
Printer Emulation vs. Network Printing
So what is printer emulation anyway? Printer emulation involves configuring a locally attached PC printer to function as an AS/400 printer, as shown in Figure 1. Sometimes, printer emulation gets confused with network printing, which occurs when you allow an AS/400-defined printer to be used by a PC user for printing PC application reports. In this article, we will focus solely on printer emulation techniques used inside a PC5250 printer session. (Even though Network printing is beyond the scope of what we are discussing here, you can still read about it in “V4R4 AS/400 NetServer Bulks Up AS/400 Network Printing” elsewhere in this issue.)
Three Different Methods of Printer Emulation
OK, now that we’ve defined printer emulation, it should be easy to set up that perfect printer emulation session in PC5250, right? Wrong! First, you need to decide what
type of print emulation you want to perform. With PC5250, printer emulation comes in three different flavors, outlined as follows and as illustrated in Figure 2:
• Host Print Transform (HPT). With this technique, the AS/400 generates the PC printer data stream on the AS/400 by using the AS/400 spool file, its spool file attributes, and a predefined AS/400 PC printer workstation configuration object (WCO). (For information on workstation configuration objects, see the article “Fill the Gaps with Workstation Customization Objects” in this issue. For information on setting up PC5250 to use HPT with a workstation customization object, see the sidebar “Hey! Workstation Customization Objects Work with PC5250, Too!” in that same article.) The AS/400 then sends the PC printer data stream to the PC to print (the left-hand portion of the diagram shown in Figure 2).
• Printer Definition Table (PDT) Transform. Using this technique, the AS/400 generates an SNA Character Stream (SCS) data stream using the AS/400 spool file, the spool file attributes, and the AS/400 printer device description and sends it to the PC. The PC takes that SCS data stream and, using a PDT file, generates the PC printer data stream (the middle portion of the Figure 2 diagram). PDT is similar to HPT except that the printer data stream transformation is done on the PC and the PDT is created from a Printer Definition File (PDF) that resides on the PC instead of on a workstation configuration object that resides on the AS/400.
• Graphical Device Interface (GDI). In this method, the AS/400 also generates an SCS data stream by using the AS/400 spool file, spool file attributes, and printer device description, but when this data stream is received by the PC, the PC generates a generic (called meta) print file. This print file is used in conjunction with the Windows print driver supplied by the printer manufacturer to generate the PC printer data stream (the right-hand portion of the Figure 2 diagram).
The Pros and Cons of Each Method
OK, now that you know there are three different methods to format AS/400 spool files to print on PC5250 printer sessions, which method is best for your users? The answer is a hardy “It depends.” Here are the pros and cons of each method:
• HPT. The biggest advantage of HPT is that you can print AS/400 office documents with embedded images. You can also print AFP documents on your PC printers. HPT also produces more consistent output when different emulators and print drivers are used.
However, HPT has one weak point that may be important to you. Since the AS/400 report is transformed to a PC printer data stream on your AS/400, HPT consumes additional CPU cycles to accomplish that task, which usually isn’t a problem on a moderately used AS/400.
• PDT. PDT’s biggest advantage is that it bypasses both your AS/400 and your Windows printer drivers. Your PC5250 printer session does most of the work. PDT is usually a faster printing solution, and it gives you greater flexibility in what the printer can do versus standard Windows print drivers. In addition, Client Access offers a workstation function (WSF) printer function tables (PFT) conversion program. If you are converting from the Windows 3.1x or DOS versions of Client Access, you can run the PCSPFC.EXE program in your Windows 95/NT client directory to convert previously existing PFT files to a PDF file that can be converted to a PDT. This is a tremendous advantage in maintaining compatibility with your older Client Access installs as they upgrade to Windows 95/98/NT and start using PC5250.
The disadvantages of PDT are that it cannot print AS/400 office documents with embedded images and cannot print AFP documents. In addition, newer printers don’t automatically come with updated PDTs, so you can use another PDT if it gives you the output you want or modify an existing PDT to create a variant PDT.
• GDI. Because GDI works in conjunction with your Windows print drivers, it supports PostScript, Windows-specific printers, and any printer for which Windows has
already defined a print driver. It’s the default standard for PC5250 printing, and it is the easiest of the three methods to use. Its disadvantages are that it cannot print AS/400 office documents with embedded images and it cannot print AFP documents.
Deciding on a Method
When you set up a PC5250-emulation session, consider these few, easy guidelines in choosing among the three different methods.
Above all, choose the method that makes your printouts look the best for your intended readers. If your printouts look acceptable by using GDI with an existing Windows print driver, use GDI and move on to the next project. However, if you need to “tweak” your printouts (e.g., add color when an item is printed in bold), then you must use HPT or PDT to make your changes in the WCO or PFT to get your output to look the way you want it.
So, the first decision point is how much you want to configure your printer sessions. If your printouts look acceptable and you only want to configure a PC5250 session, use GDI. However, if you want to customize your printouts to use features that aren’t available in the standard Windows printer or if you need high-quality output (for customer mailings, for example) that you can’t get with GDI, then you need to use HPT or PDT.
Choosing between HPT and PDT produces another set of questions. Do you want your printout conversions to occur on your AS/400 or on your PC? Which device has more resources to deal with the overhead? (Mostly, this comes down to a question of whether your AS/400 has enough cycles.) Generally speaking, new workstation configuration objects (WCOs) are provided more often than the PDT files. If there’s a WCO but not a PDT for a specific printer, that may influence your decision as well. However, we’ve usually found that the last version of a printer driver will work with a newer model (e.g., an HP4 PDT will work for HP5 printers), so you can use older PDTs with newer printers. There is also a management issue involved in distributing and maintaining customized WCOs and PDTs. Do you want to customize a centralized WCO on your AS/400 or customize a PDT that needs to be distributed to every PC that uses that particular session?
Remember that HPT and PDT printer emulation are essentially the same thing. The main difference is that HPT configuration and conversion occur on your AS/400, while PDT configuration and conversion occur on your PC. Aside from that, you are performing the same functions in two different environments. In deciding between the two, choose the one that produces the best results and that you are most comfortable maintaining.
Configuring PC5250 for Windows 95/NT
Because it is the easiest and most commonly used PC5250 emulation method, we will describe how to set up printer emulation using the GDI method. For PDT configuration, refer to the Client Access/400 PC5250 Reference Guide listed in the “Additional Reading” section. HPT configuration is discussed in “Fill the Gaps with Workstation Customization Objects” in this issue of MC.
Although it may seem simple, the first thing you need to do to set up a PC5250 printer emulation session is to ensure you have a printer configured in Windows to print to your target LPT port. If the printer driver you want to use is not installed on your Windows desktop, use the Windows printer wizard to install it by double-clicking on My Computer, opening the Printers folder, and selecting Add Printer. If the print driver is unknown to Windows, make sure you have the print driver installation media handy and install the printer to the desired port.
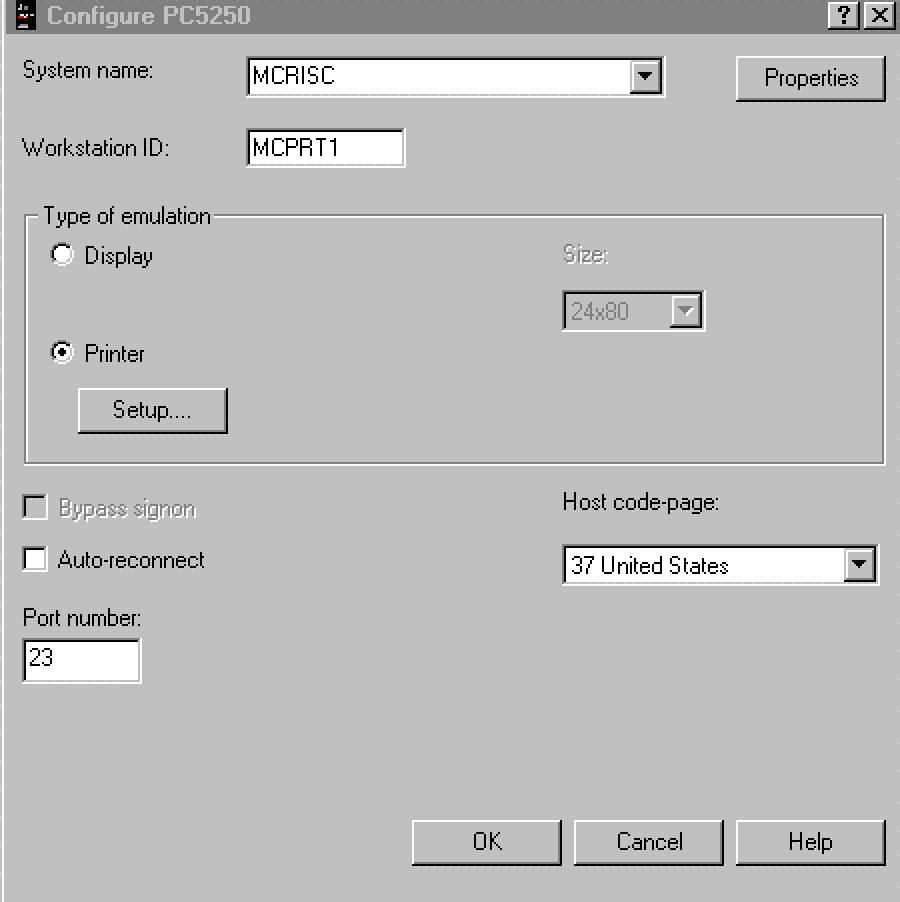
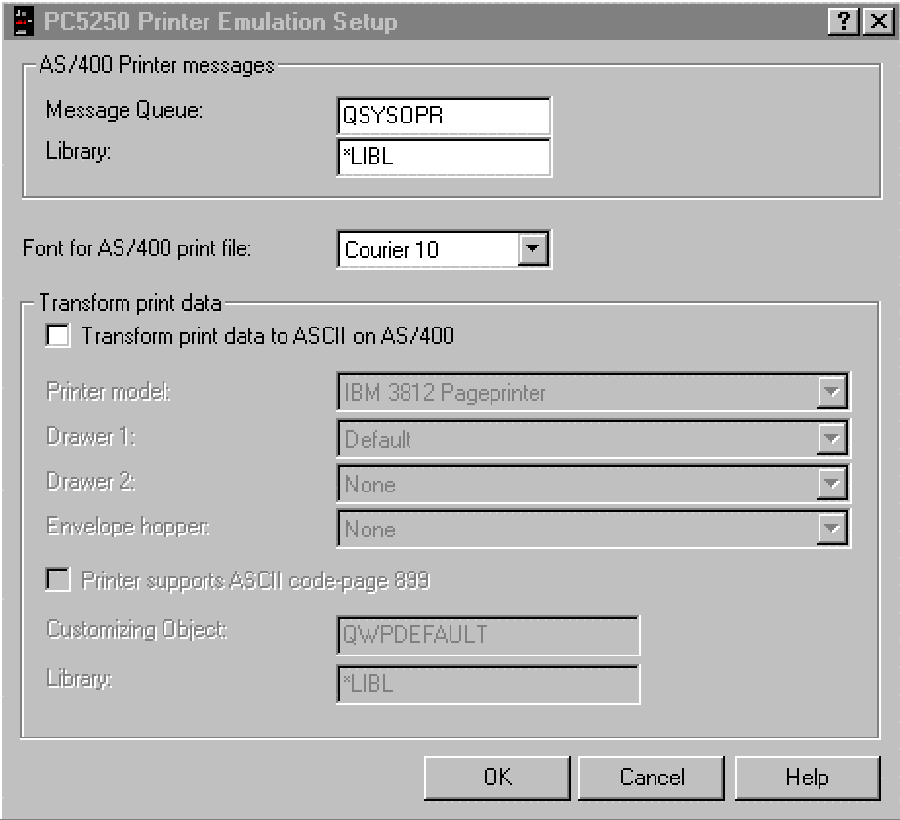
Next, configure a new PC5250 printer by clicking on the Start or Configure Session icon in the Client Access Accessories folder and follow the instructions until you get to the Configure PC5250 screen shown in Figure 3. On this screen, enter your AS/400 system name, specify a Printer ID in the Workstation ID field (this will become your AS/400 printer name), click on the Printer radio button, and then click on the Setup button. This will take you to the PC5250 Printer Emulation Setup screen shown in Figure 4. (Note:
If you are using TCP/IP, please ensure you have the host and client prerequisites listed in Information APAR II10918, which can be found on the CA/400 Web page at www.as400.ibm.com/clientaccess.)
For GDI printers, you can generally ignore most of the parameters on this screen. You may want to use the AS/400 Printer Message fields (Message Queue and Library) to specify an AS/400 message queue to which to send the printer messages. You may even want to set up a special message queue specifically for the user “in charge” of the PC that controls this printer so that a notification may be sent to that user when the printer needs attention. You can also change the default font for printouts by clicking on the Font for AS/400 print file drop-down box and selecting a new font. After you make your changes, click on OK to go back to the Configure PC5250 screen, and click OK again to start your printer.
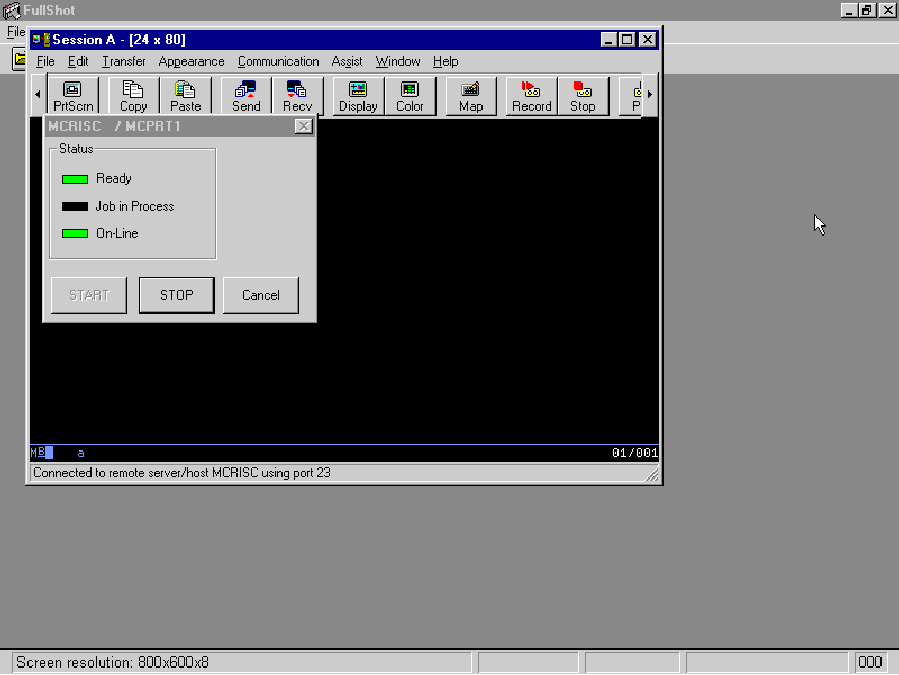
The host session will then be started as shown in Figure 5. This session panel will be displayed with the printer Status panel containing the Hostname of the AS/400 and the local Workstation ID. If a Workstation ID was not specified in the configuration, the printer device will be autocreated by the system, and the autocreated name will be displayed in the Status panel (for TCP/IP/IP printers, this assumes that the QAUTOVRT system value is not equal to zero).
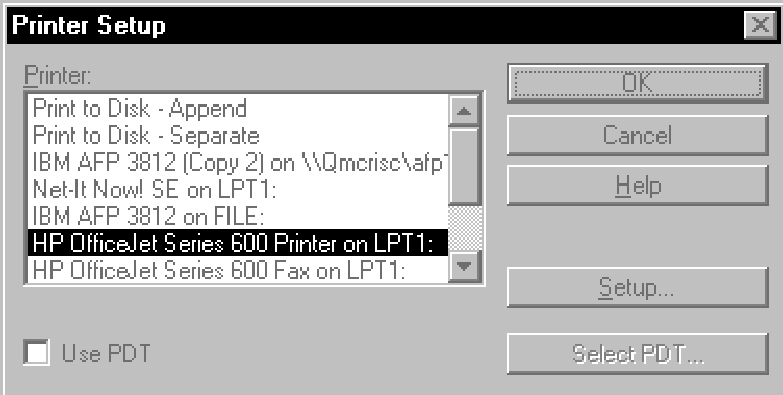
However, you are not finished yet. You need to ensure that your GDI printer is assigned to the correct printer port. You do this by clicking on the File option in the PC5250 menu bar and selecting Printer Setup from the drop-down menu. This brings you to the Printer Setup screen in Figure 6. You’ll see a list of printers that are defined on your Windows desktop. Click on the printer to which you want your AS/400 output to print to and click on the OK button. This assigns your newly created PC5250 printer to that Windows print driver and printer port.
The final step is to save your printer emulation Profile as a .WS file. Once again, select the File option on the PC5250 menu bar and click on the Save As option on the drop- down menu. Fill in the name you want to give your workstation profile (for example, becky.ws. You don’t need to fill in .WS as the extension because .WS is PC5250’s default extension). Click on OK to save the profile, and a screen will appear asking if you want to add an icon for this session to a folder. We recommend that you select YES; PC5250 will then prompt you to place the icon where you want it to be stored. You can place the icon in the Startup folder, the Client Access folder, your Windows desktop, or in another location that is convenient for your users. When you click on OK, PC5250 will inform you of where the icon was stored. The next time you (or your user) click on the icon, PC5250 will start this printer session.
Other Adjustments You Can Make
There are a few other parameters you can set that will help you use GDI printer emulation more effectively. We suggest you do the following:
1. Set the Page Rotation (PAGRTT) parameter in your AS/400 spool files that will be printed on your PC5250 session to Automatic Rotation (*AUTO) or Computer Output Reduction (*COR). This action has the following effect:
• When set to *AUTO, the output is reduced to fit on the page, but it is only rotated to landscape mode if the text will not fit on the page in portrait mode.
• When set to *COR, printer output will always be reduced by the following algorithm and the printout will always rotate to landscape mode:
Characters per inch (CPI) is divided by 75 percent (CPI / .75)
10 CPI =13.3 CPI
12 CPI = 16.7 CPI
15 CPI = 20 CPI
Lines per inch (LPI) is divided by 70 percent (LPI / .70)
6 LPI = 8.6 LPI
8 LPI =11.4 LPI
Spool file page rotation values can be set by using the AS/400 Override Printer File (OVRPRTF) command before an AS/400 print file is created.
2. Using a text editor, add the following line to the PC5250 PCSWIN.INI file or the *.WS file for a specific printer session:
 [Printers]
BestFit=Y
This action allows for Enhanced Computer Output Reduction (COR) that will print up to 198 characters on an 8.5-inch by 11-inch sheet of paper. BestFit=Y also adjusts the width and depth to fit the page. It centers and scales the output to fit the page within all page orientations (portrait and landscape as well as automatic and COR). Finally, Enhanced COR provides a better fit on 132-column output on a page when you are printing lines in a 10-characters-per-inch font. To use Enhanced COR scaling as described here, you need to ensure that your Client Access for Windows 95/NT installation is at the following service packs or greater:
• V3R2M0 = SF50134
• V3R1M3 = SF48155
• V3R1M2 = SF47544
Now, Let’s Print!
By reviewing this material, you now have all the basic information you need to configure PC5250 printer sessions on your users’ Windows PCs. However, PC5250 is not a static product and there are many more exciting offerings on the way to help you more easily manage your AS/400-to-PC printing configurations. The coming months will bring PC5250 announcements , and we’ll be covering them here and in the pages of the AS/400 Network Expert newsletter. Keep watching. PC5250 printer emulation is easy now, and it will become even easier later.
Additional Reading
The following are useful publications to refer to when you are setting up printer emulation using Client Access/400 and PC5250. All of the AS/400 publications listed here can be found on the Internet at as400bks.rochester.ibm.com.
AS/400 ASCII Work Station Reference V3R1 (SA41-3130-00, CD-ROM QBKAW01)
AS/400 Printing III, Redbook (GG24-4028)
AS/400 Printing IV, Redbook (GG24-4389)
Client Access/400 PC5250 Reference Guide (SC41-3553-01, CD-ROM QBKAK601)
Inside AS/400 Client Access for Windows 95 (SG24-4748-00, CD-ROM E230HF00)
OS/400 Printer Device Programming V3R2 (SC41-3713-01, CD-ROM QBKAUJ02)
OS/400 Workstation Customization Programming V3R2 (SC41-3605-01, CD-ROM QBKAQ602)
In addition, when you install Client Access, it also installs the Client Access Online User’s Guide on your PC. You can use this guide to look up different settings and information about PC5250 printers.
Other Web-based Printer Information
Microsoft’s print troubleshooting page at www.support.microsoft.com/support/kb/articles/Q128/3/45.asp
IBM’s printing systems support site at www.printers.ibm.com
IBM’s eNetwork Personal Communications home pages at www.software.ibm.com/enetwork/pcomm
CA/400 Service Pack available on the Internet via the Client Access Web site at www.as400. ibm.com/clientaccess (Select the Service Pack option and navigate to the most recent service for your CA/400 release.)
Lexmark printer site at www.lexmark.com
Figure 1: Not to be confused with network printing, printer emulation involves configuring a PC printer to function as an AS/400 printer
Spool file and Attributes
SCS Datastream RAW FILE Printer Device Description META FILE
+
Figure 2: The three different methods of PC5250 printer emulation
GDI Print Driver
HPT
PDT
 |
 |
 |
 |


 Business users want new applications now. Market and regulatory pressures require faster application updates and delivery into production. Your IBM i developers may be approaching retirement, and you see no sure way to fill their positions with experienced developers. In addition, you may be caught between maintaining your existing applications and the uncertainty of moving to something new.
 IT managers hoping to find new IBM i talent are discovering that the pool of experienced RPG programmers and operators or administrators with intimate knowledge of the operating system and the applications that run on it is small. This begs the question: How will you manage the platform that supports such a big part of your business? This guide offers strategies and software suggestions to help you plan IT staffing and resources and smooth the transition after your AS/400 talent retires. Read on to learn:
LATEST COMMENTS
MC Press Online