Help is available! Learn about the handy Function Assist feature available in the DB2 Web Query Developer Workbench tool.
DB2 Web Query is loaded with built-in functions to help you transform your raw DB2 for i data into something more meaningful and useful for use in your reports, graphs, dashboards, and compound documents. Some of these functions have multiple parameters and a limited number of acceptable values, so unless you have been working with the product for some time, it may not be obvious how to implement the correct format, syntax, and values to make them work. Wouldn't it be nice if there was an interface complete with help text and examples to guide you through the process of defining these functions?
Well, hot diggity, there actually is! If you have the DB2 Web Query Developer Workbench tool installed on your PC, help is right at your fingertips in the Synonym Editor tool! The Synonym Editor has many nice help-related features, perhaps the most useful of which is a little gem called Function Assist.
To use Function Assist, open DB2 Web Query Developer Workbench, find your synonym and open it in the Synonym Editor. An example is shown below.
Figure 1: Open the Synonym Editor. (Click images to enlarge.)
In order to use DB2 Web Query built-in functions, you must create either a Define or Computed field in your synonym. These are virtual columns that are not actual fields in your database file but can be based on a field from the file (or even another virtual column). While they are similar, there is a difference between a Define and a Computed column: the expression in a define column is executed for every row in the result set returned by the DB2 Web Query report, while a computed column's expression is executed for only each row from the grouped/aggregated result set after the aggregation has been performed. For more information on this, see Tyler Even's TechTip: "Exploit DB2 Web Query's Defined and Computed Fields."
For this article, we are going to create a Define column that uses the DATEADD function to calculate the date two weeks before the value of the ORDERDATE field in our database. To do this, click on the Add Define smart icon. As shown in the example below, it looks like a lowercase "f" with a thick blue underscore.
Figure 2: Click on the Add Define icon.
In the name text box, type the name of your new define field (call it TwoWeeksBeforeOrder), and click on the Functions tab:
Figure 3: Enter your define field and click on Functions.
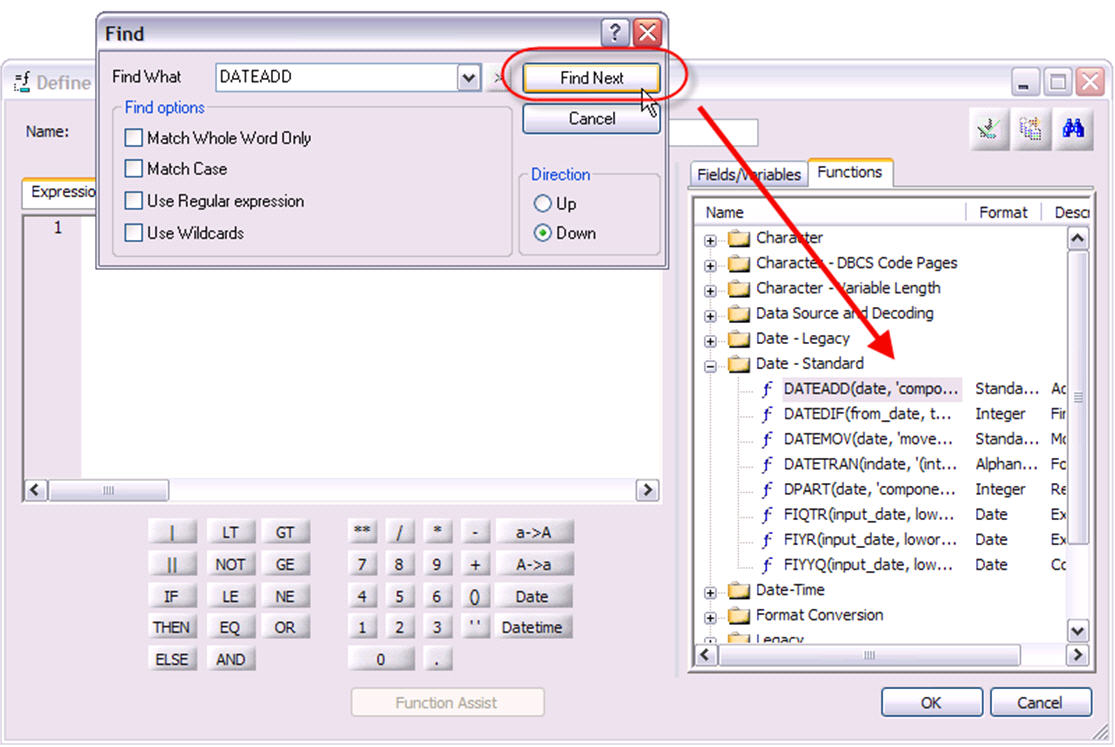
You can either try to locate the desired function by expanding the function categories (provided you know which category it falls under) or—an easier way—use the Find icon as shown below.
Figure 4: Locate the desired function with the Find icon.
Simply type the name of the function (or even the first few letters of it) and click Find Next. If a match is found, that function will be highlighted in the expanded category it is under. This is shown in Figure 5 below.
Figure 5: Your match is highlighted.
If you want help on the selected function, select it and click Help from the right-mouse-click context menu. As example is shown below.
Figure 6: Right-mouse-click for help.
As you can see in Figure 7, this action opens up a new window titled Function References with information about the specific function you selected.
Figure 7: Get information about the function you selected.
From here, a wealth of information is available about that function, including details about the syntax, valid parameter values, useful tips, and some examples to help guide you. Other functions can be researched by utilizing the Search and Index features in the left pane of this window. You can even build and save a list of Favorite searches!
Once you close the Function References window, you will return to the Define Calculator window. Simply double-click on the function to present it in the Function Assist window.
Function Assist is an extremely useful interface that will help you decide what values to specify for each of the function's parameters. If the parameter value is limited to a set of values, a drop-down list interface is presented for that parameter. In our example, the first parameter for DATEADD is the date field that you want to increment. If you click on the drop-down list twisty icon as shown in Figure 8, it will display all of the date columns from the synonym. Simply select the one that you want.
Figure 8: Function Assist will help you choose values for the function's parameters.
The next parameter for DATEADD is the 'component_code'. Again, click on the drop-down twisty to see the valid parameter values. In the bottom pane, more information is displayed about the parameter.
Figure 9: A drop-down list shows valid parameter values.
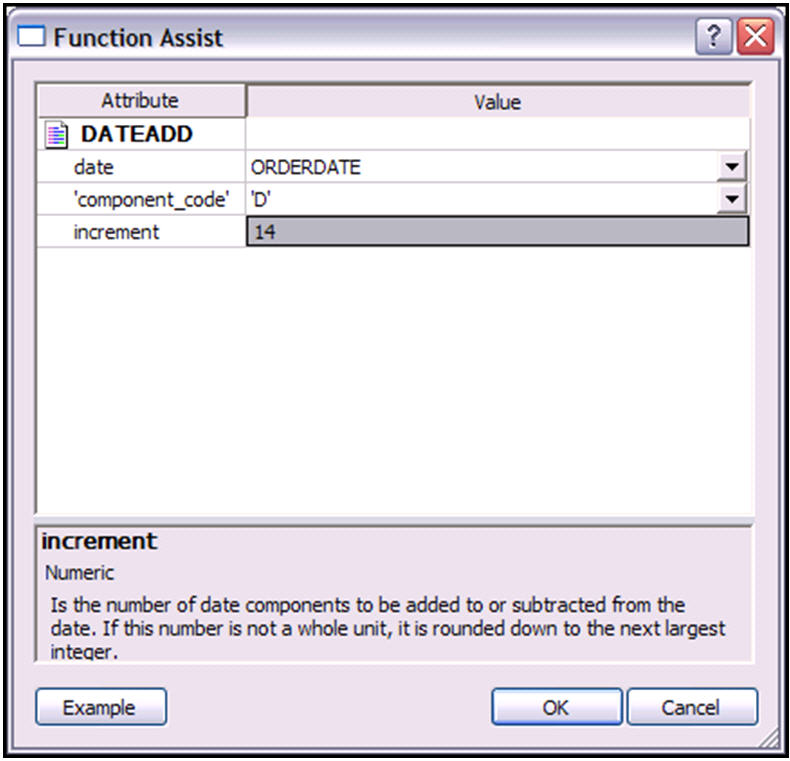
In our example, we want to add 14 days (two weeks) to ORDERDATE, so select 'D' for day units.
Finally, specify the number of days you want to increment ORDERDATE by. In our example, we specified 14, as shown below.
Figure 10: Choose the number of days to increment by.
If you wanted to see some examples that use the function, simply click on the Example button, as shown in Figure 11.
Figure 11: See examples that use the function.
The Example dialog is displayed. This gives you one or two examples, often with some other useful information specific to this function.
Figure 12: Here's your example, along with other helpful information.
Click OK to close this window and return to the Function Assist Window. Once you are satisfied with the parameter values, click OK to return to the Define Calculator window.
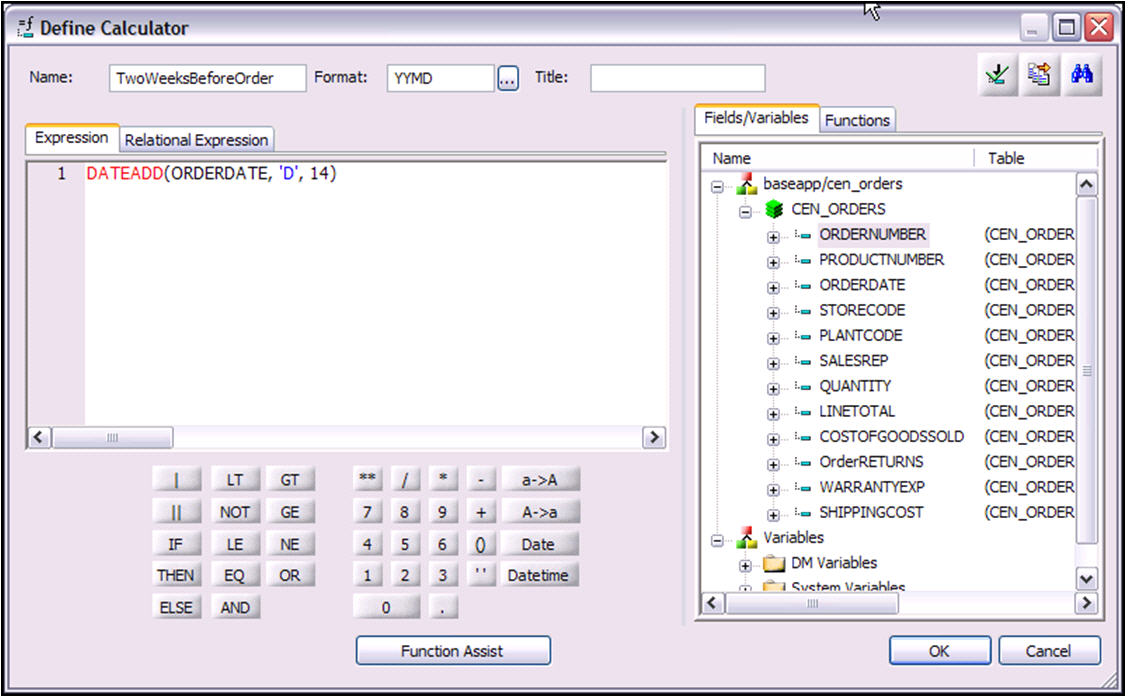
Figure 13: Return to the Define Calculator menu.
As you can see, all of the values specified from Function Assist are plugged into the Define Calculator.
You can bring up the Function Assist window directly from the Define Calculator field as well. This is often more efficient than going through the above Search process (particularly if you already know the name of the function you want to use). Simply type the function in the Expression pane (be sure to include both the left and right parenthesis after the function name) and click on the Function Assist button as shown in the example below using the SUBSTR function.
Figure 14: Bring up Function Assist from the Define Calculator window.
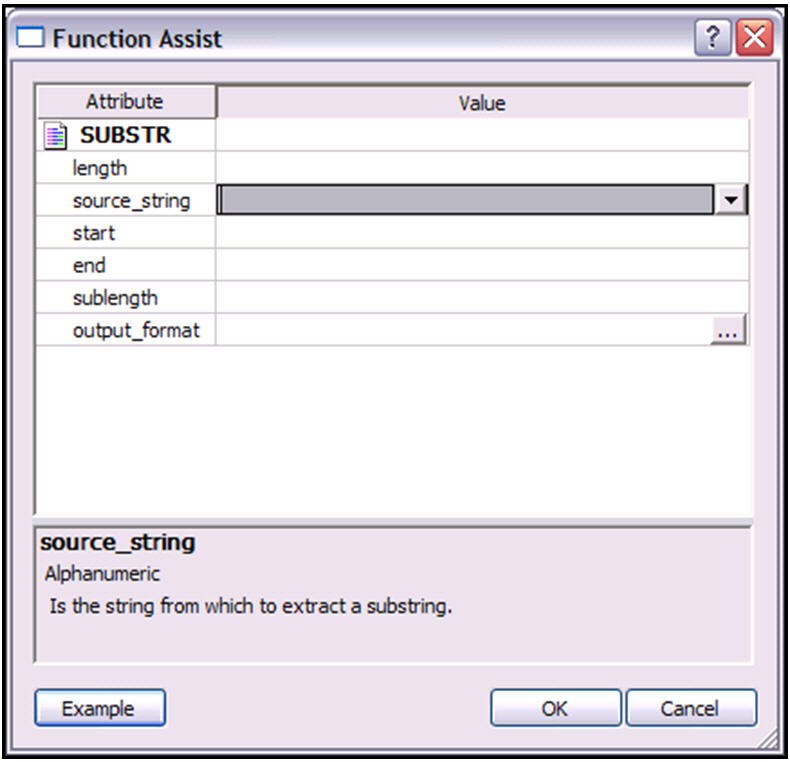
The (hopefully) now-familiar Function Assist dialog window is displayed for the SUBSTR function:
Figure 15: Your Function Assist window shows the chosen function.
Unfortunately, not all of the Function Assist and help features described above are available in the report development tools (such as Report Assistant and InfoAssist). However, you can use the Developer Workbench Synonym Editor and the techniques described to help you formulate the correct function syntax and values. Once you have them, simply copy/paste the expression into the Define Fields in Report Assistant and InfoAssist. Easy, pleasy, lemon-squeezy! If you currently do not have DB2 Web Query Developer Workbench installed, you can install a free 70-day trial version and take it for a test drive The trial version can be downloaded here:
http://www.ibm.com/services/forms/preLogin.do?lang=en_US&source=swg-idwq
Hopefully, this tip has shown you the wide variety of helpful options that are available to lend you a hand while adding DB2 Web Query functions to your synonyms and reports. If you have other questions on the product or are looking for other tips and techniques, visit IBM's online forum, where you can post your questions to the experts. Just use the Forum link on the IBM DB2 Web Query developerWorks Web site.
Once registered, you can post your questions! You can even subscribe to the forum and get email alerts whenever there is a response to your question. Or if you just can't get enough DB2 Web Query information, you can subscribe to all the threads!
as/400, os/400, iseries, system i, i5/os, ibm i, power systems, 6.1, 7.1, V7, V6R1


 Business users want new applications now. Market and regulatory pressures require faster application updates and delivery into production. Your IBM i developers may be approaching retirement, and you see no sure way to fill their positions with experienced developers. In addition, you may be caught between maintaining your existing applications and the uncertainty of moving to something new.
 IT managers hoping to find new IBM i talent are discovering that the pool of experienced RPG programmers and operators or administrators with intimate knowledge of the operating system and the applications that run on it is small. This begs the question: How will you manage the platform that supports such a big part of your business? This guide offers strategies and software suggestions to help you plan IT staffing and resources and smooth the transition after your AS/400 talent retires. Read on to learn:
LATEST COMMENTS
MC Press Online