Learn how a recent enhancement to DB2 Web Query provides a way to customize a granular yet secure reporting environment.
V1R1M2 of IBM DB2 Web Query for i was a significant version, one that offered new features such as the InfoAssist development tool as well as the Oracle JD Edwards Application Adapter. One feature that has flown a bit under the radar is a security enhancement named DBA (short for Database Administrator). This new feature is found in the synonym editor in DB2 Web Query Developer Workbench. It provides a way to configure a secure reporting environment that is both granular and flexible.
So how might you be able to leverage this new feature? First some background: For years, many shops secured their data by employing a technique often referred to as "application-level" security. This simply meant that access to the data was governed by rules defined in the both the program code and storage objects, such as database tables (files) and data areas. These rules were enforced by one or more programs that were part of an application. When a user profile logged into the IBM i, the initial program (application) was called and was in complete control of what information was provided to the user. Based on the rules defined in the database and the application, the user was presented only specific menu options and data. Since users were effectively fenced by the application, no other access to the data was available, and consequently, setting up object-level security was often deemed as unnecessary.
This implementation worked splendidly for 5250-only access (and still does), but times have changed, and those same customers need other interfaces to access their data (such as Web applications and tools like DB2 Web Query) without compromising data security. While setting up object-level security would certainly secure the data, such a venture often requires much time in planning, testing, and implementation and is fraught with risk as it could introduce problems in a production environment. If not implemented correctly, it could disable applications that rely exclusively on application-level security and prevent "authorized" users from accessing their data. Therefore, from purely a DB2 Web Query reporting perspective, what is needed is a similar approach: application-level security. And that's exactly what DBA is.
Using DBA, a DB2 Web Query administrator can define DB2 Web Query metadata access/restrictions on a per-user basis at the following levels:
- Segment (File)
- Field
- Value (Row)
- No Print (Column)
Each of these options provides a different level of access control. To give you more clarity on each of these levels, we'll later go through each one in detail. But first, let's review how to set up DBA.
Setting Up DBA
DBA works by securing different elements in the DB2 Web Query synonym. This means its rules are enforced for all reports, graphs, and dashboards that are based on that synonym. This centralization of business logic is yet another shining example of the benefits of having a metadata layer!
To illustrate this, let's go through an example. For this example, we have a basic set of reports that are based on a synonym over the ORDERS table. This synonym contains join segments to the tables INVENTORY, STORES, and PLANT. A sample report looks something like the example shown in Figure 1.
Figure 1: A typical, non-secured report looks like this.
Assuming that there are no specific object-level permissions defined over those tables, all users that have access to the domain (in which the report resides) would see the same reports and would see the same results in each of those reports. This may be fine and dandy in most cases, but what if you would like a little more granular control over which users see what in those reports? You guessed it: Set up DBA!
To do this, open DB2 Web Query Developer Workbench, find your synonym, and open it. In the synonym editor, click on the DBA icon located in the toolbar, as shown in Figure 2.
Figure 2: Launch the DBA interface. (Click images to enlarge.)
The DBA palette will be displayed on the right side. Right-mouse click on the segment name and select Insert>DBA, as shown in Figure 3.
Figure 3: Insert a DBA into the synonym.
By default, your user profile (in my case, COBBG) will be the synonym's "DBA" as shown in Figure 4.
Figure 4: The synonym's DBA has been defined.
This simply means that user profile COBBG is the DBA for this synonym, and as such, has full control over the synonym's security. This profile can assign access rights to other users. Once a DBA has been assigned and the synonym saved, no other user can run reports based on the synonym unless explicitly granted access by the DBA. So let's do that.
In our example, we want only four users to be able to run reports over this particular synonym. We would also like to restrict each of those four users in different ways. To add users to the synonym's access list, right-mouse click on the DBA name and select Insert>User, as shown in Figure 5.
Figure 5: Provide synonym access to other users.
By default, a placeholder user profile name (USER0001) is inserted. We don't have any user profiles with that name, so rename it by selecting Rename from the right-click menu (Figure 6).
Figure 6: Rename the user.
The first user we want to add is KATHY, so rename the user to that profile name (Figure 7).
Figure 7: KATHY is now the user.
Next, we grant user KATHY read access to the synonym by selecting Insert>Read Access from the right-click menu (Figure 8).
Figure 8: Provide read access to KATHY.
The result is shown in Figure 9.
Figure 9: KATHY now has access to the synonym.
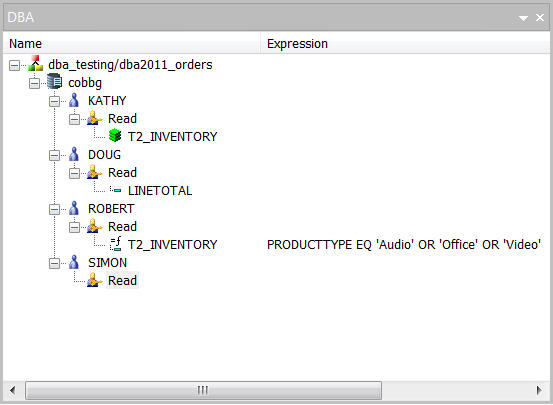
Follow the above steps to grant read access to user profiles DOUG, ROBERT, and SIMON. When finished, it should look like Figure 10.
Figure 10: Four users have read access to the synonym.
Once the synonym is saved, only those four users (and the DBA) can run any report, graph, or dashboard based on the synonym. Such an attempt from any other user would result in the following error:
(FOC047) THE USER DOES NOT HAVE SUFFICIENT ACCESS RIGHTS TO THE FILE:
DBA2011_ORDERS
|
Note: Reports based on other synonyms are not affected by these changes. |
Segment Restriction
This is a good start, but we have security requirements that require more granularity. The INVENTORY file has fields that contain sensitive data that we do not want to expose to user profile KATHY. So we would like to prevent KATHY from running reports that contain any field from that particular join segment. To do this, we set up a DBA Segment Restriction.
Under KATHY, select Read, right-mouse click, and select Insert>Segment Restriction, as shown in Figure 11.
Figure 11: Insert a Segment Restriction.
By default, the primary segment (T1_ORDERS) is selected. To change this to the INVENTORY segment, first make sure the Properties palette is displayed (above the DBA dialog). If it's not, click on the Properties icon in the toolbar, as shown in Figure 12.
Figure 12: Open the Properties palette.
In the Properties dialog, click on the drop-down list for segment NAME and select T2_INVENTORY, as shown in Figure 13.
Figure 13: The Properties palette offers options.
Once you're done, you see the new Segment Restriction under KATHY (Figure 14):
Figure 14: KATHY now has a segment restriction in the synonym.
Save the synonym. Now, when KATHY tries to run our sample report (which contains the field PRODUCTTYPE in the INVENTORY segment), the request fails and she sees the following errror:
(FOC052) THE USER DOES NOT HAVE ACCESS TO THE FIELD: PRODUCTTYPE
Field Resriction
A Segment Restriction is great if you want to block all of the fields in a particular file/join segment from a specific user profile. But what if there are just one or two fields in the segment you want to restrict access to? The Field Restriction is just the ticket!
The process is similar to the Segment Restriction: Simply select Read under the user profile and select Insert>Field Restriction, as shown for user profile DOUG in Figure 15.
Figure 15: Insert a Field Restriction.
Next, go the the Properties dialog to select the specific field you want to restrict. In our example below, we select the LINETOTAL field (Figure 16).
Figure 16: Select the field to restrict.
Now DOUG has field restriction for LINETOTAL (Figure 17).
Figure 17: DOUG now has a Field Restriction.
After saving this change, user profile DOUG sees the following error when attempting to run a report that contains LINETOTAL column.
(FOC052) THE USER DOES NOT HAVE ACCESS TO THE FIELD: LINETOTAL
Value Restriction (Row-Level Security)
Segment and Field Restrictions are quite handy, but as you can see, they're both "all or nothing" types of implementations. That means that once the restriction is in effect for a user, that user cannot run the report at all. Wouldn't it be nice if you could allow the report to run but hide only certain rows and/or certain columns from those users? Both can be accomplished! A DBA Value Restriction is a way to implement row-level security for that synonym.
In our case, we would like user profile ROBERT to be able to successfully run the report and see all of the fields in the report, but restrict him to only see rows in the tables that meet certain selection criteria: where the PRODUCTTYPE field equals Audio, Office, or Video.
To set up a Value Restriction, select Read under ROBERT and select Insert>Value Restriction from the right-click menu. This is demonstrated in Figure 18.
Figure 18: Insert a Value Restriction.
Next, from the Properties dialog, select the name of the segment that contains the field you want to restrict and then click on the VALUE ellipsis icon as shown in Figure 19.
Figure 19: View the Value Restriction properties.
The Value Selection dialog is displayed. From the list of Fields/Variables on the right, find and double-click the PRODUCTTYPE field as shown in Figure 20.
Figure 20: Select the field of the Value Restriction.
This action bring the PRODUCTTYPE column over in the the Relational Expression tab on the left.
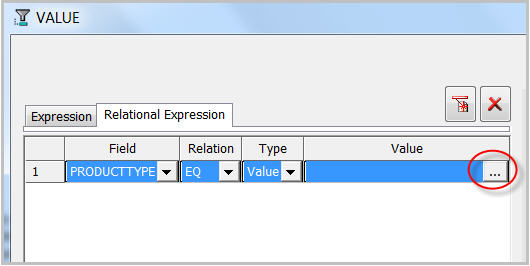
Next, specify the values (for PRODUCTTYPE) that you want to match on by clicking on the ellipsis button. This is demonstrated in Figure 21.
Figure 21: Specify the value of the Value Restriction.
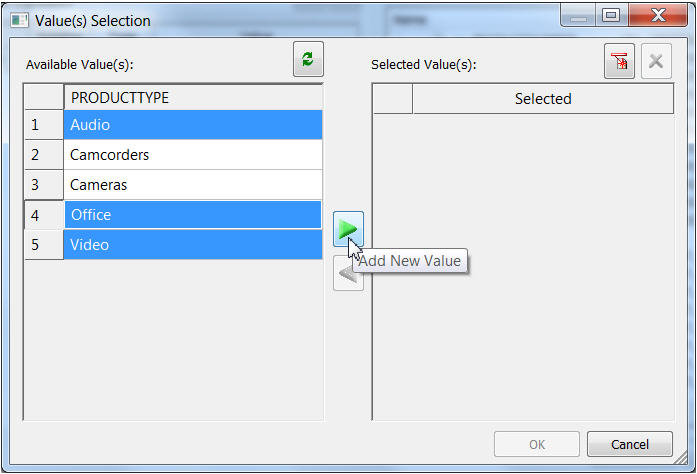
A list of valid values for PRODUCTTYPE is dynamically pulled from the INVENTORY table and displayed. Select the values you want to reveal to the user and click on the Add New Value arrow, as shown in Figure 22.
Figure 22: Add a new value.
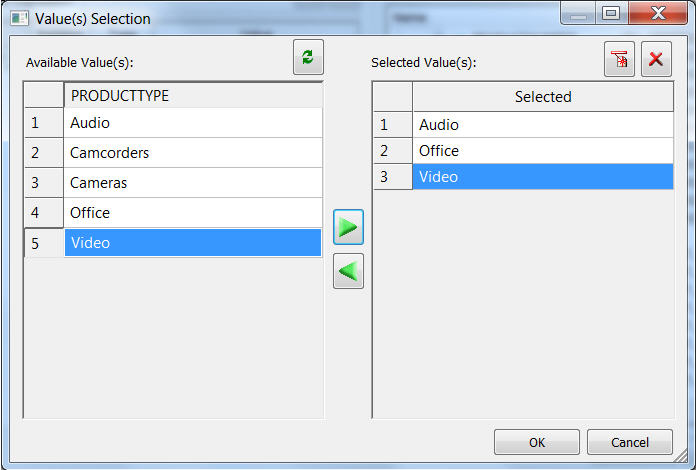
You'll see the values on the right side, as shown in Figure 23. Click OK.
Figure 23: Values have been added.
As you can see in Figure 24, the three values are in place. Click OK again.
Figure 24: Value Restriction is ready to be saved.
Now Robert has a Value Restriction in place (Figure 25). Save the synonym.
Figure 25: ROBERT now has a Value Restriction.
When ROBERT runs the sample report, he sees all of the report columns, but based on the defined Value Restriciton, he only sees data for Audio, Office, and Video (Figure 26). Row-level security has been achieved!
Figure 26: Value Restriction success!
Noprint (Column)
In addition, the administrator can impose column-level restrictions for certain users. This form of column-level security it referred to as "Noprint" and allows a report to be successfully run, while the value of specific columns in the report are hidden from the user. For our final example, we set up a Noprint restriction for user profile SIMON so that he can run a report and see all of the data except the values for the LINETOTAL column.
To set up a Noprint Restriction, select Read under SIMON and select Insert>Noprint Restriction from the right-click menu (Figure 27).
Figure 27: Insert a Noprint Restriction.
From the Properties palette, find and select LINETOTAL from the NAME drop-down list. This is demonstrated in Figure 28.
Figure 28: These are the Noprint properties.
That's it! The Noprint Restriction for SIMON (Figure 29) is ready to be saved.
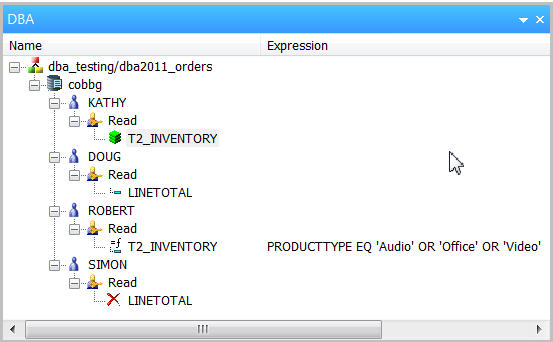
Figure 29: SIMON now has a Noprint Restriction for LINETOTAL.
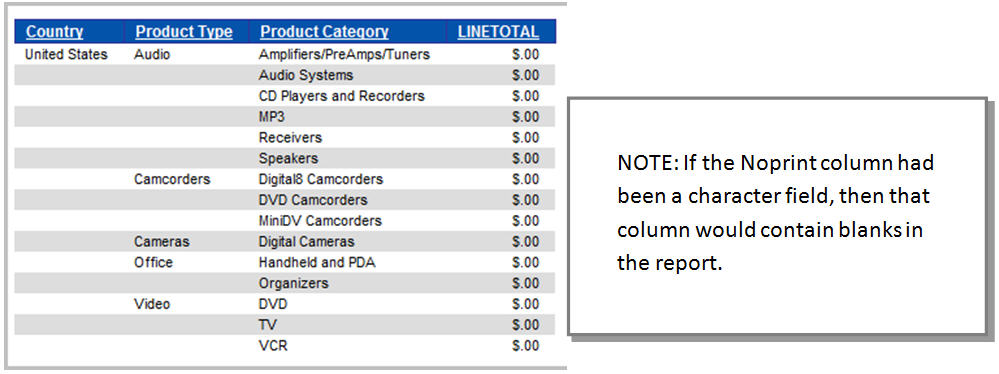
Once the synonym has been saved and SIMON runs the report, notice that the the LINTETOTAL column contains zeroes (Figure 30).
Figure 30: SIMON cannot see the LINETOTAL column!
Same
Last but not least, a very handy restriction type is one that is called "Same." This simply means you can set up a specific set of DBA restrictions for one user and then assign that same set of restrictions to other users. This can be a big time-saver if you have a group of identical restrictions that you want to apply to multiple users, because you will not be forced to redefine those same restrictions over and over again for each user. Simply set up a "Same" restriction and select the user whose set of restrictions you want to inherit. In the example below, user ROBERT not only has an explicit value restriction in place, but is also inheriting the same set of restrictions that were set up for SIMON.
Figure 31: ROBERT has a Same restriction.
A Lock to One of the Castle's Doors, Not a Moat!
While DBA is a very handy addition to your toolbox, bear in mind that DB2 Web Query is an application and DBA is simply another form of application-level security. Consequently, DBA should never be considered the technique to completely lock down your database. If your security requirements dictate that you must completely secure the data and provide access to only specific users or groups for all interfaces to the database, choose object-level authority, and further complement that with database features such as such as row- and column-level security (using SQL views, functions, and encryption), or even the Database Open Exit Point. If you're not employing these techniques, wily and nefarious users with bad intentions can potentially access data that they should not see!
as/400, os/400, iseries, system i, i5/os, ibm i, power systems, 6.1, 7.1, V7, V6R1







 Business users want new applications now. Market and regulatory pressures require faster application updates and delivery into production. Your IBM i developers may be approaching retirement, and you see no sure way to fill their positions with experienced developers. In addition, you may be caught between maintaining your existing applications and the uncertainty of moving to something new.
 IT managers hoping to find new IBM i talent are discovering that the pool of experienced RPG programmers and operators or administrators with intimate knowledge of the operating system and the applications that run on it is small. This begs the question: How will you manage the platform that supports such a big part of your business? This guide offers strategies and software suggestions to help you plan IT staffing and resources and smooth the transition after your AS/400 talent retires. Read on to learn:
LATEST COMMENTS
MC Press Online