Scenario 2: It's 1 a.m., your pager goes off, you call in, and the system is down. The operators explain the problem. You log in to the system and quickly isolate the error. You write a test that should pass if the error were fixed. You run the test, and of course, it fails because you haven't fixed the error yet. You then write the one-line fix to the code and rerun your new test; this time it passes. You load up the master test suite of all the tests that have ever been written for the system and run them. All the tests pass except for one, which surprises you because the one that broke was in what you had thought was an unrelated module. As it turns out, some new functionality was recently added to this previously unrelated module, and that's what caused your original problem. You fix the new problem and rerun all the tests. They all pass. You put the new code into production and go back to bed, feeling confident that your two changes to the code will work.
Unfortunately, many of us live in the world of the first scenario. The focus of this article is how to use JUnit to get out of the world described in Scenario 1. JUnit is a framework written by Erich Gamma and Kent Beck to test Java code. JUnit can be downloaded from www.junit.org and is covered by an open-source software license (see the Web site for details). Installation is easy; you just download the installation file and unzip it to a convenient place. There are two key files that you will want to use. The first file is README.html, which has links, all the release notes, and some good examples. The second is file is junit.jar, which you will need to add to your CLASSPATH.
Taking JUnit for a Test Drive
Now that you have JUnit installed, you are ready to try your first test. Figure 1 shows the code for a trivial class called SimpleTest that you can use to make sure that you have JUnit installed correctly.
public class SimpleTest extends TestCase public void testAlwayPasses() import junit.framework.TestCase;
{
public SimpleTest(String name)
{
super(name);
}
{
assert(true);
}
}
Figure 1: The class SimpleTest can be used to verify that JUnit was installed correctly.
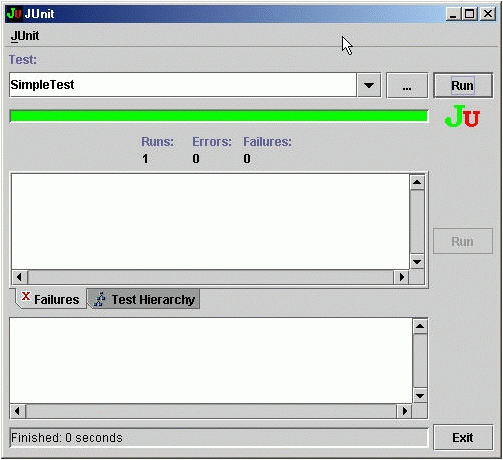
Although there are several implementations of the TestRunner in JUnit, you will be using the swing version. Compile the class and invoke the swing version of JUnit. (Be sure the directory of the test classes is in your CLASSPATH.) Simply type java junit.swingui.TestRunner at the command prompt, or direct your integrated development environment (IDE) to use junit.swingui.TestRunner as the Main Class for your project, and execute the project. Either way, the JUnit swing interface will launch. Next, type in the name of the test class--in this case, SimpleTest--and click Run. Your result should look exactly like Figure 2.

Figure 2: JUnit should look like this after you've successfully run the test in SimpleTest.
JUnit opens up classes that extend junit.framework.TestCase, looks for methods that begin with test, and then invokes them one at a time. Each invocation of a test method is recorded as a Run and may contain any number of asserts(). If an assert evaluates to false, the method is terminated and the test is recorded as a failure. If the method throws an exception that isn't caught, it is recorded as an error. In this example, only one method was called. It made no false assertions and threw no errors, so JUnit in Figure 2 is showing 1 Run, 0 Errors and 0 Failures.
Next, try the class in Figure 3, which has some trivial String tests.
public class StringTest extends TestCase public StringTest(String name) public void setUp() public void testConstructingStrings () public void testConcatString() public void testAnotherConcatString() public void testAlwaysFailsAssert() public void testAlwaysThrowsException() throws Exception public void testNullPointerException() import junit.framework.TestCase;
{
private static final String aTestString = "A Test String";
private String aString = "";
private String bString = "";
private String abString = "";
{
super(name);
}
{
aString = "A";
bString = "B";
abString = "AB";
}
{
String aString = aTestString;
assert(aString.equals(aTestString));
}
{
String result = aString + bString;
assert(result.equals(abString));
}
{
String result = aString + bString;
assertEquals(result,abString);
}
{
fail("Always Fails Here");
}
{
throw new Exception();
}
{
aString = null;
try
{
bString = new String(aString);
fail();
}
catch (NullPointerException NPE)
{
}
}
}
Figure 3: The StringTest class can be used to try out JUnit?s testing features on Java Strings.
This test class contains a method called setUp(), a constructor, and six methods that begin with the word test. The method setUp() is part of something known as a "test fixture." Use fixtures when you want to set the system to a particular state before and after you call each test method. Fixtures are implemented through the use of the methods setUp() and tearDown(). The framework calls setUp() before each test method and calls tearDown() after each test method. Note that setUp() and tearDown() are inherited methods and need not be overridden in your classes that inherit from TestCase. Fixtures are obviously good for tests that involve opening and closing files or database connections, but they can also be useful in setting up complex object states. So in this example, setUp() would get called a total of six times, just before each of the test methods. Now take a look at each of the methods:
· testConstructingStrings()--This test creates one string from another and then makes sure that they are still equal. The test passes.
· testConcatString()--This test concatenates two of the strings created in the fixture and tests for the correct result. This test passes.
· testAnotherConcatString()--Similar to testConcatString(), except this test uses assertEquals() instead of assert(). There are quite a number of different types of asserts; see the JUnit JavaDoc for the full list. This test passes.
· testAlwaysFailsAssert()--As the name implies, this test always fails because of the call to fail(). This test is included to show how JUnit reports failures. Note that fail() is equivalent to assert(false).
· testAlwaysThrowsException()--As the name implies, this test always throws an exception that is not caught. This test is included to show how JUnit reports unhandled exceptions as errors.
· testNullPointerException()--This is the only tricky test. Here you want to test that the class correctly throws a NullPointerException, but since this is the behavior that you want to test for, you catch the exception, do nothing with it, and fail() the test if the exception is not thrown.
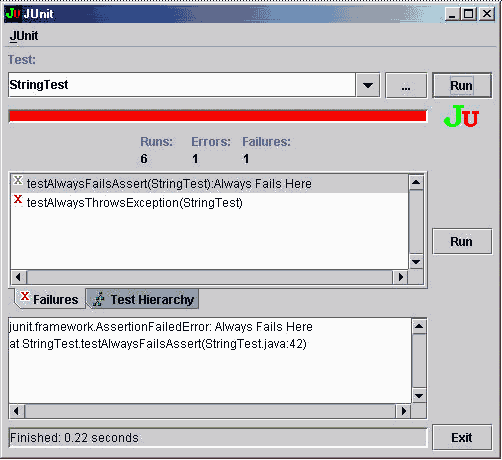
Compile the code and launch JUnit as you did in the first example, but change the name of the test name to StringTest. Figure 4 shows the results, which are 6 Runs, 1 Error, and 1 Failure, as described above. On the Failures tab, there is a list with the class name and method of the tests that had an error or failure. Clicking on an item in this list populates the pane below it with even more information, including the line number of the offending statement. Also, note that the progress bar turned red. Anytime even one test has a failure or error, the entire bar turns red.

Figure 4: The JUnit graphical interface clearly displays code failure points.
To better organize large groups of tests, combine them into suites, which can then be combined into other suites. In this way, you can create a class that extends TestCase for each class in your system and then combine these classes into suites grouped by package, functional area, length of test, or any other requirement. The ultimate goal is to have one master suite that contains all the other suites, allowing you to run all your tests with one click. Figure 5 contains the source code to create a suite containing both of your classes.
public class SimpleSuite import junit.framework.Test;
import junit.framework.TestSuite;
{
public static Test suite()
{
TestSuite suite = new TestSuite("Simple Test Suite");
suite.addTest(new TestSuite(SimpleTest.class));
suite.addTest(new TestSuite(StringTest.class));
return suite;
}
}
Figure 5: The Class SimpleSuite shows how to combine tests into suites.
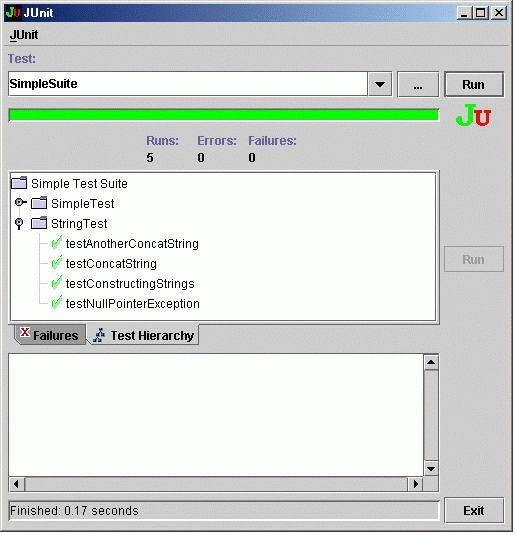
Compile this new code and then comment out the testAlwaysFailsAssert() and testAlwaysThrowsException() methods from StringTest so that you are running only tests that will pass. Then, recompile StringTest. Now run JUnit as before, but give it the class name of your suite, SimpleSuite. When you run the suite, it will call all the test methods in both of your classes. After you run the test, click on the Test Hierarchy tab in the center pane and you will see a tree structure showing all the test classes and their test methods. As shown in Figure 6, each of these tests can be run individually by selecting the test and clicking on the Run button to the right.

Figure 6: SimpleSuite completes a successful test.
Test-First Programming
Robust testing tools such as JUnit have given rise to a programming construction technique known as "test-first programming." The idea is simple: When you need to add functionality, you first write all the tests that will need to pass in order for the new functionality to work. You then stub out just enough of the code that the tests call, in order to make all the tests fail. Then you add code so that, one by one, the tests start passing. When all the tests pass, you are done. Similarly, when you are fixing a bug in the system, you first write one or more tests that should pass when the bug is fixed. Run the tests to make sure that they all fail and then fix them one at a time until once again all the tests pass. Once test-first programming has become ingrained into your everyday work habits, it is very hard to go back. This has been described as the "If it isn't tested, it doesn't exist" mentality.
An interesting benefit to having piles of test code is that the pile becomes a working example of how to use the code being tested. Sometimes you can learn more by reading the test cases than by reading the source code itself because you get more context from the tests and are more focused on what something is doing, rather than how it is doing it. Test code is also great for cutting and pasting complicated method calls.
Integration
JUnit makes integration easier, more robust, and more frequent. When you want to integrate new code into the system, first make sure that it passes all your new tests. Then make sure that it passes every other test that has ever been written. If it doesn't, fix the code or don't integrate. The key to integration is in thinking to yourself: All the code passes all the tests all the time.
So how does JUnit find all these methods with test at the beginning of their names and know how to set up fixtures? The short answer is design patterns and reflection. The long answer, you get by reading "JUnit: A Cook's Tour" at http://junit.sourceforge.net/doc/cookstour/cookstour.htm.
A Final Scenario
Scenario 3: Your pager doesn't go off at 1 a.m. because when the new functionality was added to the system it broke an existing test case and since the code was corrected before it went into production, you get to sleep blissfully through the night.
JUnit is a great tool, but it can't do everything. Although people are working on extensions to the framework, it is difficult to test servlets and user interfaces without changing the code being tested. A definite red flag is if you find yourself modifying your code to make it easier to test. A common mistake is changing something from private to public to make it testable. JUnit testing should only be used for "blackbox" testing; you should only be testing the interface of an object, not its implementation.
JUnit is an easy-to-learn yet powerful tool for creating tests and test fixtures. It allows you to combine your test into suites that you can use to test your entire system. JUnit lends itself to test-first programming and has a side benefit of providing you with test code that helps document your system. Once you have tests that allow you to test your whole system, integration becomes easier to manage. Servlets and user interfaces are difficult to test using JUnit, but there are a number of projects being worked on that should change this.
Michael J. Floyd is a senior software engineer and extreme programmer with DivXNetworks. He can be reached at
Related Materials
JUnit Test Infected Web site: http://junit.sourceforge.net/doc/testinfected/testing.htm


 Business users want new applications now. Market and regulatory pressures require faster application updates and delivery into production. Your IBM i developers may be approaching retirement, and you see no sure way to fill their positions with experienced developers. In addition, you may be caught between maintaining your existing applications and the uncertainty of moving to something new.
 IT managers hoping to find new IBM i talent are discovering that the pool of experienced RPG programmers and operators or administrators with intimate knowledge of the operating system and the applications that run on it is small. This begs the question: How will you manage the platform that supports such a big part of your business? This guide offers strategies and software suggestions to help you plan IT staffing and resources and smooth the transition after your AS/400 talent retires. Read on to learn:
LATEST COMMENTS
MC Press Online