Now that you've installed Visual Studio, it's time for a quick tour of this IDE. Let's do so while creating your first C# program!
The first TechTip of this new series showed you how to install Visual Studio. This one will take you on a quick tour of the IDE. It won't discuss every single detail because Visual Studio (VS) is a multi-purpose, multi-language tool, and there's a lot that's simply not relevant at this time.
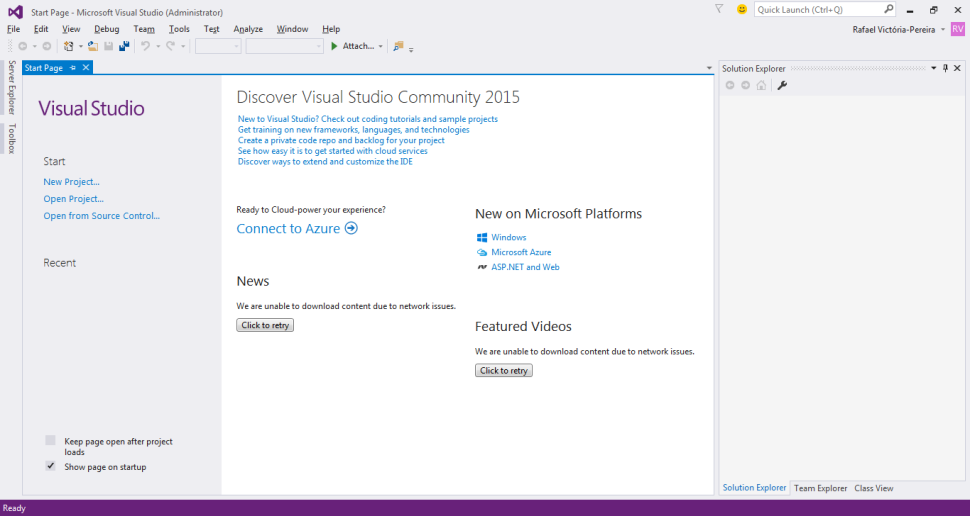
Let's start our quick tour by picking up where we left off in the previous TechTip, with the Start Page, shown in Figure 1:

Figure 1: This is Visual Studio's Start Page.
As you can see, the design is similar to other IDEs: a row of menus at the top, followed by a context-sensitive row of buttons. On the top right corner of the window, you'll find a very handy search bar, named Quick Launch, which enables you to find and execute menu commands and options and to search online for IDE add-ons. I'll get back to what the latter are and how they can be used later.
Below that, you'll find adjustable panels that you can reorganize at will. This version of VS allows you to save your panel organization, something that Eclipse already allowed for quite a while, in order to maximize the efficiency. Just drag and drop panels around to see how this works. When you're done, you can go to the "Window" menu and choose to save the current layout or go back to the default configuration by selecting the "Reset Layout" option. As you gain experience with VS and C#, you'll realize that some panels that are critical when designing a form are basically useless when coding a regular class.
Creating Your First C# Program
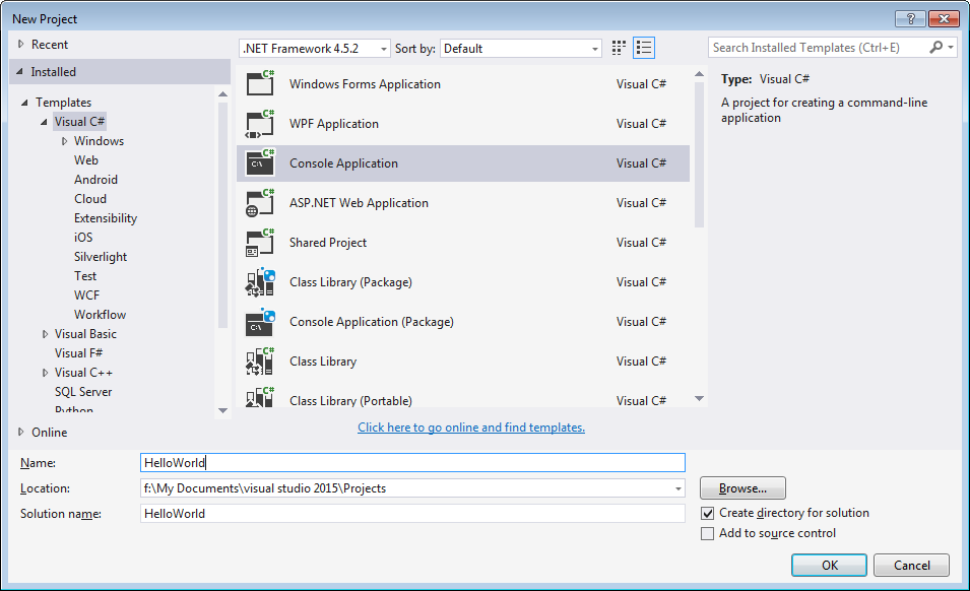
The prequel to this series used the traditional "Hello World" program to give you a peek at what C# looks like. Let's create that program, step by step. The first step is to create a new project. You can do that by going to the File menu and selecting "New" and then "Project," or pressing Ctrl+Shift+N, or clicking the "New Project…" link on the left side of the Start Page. Whichever you choose, VS will present you with a new window, as shown in Figure 2:

Figure 2: Start the first C# project.
If it's not chosen by default, click on "Console Application" and then change the project name to "HelloWorld." You can leave the rest of the prompts as they are. Click OK and you'll get a code editor window, with the bare bones of your program. Note that three things were created: a namespace called "HelloWorld," a class entitled "Program," and a method named "Main." I'll explain the mechanics of these things in a couple of upcoming TechTips. If you look at the horizontal bar that sits atop the code editor window (shown in Figure 3), you'll see three sections, one for each of the things I just mentioned.
![]()
Figure 3: This is the code editor navigation bar.
This bar is particularly useful when you have a long and complex piece of code with a lot of methods (very common when working with large forms, for instance) and you need to quickly jump from one to the other. Just click the rightmost section of the bar and choose the method you want to jump to. It can also be used to perform the same navigation between classes of the same source file, but as I prefer to stick to the one-class-per-file rule whenever possible, I don't really use this class navigation functionality. For the moment, given that you have one class and a single method, you really can't experience the functionality, but believe me, it's another huge timesaver.
Anyway, back to the "Main" method: this method is C#'s equivalent to an ILE program's entry point—it's what gets the ball rolling. For now, let's ignore the static void declaration that precedes the name of the method and the way the parameters are defined. Position the cursor between the curly braces that delimit the Main method, press Enter, and type (or simply copy and paste) the following:
Console.WriteLine("A big Hello to the C# World from an RPG programmer!");
Now let's run the program. There are a couple of ways to do this: you can either click the "Start" button (it's on the top toolbar, next to a green triangle) or press Ctrl+F5. This will compile and run your program, showing the output on a command-line window. Once you've pressed any key and the VS window is displayed again, there'll be an Output panel overlapping the bottom of the code window. This panel shows the equivalent to the compilation result of an RPG program; when something goes wrong during compilation (where called "build"), this is a good starting place to figure out what went wrong. If you look at the top right corner of this panel, you'll find three icons that allow you to define the behavior of this panel: you can pin it down, thus making it always visible; have it behave like another tab, next to the code window, by selecting the Dock as Tabbed Document option; or even make it an independent window by choosing the Float option. I usually leave it in auto-hide mode, the default. When it's hidden, you can pop it back up by clicking the panel name displayed at the bottom left side of the IDE. Sometimes I dock it next to the code window to look for an error, but most of the time, I don't really look at it because the code assistance tools provided by VS are so powerful that they catch most build errors while you're coding. That's what I'm going to talk about in the next TechTip.
Until then, feel free to ask questions and share your thoughts in the Comments section below!


 Business users want new applications now. Market and regulatory pressures require faster application updates and delivery into production. Your IBM i developers may be approaching retirement, and you see no sure way to fill their positions with experienced developers. In addition, you may be caught between maintaining your existing applications and the uncertainty of moving to something new.
 IT managers hoping to find new IBM i talent are discovering that the pool of experienced RPG programmers and operators or administrators with intimate knowledge of the operating system and the applications that run on it is small. This begs the question: How will you manage the platform that supports such a big part of your business? This guide offers strategies and software suggestions to help you plan IT staffing and resources and smooth the transition after your AS/400 talent retires. Read on to learn:
LATEST COMMENTS
MC Press Online