Ever wish you had an easy way to query the attributes of the objects in your integrated file system to find, for example, who owns the largest objects in a subtree? Or maybe you wanted to find all the objects in an authorization list regardless of what file system they were in? This article will explain how to build such queries in a few short steps.
In V5R3, IBM added the Retrieve Directory Information (RTVDIRINF) command to collect attributes about objects in a subtree (which can include the entire system) and put them in database files. A corresponding Print Directory Information (PRTDIRINF) command is also provided to print selected subsets of the data collected. The PRTDIRINF command can generate reports based on directories, objects, or owners. Within each type of report, data can be subsetted and sorted.
The question "who owns the largest objects in a subtree?" can be answered by the command PRTDIRINF RPTTYPE(*OBJ). In many cases, the information available in the PRTDIRINF reports will fit your needs. Sometimes, however, you will want to go beyond what is available with the PRTDIRINF command. Although RTVDITINF collects over 80 fields for the full set of attributes, PRTDIRINF will report information from less than 20 of them.
This article discusses ways to customize queries using the data collected by the RTVDIRINF command. First, some additional information about the files created by RTVDIRINF must be understood.
The results of the RTVDIRINF command use Unicode for the character fields because the "root" (/) file system uses Unicode names. The job running the commands needs to have a valid CCSID. A CCSID of 65535, which is the default, indicates that no character set translation is done. A CCSID of 65535 will cause both an error message on the RTVDIRINF and PRTDIRINF commands and unreadable displays on queries. A CCSID of 37 will work in most cases. For interactive use, simply use CHGJOB CCSID(37) before starting.
By default, RTVDIRINF produces the files QUSRSYS/QAEZDxxxxO (for all objects) and QUSRSYS/QAEZDxxxxD (for directories). The QAEZDxxxxO file contains a row for each object in the requested subtree. The QAEZDxxxxD file contains the full path name for each directory in the subtree. Each run produces a new file, which is given a sequentially numbered name (represented by xxxx). Thus, there is a maximum of 9,999 result files possible in any one library. You can also specify your own prefix and library if you like. If you specify your own prefix, only the D and O suffixes are appended. There is no automatic sequence generation. This option is used for some of this article's examples.
Information about specific data fields in these files can be found in the iSeries Information Center under Files and file systems -> Integrated file system -> Access the Integrated File System -> Access using CL commands -> Work with output of the RTVDIRINF and PRTDIRINF commands.
The RTVDIRINF command can be long running if a large subtree (for example, "root") is processed. In that case, you may want to run it as a batch job where
Just a few more considerations before we get to the fun part:
- Symbolic links are treated as simple objects; they are not used for path name resolution.
- File systems on remote systems are not processed.
- A user-defined file system (UDFS) must be mounted to be processed. This means that references to a UDFS such as /dev/qaspxx/yyy.udfs will only give information on the block special file that represents the UDFS.
- The files created by RTVDIRINF are just a snapshot of the objects at the time the command was run.
A directory /example, with two subdirectories, was created for the following examples. The results were put into files with a prefix of EXAMPLE in the EXAMPLIB library. The following command was used:
The command issues a message indicating where the results were placed (very handy if you are using the default naming).
Directory information was successfully retrieved.
Files were also created over the entire system with a batch job as follows:
The resulting files, QAEZD0009O and QAEZD0009D, were created in QUSRSYS.
Now let's do some examples. We'll start simple and then build to more complex queries. Start Query (STRQRY) examples are first followed by SQL under iSeries Navigator. You may want to follow along by running a RTVDIRINF on a small subtree and substituting your own file and library names in the examples.
STRQRY Examples
These examples will use interactive query via the Start Query (STRQRY) command. Some of the screens are omitted to save space, but the text should allow you to fill in the missing steps.
First, ensure the interactive session has a valid CCSID as described earlier. Then issue the STRQRY command. At the first screen, select 1 (Work with queries) and press Enter. At the next screen, enter 1 (Create) for the option and a name for the query (for example, DEMO1) and press Enter. At this point, you should see the main query definition screen (Figure 1).
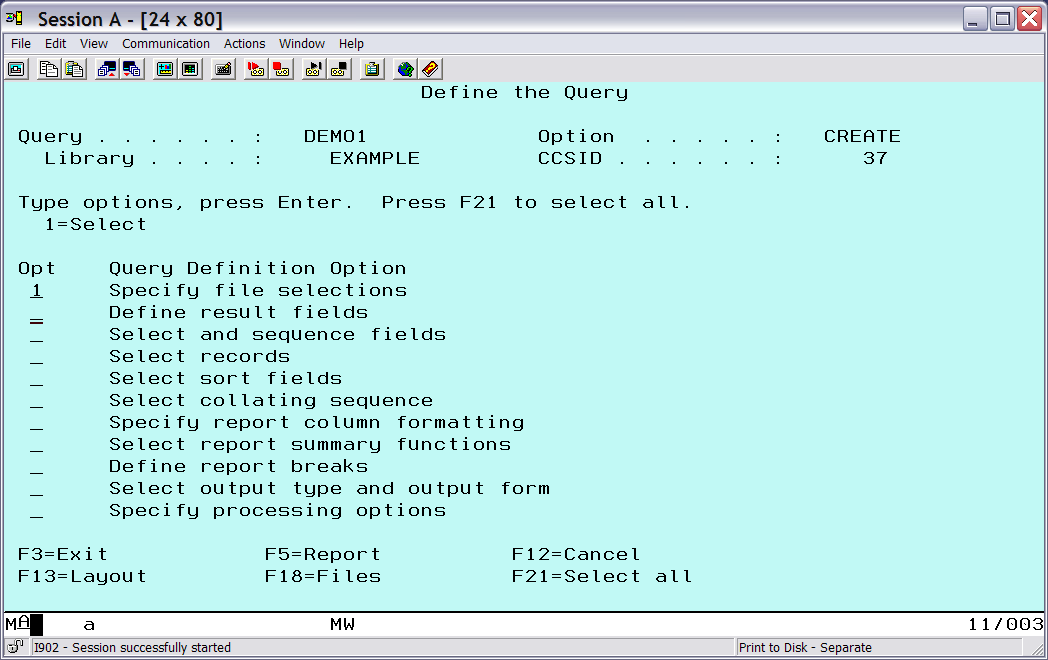
Figure 1: This is the main query definition screen. (Click images to enlarge.)
Example 1: Simple Selection, Name and Attributes
The first example will display the full name, type, size, and owner of the objects in the /example directory.
Select the Specify file selections option to define the files to use. To get both path and object information, we will do a join on the directory and object files. The directory file is first because it has fewer fields and records. This makes for less paging on later screens to find field names.
Specify the directory file first (EXAMPLED), and then press F9 to prompt for a second file--in this case, the object file (EXAMPLEO). After pressing Enter, the screen should be similar to Figure 2. (Ignore the warning that the files contain DBCS data or text. We took care of potential problems by setting a valid CCSID.)
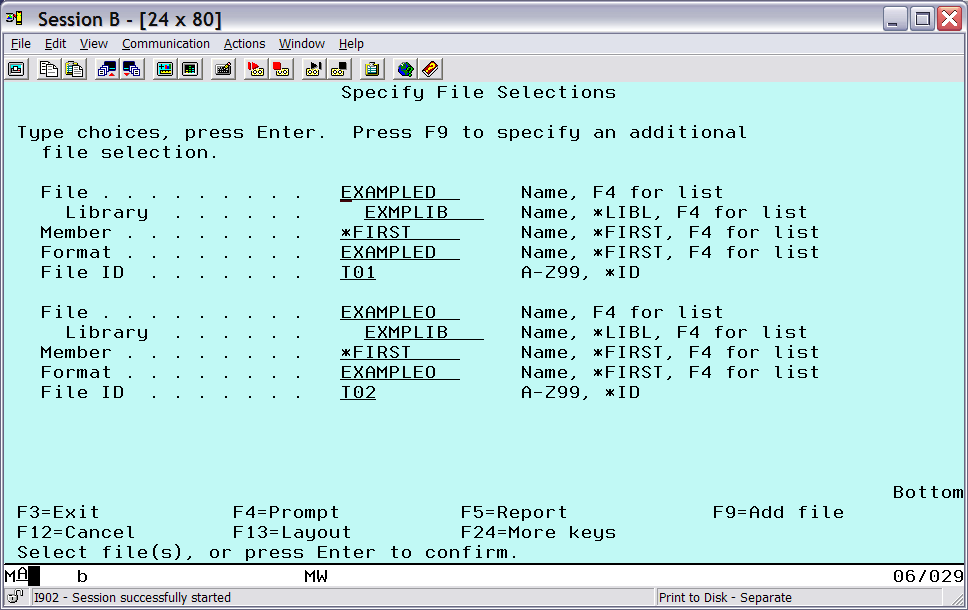
Figure 2: Select the files.
After pressing Enter to confirm, you will get to a Specify Type of Join screen (not shown). Take option 1 (Matched records) and press Enter. This will take you to the Specify How to Join Files screen (Figure 3).
The files have a common field, which is the directory index. Each directory path in the directory file has a unique index value assigned. Each object record will have a corresponding index value to indicate the path to the object. Remember, from the file selection screen above, the directory file has an ID of T01 and the object file has an ID of T02. Specify the match field as QEZDIRIDX, with a test type of equal (EQ).
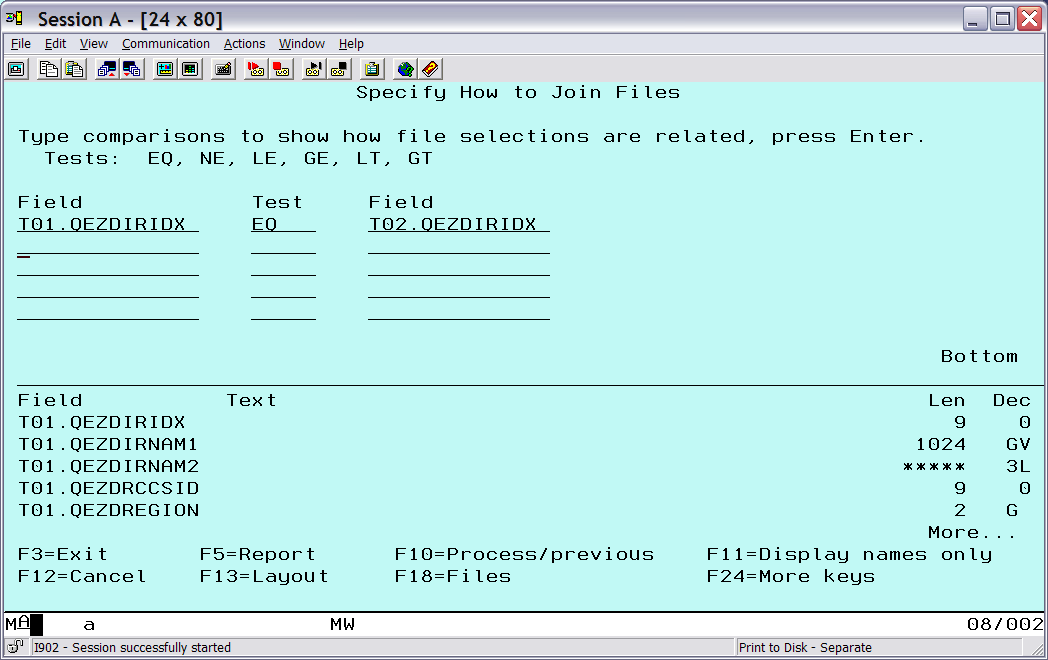
Figure 3: This is the join fields selection.
Press Enter to return to the main query definition screen.
The path name field (QEZDIRNAM1) is defined as a 1024-character field, and the object name field (QEZOBJNAM) is defined as 512 characters. To make the output display more manageable, redefine them to smaller sizes that will fit the data available. Also, give the result fields shorter, more meaningful names. From the main selection screen, choose Define result fields and redefine the fields (Figure 4). Then press Enter.
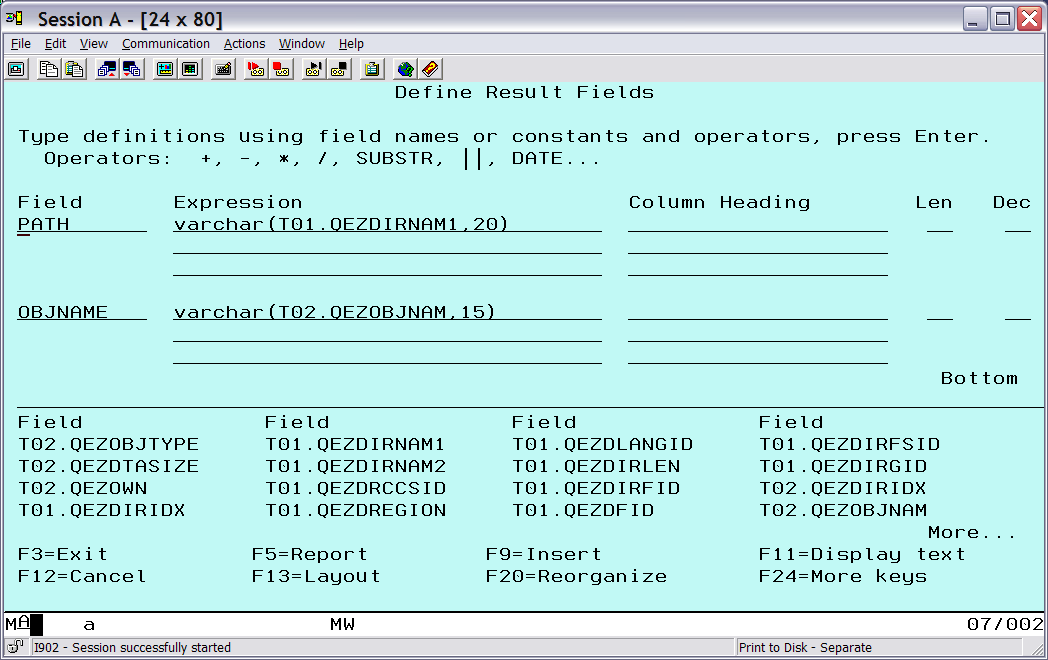
Figure 4: Remap Name field sizes.
From the main query definition menu, choose Select and sequence fields and select the following fields in ascending order: the PATH and OBJNAME fields that were just defined, T02.QEZOBJTYPE (object type), T02.QEZDTASIZE (object data size), and T02.QEZOWN (object owner). The T02.QEZOWN field is on the second page. After pressing Enter, the screen should look like Figure 5.
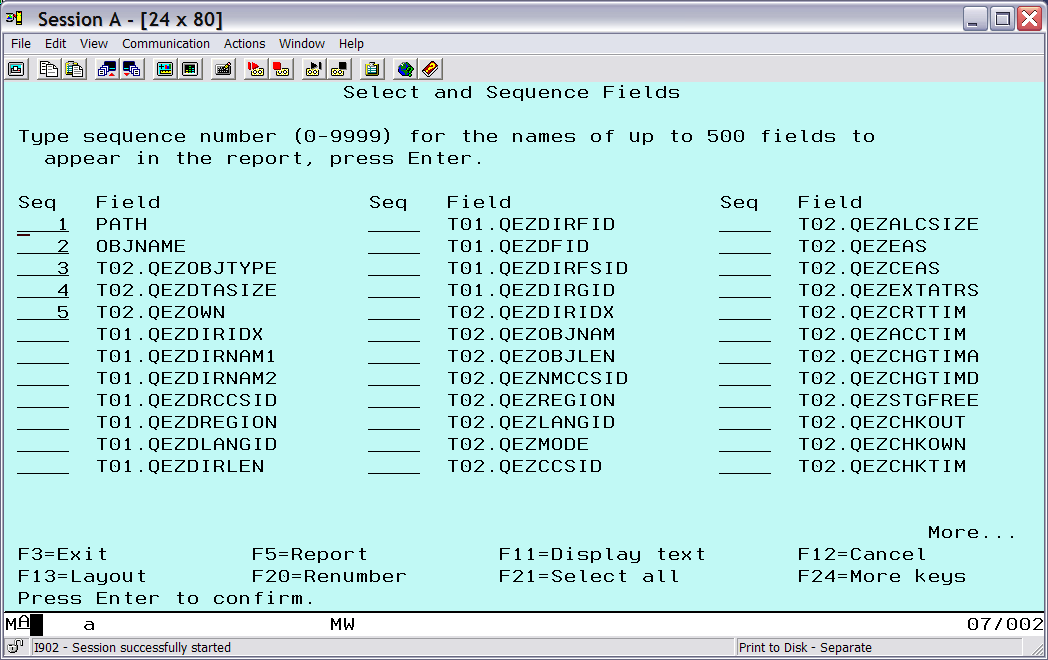
Figure 5: Select and order the output fields.
At this point, press F5 to see the selected output (Figure 6).
Figure 6: This is the output report for example 1.
Notice that the symbolic link shows up as a simple object. The data size is the size of the path name specified in the symbolic link.
Example 2: Adding Summary Information
Now let's take advantage of some of the other query facilities to make the report more interesting. Let's group by object type, sort by size, and generate summary information.
Press Enter to get back to the main definition screen, and then select Select sort fields. Select the object type and size fields for sorting (Figure 7). Give the type field a higher sort priority, because it will be used later for grouping the results. Choose descending (D) for the size field so that the largest objects will show up first.
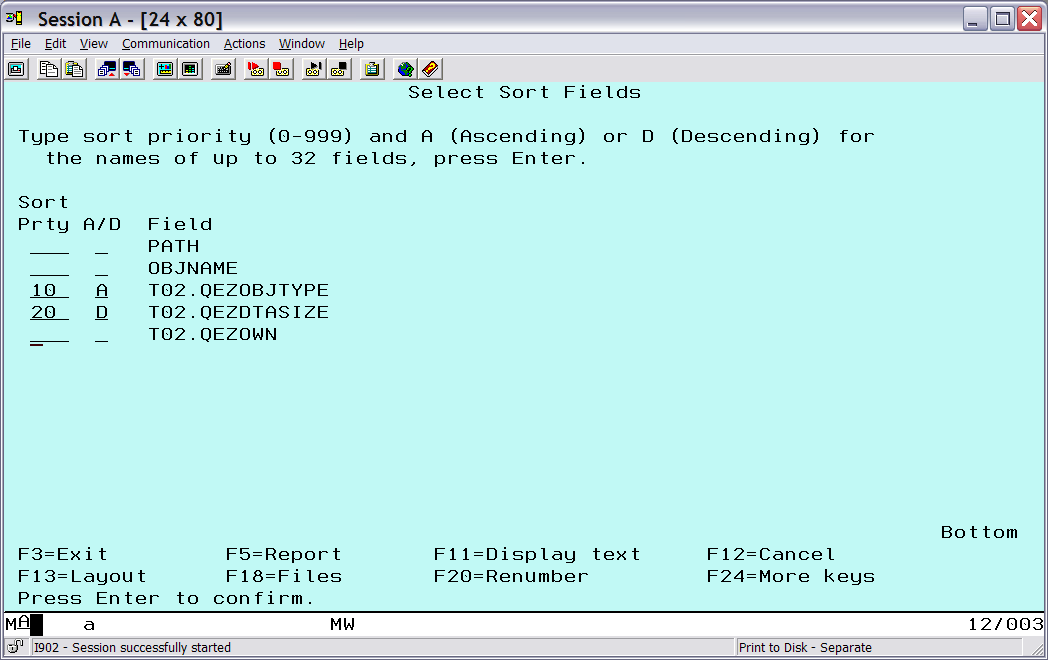
Figure 7: Sort by object type and size.
To check the result of the sort selection, press F5. As a query is built, you can press F5 to see the progress.
After returning to the main query screen, choose Select report summary functions to define the summary information to generate. The number of each object type will be counted, and sizes of each object type will be totaled (Figure 8).
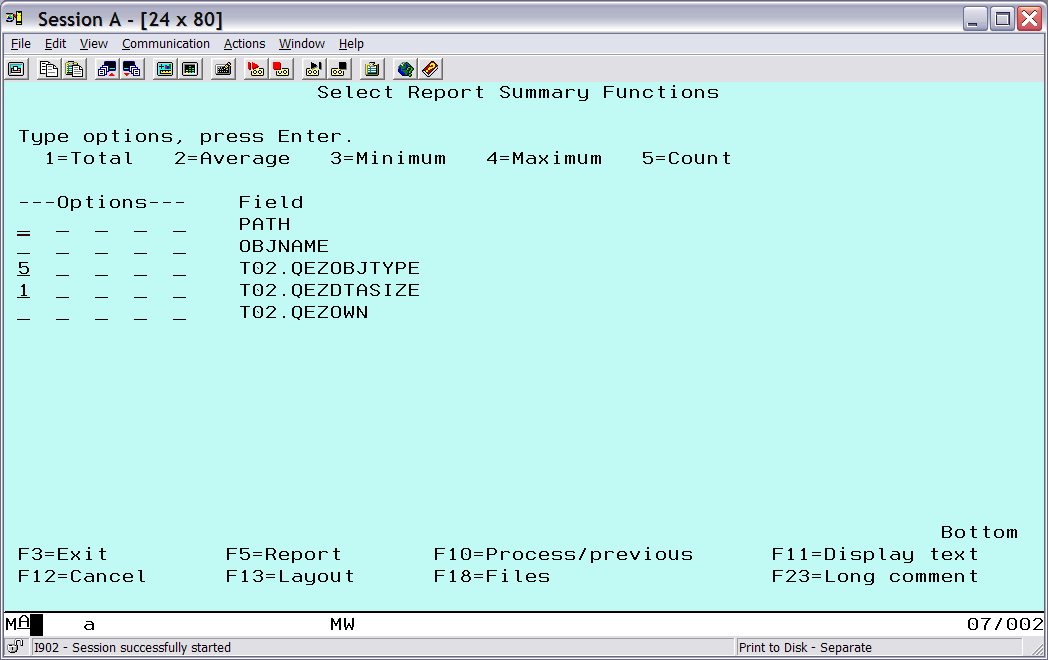
Figure 8: Specify object type and size summary information.
Next, go to the Define report breaks option to group by type. Here is where grouping on the object type is done by placing 1 for the break level (Figure 9). After pressing Enter, the Format Report Break screen for break level 0 will appear (not shown in figures), take the defaults by pressing Enter.
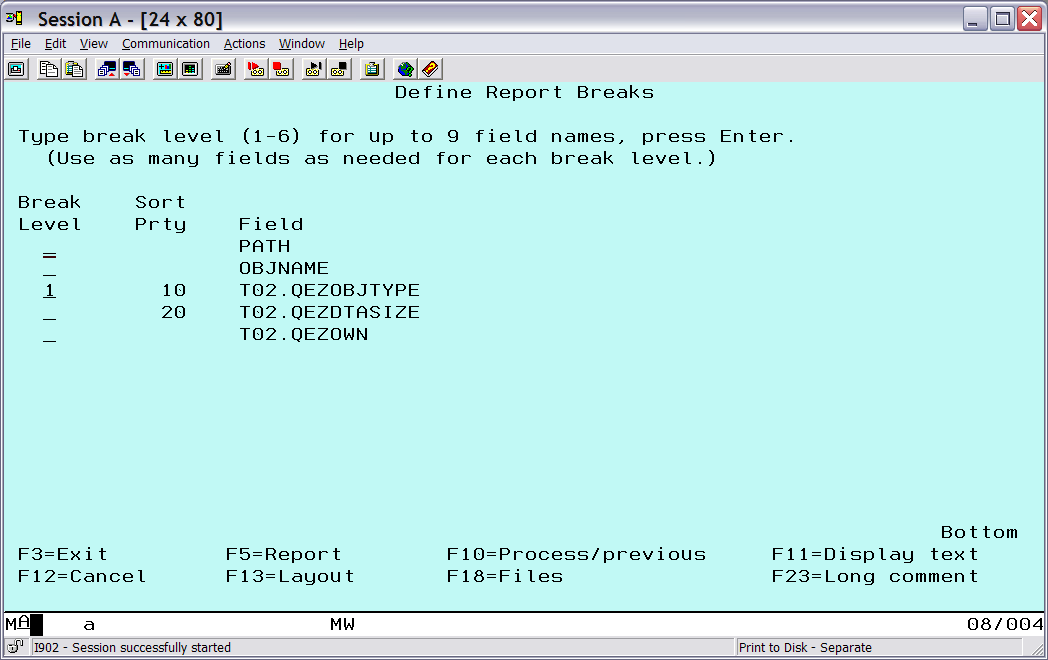
Figure 9: Grouping on the object type.
Next, the Format Report Break screen for break level 1 will appear. This is where the text for each group of object types is entered. Fill in the text (Figure 10). The &T02.QEZOBJTYPE value indicates that the current value of the object type field should be output on the line.
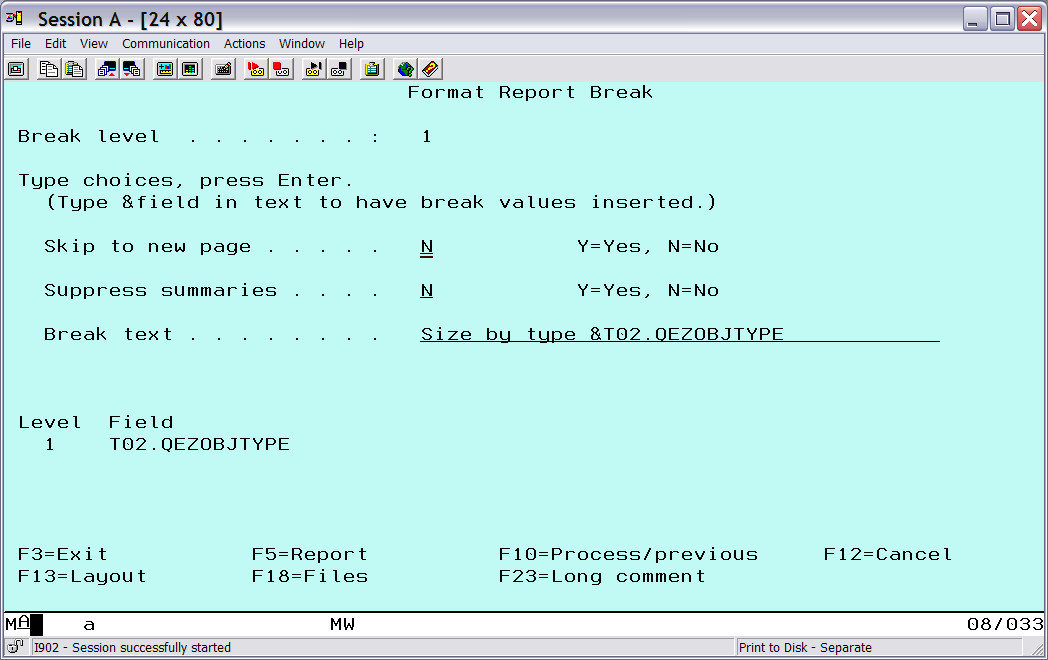
Figure 10: Specify the object type summary text.
Press F5 again to see the final report (Figures 11 and 12).
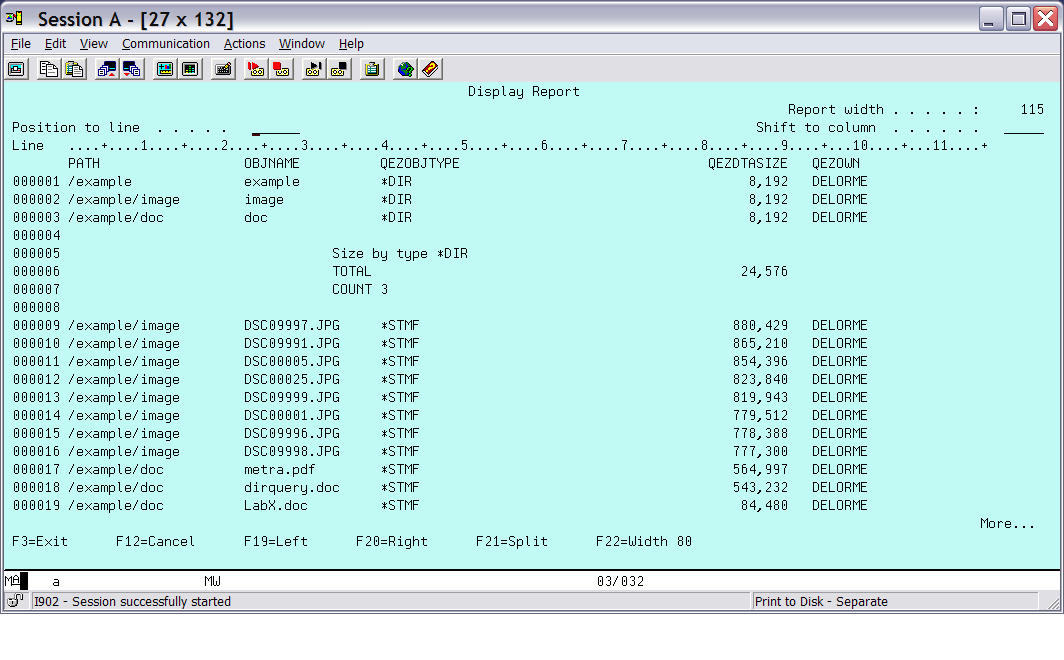
Figure 11: This is final output page 1.
The output is grouped by type, and each group has summary information.
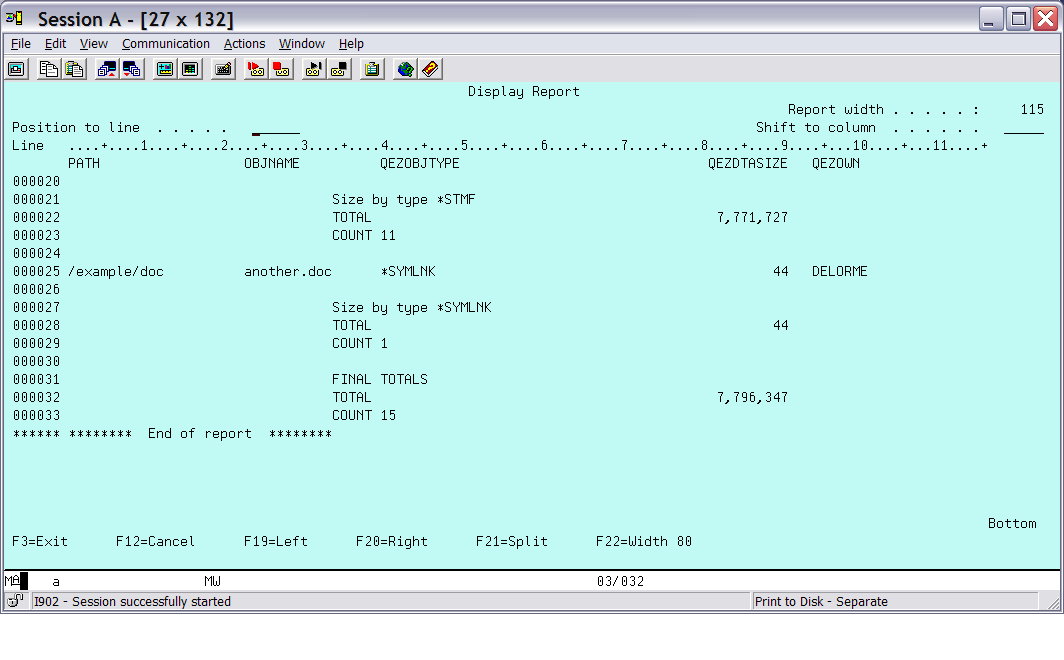
Figure 12: This is final output page 2.
Figure 12 shows the final totals for all the groups. This is the break level 0 output from the defaults for that level.
Example 3: Record Selection
In the previous examples, all the records in the object file were used. STRQRY can subset the records to look at just a portion of the data. For this example, the RTVDIRINF on the "root" (/) file system, which generated several thousand records, will be subsetted.
The purpose of this example is to select the records for objects that are in a particular authorization list and display their information. First, select the files and remap the path and object names, as described in the first example. Then, select the QEZAUTLST field, which contains the authorization list that the object is in, the PATH and OBJECT from the remap, and the QEZOBJTYPE fields (as previously described).
Next, select the Select records option from the main query menu and select the records that have QEZAUTLST equal (EQ) to MRFAUTL (Figure 13).
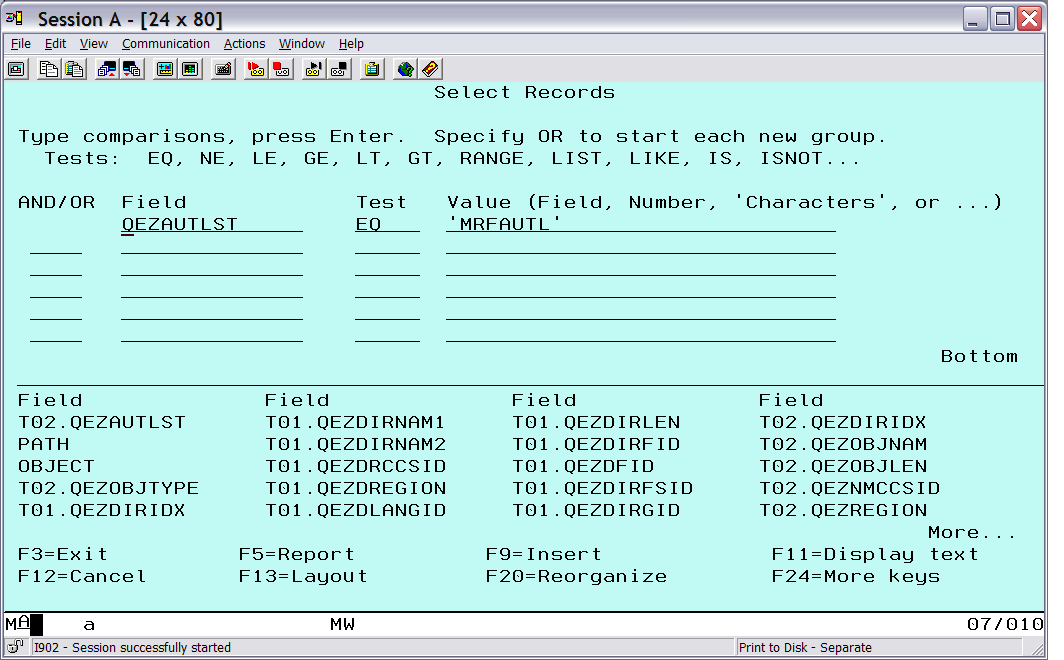
Figure 13: Select records for the specified authorization list.
Press F5 to get the results (Figure 14).
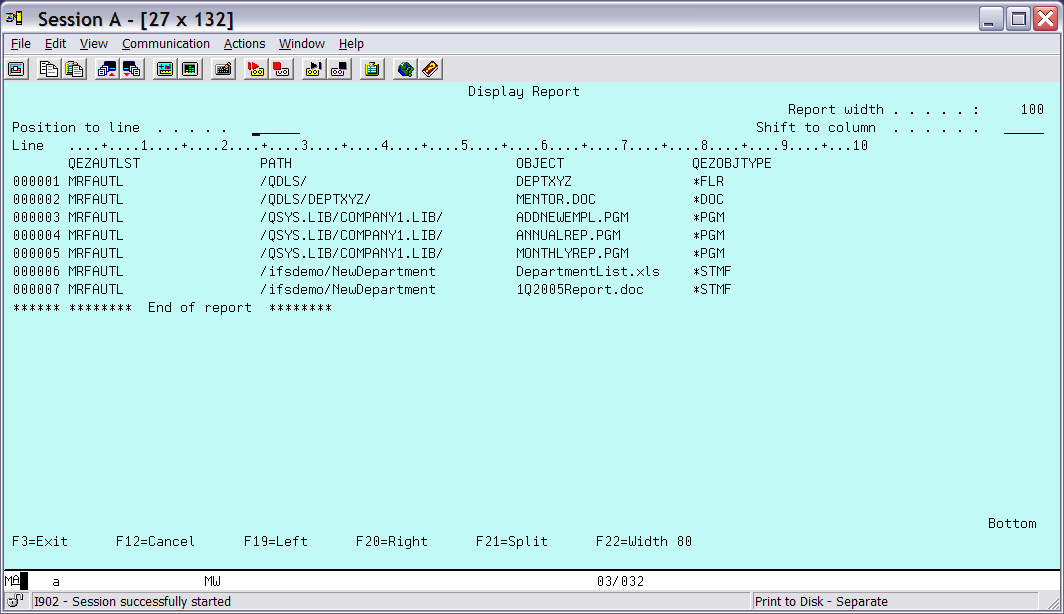
Figure 14: Here is the selected record output.
This example was chosen to show that data from multiple file systems is available when the entire system is selected. The first two objects are in folders, the next three are in a library, and the last two are in the "root" (/) file system.
SQL Examples Using iSeries Navigator
After starting iSeries Navigator, select Databases, and then the database name (usually the same as the system name). Under Database tasks, select Run an SQL script to get the SQL script screen.
Example 4: Record Selection Using SQL
This example is similar to the STRQRY authorization list in example 3, but in this case, some SQL features are used. First, we drop the file identifiers (T01 and T02, in the STRQRY examples) when not needed. As long as a field name is unique, only the name is required. The QEZDIRIDX field is the only field name that is common to both files. Second, instead of specifying the join as part of the file specification in the FROM clause, we can do it implicitly as part of the selection in the WHERE clause.
SELECT QEZDIRNAM1, QEZOBJNAM, QEZOBJTYPE
FROM QUSRSYS.QAEZD0009O AS O, QUSRSYS.QAEZD0009D AS D
WHERE QEZAUTLST = 'MRFAUTL' AND
O.QEZDIRIDX = D.QEZDIRIDX
The FROM clause is equivalent to the Specify file selections screens. AS O and AS D serve as short identifiers for the files, which is similar to T01 and T02 in the query. The SELECT clause is the equivalent of the Select and sequence fields in the query. For iSeries Navigator, we don't need to redefine the character field sizes; simply resize the fields by clicking and dragging the column heading separators once the information is displayed.
Press Ctrl+R to execute the SQL statement. The results are shown in Figure 15.
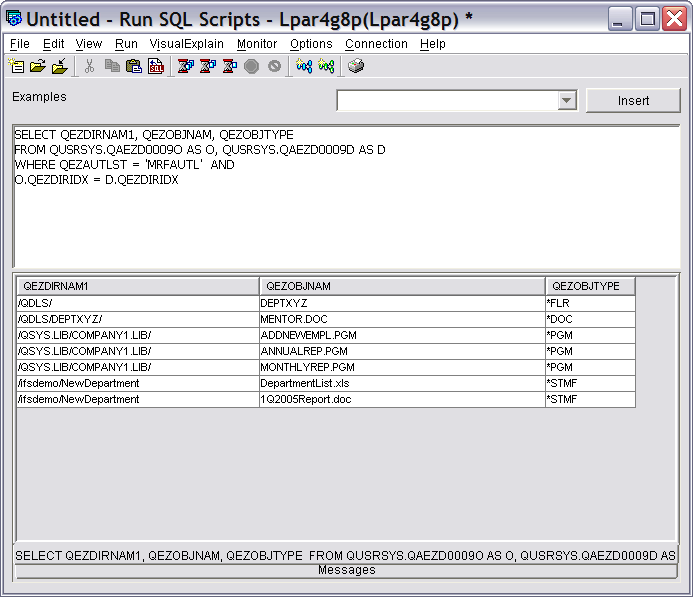
Figure 15: The record selection and implicit join.
SQL can also be used interactively with the Start SQL Interactive Session (STRSQL) CL command. In that case, the statement would need to be modified slightly. First, the file name format is different and uses a slash (/) instead of a period (.) to separate the library and file names. Second, it suffers the same problem as query with large character fields. The CAST operator is the SQL equivalent of the varchar() operator of Define result fields in Query. The STRSQL statement would look like this:
SELECT CAST(QEZDIRNAM1 AS CHAR(30)) AS PATH,
CAST(QEZOBJNAM AS CHAR(20)) AS OBJNAME, QEZOBJTYPE
FROM QUSRSYS/QAEZD0009O AS O, QUSRSYS/QAEZD0009D AS D
WHERE QEZAUTLST = 'MRFAUTL' AND
O.QEZDIRIDX = D.QEZDIRIDX
Example 5: Summary Information
In this example, some of the SQL aggregation functions are used to get summary details for all the object types on the system. In this case, only the object file is used, since the full path name information is not needed.
The SELECT clause specifies the object type field and then performs various summary operations on the type and size fields. The results are grouped by type and then finally sorted by type.
AS LARGEST,SUM(QEZDTASIZE) AS TOTAL
FROM QUSRSYS.QAEZD0009O
GROUP BY QEZOBJTYPE
ORDER BY QEZOBJTYPE
The partial result is shown in Figure 16.
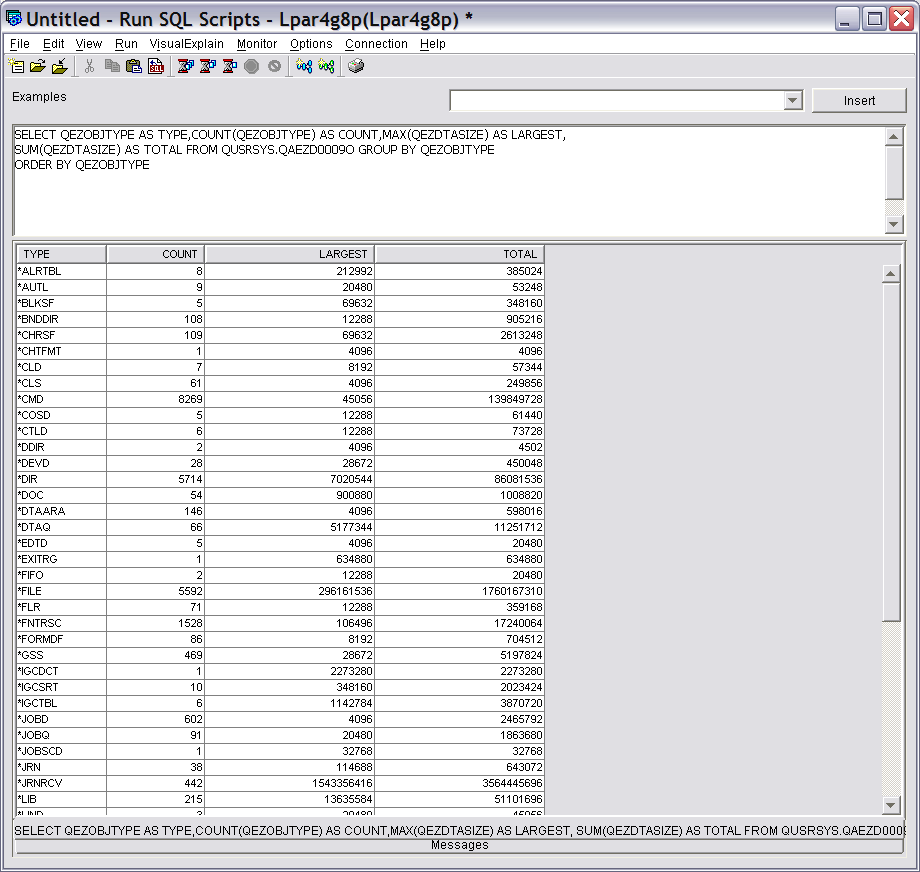
Figure 16: Here is summary information on all objects.
Example 6: Subset of Summary Information
Now let's take the result from the previous example and select specific object types for the output. The WHERE . . . IN . . . clause can be used to select only those values that are in a list.
SELECT QEZOBJTYPE AS TYPE,COUNT(QEZOBJTYPE) AS COUNT,MAX(QEZDTASIZE)
AS LARGEST,SUM(QEZDTASIZE) AS TOTAL
FROM QUSRSYS.QAEZD0009O WHERE QEZOBJTYPE IN ('*BLKSF','*CHRSF','*DIR',
'*FIFO', '*STMF', '*SOCKET')
GROUP BY QEZOBJTYPE
ORDER BY QEZOBJTYPE
The result is shown in Figure 17.
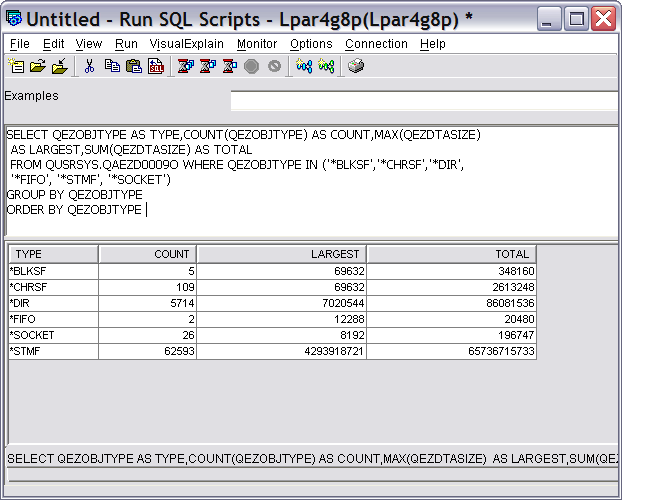
Figure 17: This is the subset of summary information.
Example 7: Subset on Calculated Data
This example computes the number of days since a file was last changed, and displays that value for each object. The SQL statement is as follows:
DAYS(CURRENT_DATE)-DAYS(QEZCHGTIMA) AS DIFFERENCE, QEZDTASIZE
FROM EXMPLIB.EXAMPLED AS D
INNER JOIN EXMPLIB.EXAMPLEO AS O ON D.QEZDIRIDX = O.QEZDIRIDX
Here the join is explicitly specified on the FROM clause (just for a little variety). The QEZCHGTIMA field is the time stamp of the last modification. The DATE( ) function will extract the date part of the time stamp. The DAYS( ) function will return the number of days since a system-defined date. Since only the difference is needed, the value of the system-defined date is immaterial.
CURRENT_DATE is an SQL special register that returns the time stamp for the current date. The result is shown in Figure 18.
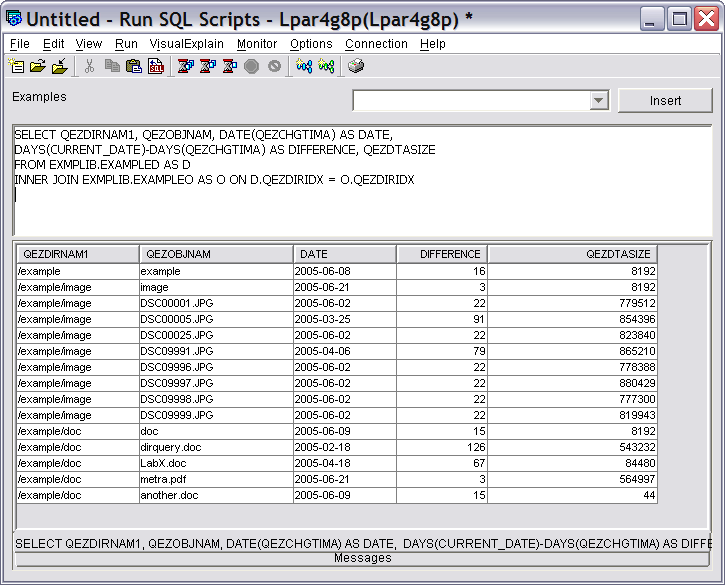
Figure 18: This is the result with calculated data.
The result can be useful as is for small sets of data. For larger result sets, it may be difficult to find the objects that meet the criteria.
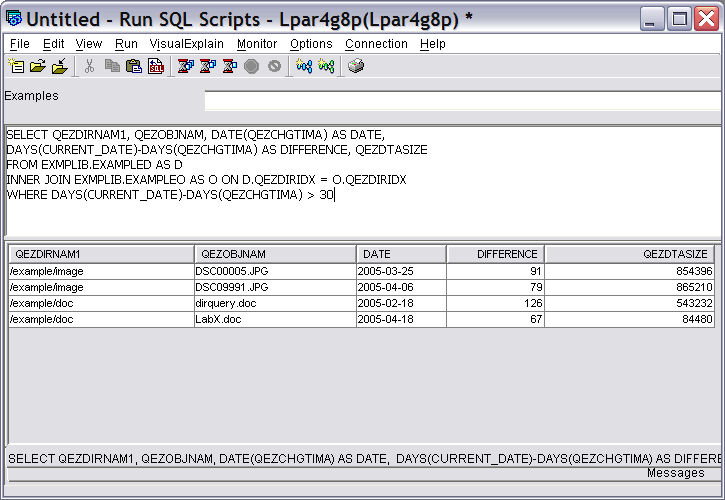
To limit the result to the objects that haven't changed in 30 days, add a WHERE clause to select on the date difference. Note the WHERE clause added to the end of the previous SQL statement.
DAYS(CURRENT_DATE)-DAYS(QEZCHGTIMA) AS DIFFERENCE, QEZDTASIZE
FROM EXMPLIB.EXAMPLED AS D
INNER JOIN EXMPLIB.EXAMPLEO AS O ON D.QEZDIRIDX = O.QEZDIRIDX
WHERE DAYS(CURRENT_DATE)-DAYS(QEZCHGTIMA) > 30
The result is shown in Figure 19.
Figure 19: This is the selection on calculated data.
Here, only the records of interest are shown. The WHERE clause can be modified to use other selection criteria, such as a particular date or a range of dates.
An alternative to the WHERE clause selection would be to use an ORDER BY DIFFERENCE clause to organize the results in order. This would also allow data of interest to be found easily. Of course, both could be used to select and sort the data.
Create Your Own Queries
The RTVDIRINF command provides a wealth of information about Integrated File System objects. Using Query and SQL, the data can be subsetted and organized into more meaningful forms. This article has shown only a few examples of the possibilities. With the power of Query and SQL and the field definitions for the RTVDIRINF files, you can extract and organize the information that is of interest to you.
Important Update Information
In V5R3M0, there is incorrect information stored for some fields. Users of V5R3M0 should apply PTF SI20628. This PTF can be immediately applied. The RTVDIRINF command should be re-run after the PTF is applied so that the correct data is stored. See the PTF for more information. This problem is fixed in base release V5R4M0.
In V5R4M0, the CCID on the RTVDIRINF command is set to 37 if the default job CCSID is 65535. The command will then have a valid CCSID, and an error message is not signaled.
Dennis DeLorme is an iSeries developer on the Integrated File System team at IBM Rochester. He can be reached at


 Business users want new applications now. Market and regulatory pressures require faster application updates and delivery into production. Your IBM i developers may be approaching retirement, and you see no sure way to fill their positions with experienced developers. In addition, you may be caught between maintaining your existing applications and the uncertainty of moving to something new.
 IT managers hoping to find new IBM i talent are discovering that the pool of experienced RPG programmers and operators or administrators with intimate knowledge of the operating system and the applications that run on it is small. This begs the question: How will you manage the platform that supports such a big part of your business? This guide offers strategies and software suggestions to help you plan IT staffing and resources and smooth the transition after your AS/400 talent retires. Read on to learn:
LATEST COMMENTS
MC Press Online