I know what you're thinking: "Yawn. Another story about NAS. Isn't Kline behind the times with this article?"
I understand your confusion, since network-attached storage (NAS) devices are truly a commodity. A quick search on PriceWatch.com finds NAS devices priced for as little as $200.
So why my fascination with cheap and passe technology? Because these low-cost devices are little more than simple file servers. I wanted something a bit more useful. This two-part series describes what I had in mind.
Supply-Driven Technology
A recent upgrade of perfectly good desktop computers (prompted by the need to run Redmond's latest desktop OS) left a large quantity of carcasses (carcii?) sitting in the warehouse. As I looked over their remains, I contemplated the various uses for which I could resurrect a few machines. They were nothing particularly special: Pentium III 500 MHz with 128 Mb of RAM, 20 GB hard drives, and 10/100 NICs. These machines were not state-of-the-art by any means. But they certainly were representative of the many machines languishing in closets throughout corporate America, all because Moore's Law has lost the race with Gates's Law. Perhaps you have some of these underpowered computers, too?
Building a Better Mousetrap
Although you can easily purchase a NAS device with basic file-serving capabilities for under $200, models that include more advanced features (such as RAID or snapshot backups) will quickly drive the price toward the range requiring a budgetary line item. With Linux and one of the aforementioned machines, you can build your own NAS device with a feature set that meets or exceeds that of the higher-end commercial versions. And why not? What OS do you think many of the commercial vendors are using to build their devices? All it takes is a little time to install the OS and configure a couple of services, and you're good to go. Once you've set up your first NAS machine, you can clone it to create as many machines as you need. Still wondering why you would want to build one of these? Consider a former President's answer: "Because I could."
Protecting the Users from Themselves
All of us have a well-crafted backup strategy in place to protect our users' data (at least I hope so!). Yet, try as we might, there is always that user who shows up at our door in a panic. You know the story; he has been working on some project for n hours (where n is less than the difference between now and the last time he backed up his data) and, even though he has been regularly saving the file, it somehow disappeared upon exiting the application he was using to create it. Upon further investigation (performed during your copious free time), you determine that, by some quick clicks of the mouse, he has managed to delete it.
Wouldn't it be nice if you could restore at least some of his work? Wouldn't it be even nicer if he could do it himself? It's possible, if you take snapshot backups every so often. This feature is available with many of the high-end NAS devices. And with Linux, it's a "snap" to provide it for yourself. If you combine snapshots with a server accessible to your users, you are home free. It just so happens that everything you will need to provide such a beast is included with the major Linux distributions.
Since Microsoft networks are predominant among MC Press readers, I will focus the remainder of this discussion toward them. Keep in mind, however, that Linux can speak to both AppleTalk and Novell networks, too. So many of the techniques described herein can be applied outside of the Microsoft world.
Samba Lessons
In case you don't know, Samba is the open-source software that allows Linux and the other UNIX-like operating systems to participate on a Microsoft network. Machines endowed with Samba can both serve their resources to the network at large and avail themselves of resources provided by other machines. Besides file and print serving, Samba can act as a primary domain controller (PDC) for an MS network, it can participate in trust relationships with other domain controllers, and it can be a backup domain controller (BDC) for a domain controlled by a Samba PDC.
In spite of the convenience of having snapshots available to your users, it simply would be unacceptable for anyone browsing the network to have access to all users' backup files. Some kind of security must be provided, and Samba is quite flexible in the ways it will authenticate users requesting its services. The two most common methods are to have Samba authenticating locally (with its own password database) or authenticating against a Windows domain controller--be it an actual Microsoft Server product or a Samba server acting as a PDC. For a standalone machine, I'd recommend authenticating against the domain controller (if you have one), since it will be much more convenient for both the administrator and the user. If you do it that way, then the admin won't have to deal with users and passwords on the snapshot server, and the user won't need to give credentials every time he or she attempts to access the snapshot server (assuming different passwords). You can consult the Samba Web site for further information on security issues and authentication.
A Modest Configuration File
One of the reasons I am so enamored with Samba is the simple, yet powerful, configuration file it uses. Unlike that other OS that insists that everything be done with a binary registry database and graphical tools, Samba's configuration is done in a simple text file. You need not configure thousands of parameters; Samba provides sensible defaults. A sample configuration is shown below:
[global]
workgroup = MYGROUP
server string = Snapshot Server
log file = /var/log/samba/%m.log
security = server
password server = MYPDC
[backups]
path = /var/samba/backups/%U
read only = yes
browseable = yes
This configuration is succinct yet functional. A synopsis of what it provides is straightforward. Under the [global] section (which defines how the Samba server behaves), we have indicated that our machine should appear in the MYGROUP workgroup and should have the text "Snapshot Server" appearing next to it in a browse list. The log files (plural) are located in the directory /var/log/samba and are named for the NetBIOS name of the machine making the connection. A machine named "AP1" connecting to our server will cause a log file "AP1.log" to be created. The "%m" will be substituted with the connecting machine's name. This server will authenticate against a Windows PDC (security = server), and that domain controller's name is MYPDC.
Any text appearing between brackets ([ and ]) and after the global section defines the shares that Samba will provide. In this case, we create one called "backups" that points to the /var/samba/backups/user directory. Once again, we employ one of Samba's variable replacements (%U), which returns the name of the user making the request. So a user named "max" will see a share called "backupcopies" that points to the
/var/samba/backups/max directory. The share is browseable from a Windows machine, and it is read-only. (You wouldn't want your user to make the same mistake twice, would you?)
Even this simple configuration file gives you an inkling about the creative uses to which you can put Samba. In addition to the replacement variables for user and machine, there are others that provide date and time, client OS and domain information, and the IP address and Internet name of the client connecting. Additionally, the Samba team has provided hooks into the process so that you can call scripts before and after a client both connects and disconnects. Thus, you have a great deal of programmatic control over what the user finally receives as a service, while the process is totally transparent to him.
We'll return to Samba next month when we look at a working server.
Size Does Matter
For those unfamiliar with the term, a "snapshot" backup is just what it sounds like: a snapshot of a file system at a given point in time. This is unlike a differential or incremental backup (where only files that have changed are backed up) because all files appear in each snapshot.
Here's a question for you: If you have a group of files that total 2 GB and you want five snapshot backups, how much disk space do you need? Did you say 10 GB? Wrong! (It was a trick question.) That's not necessarily true if you are using Linux. We'll be able to pull off this feat in roughly double the space of the original fileset's size, or 4 GB. The variation from exactly two times the original comes from the sizes of the files changed, added, or deleted between each snapshot.
Tricks with Links
In the British science fiction series Dr. Who, the good doctor traveled about in a phone booth. Yet, if you entered the phone booth, you'd find yourself in spacious quarters much larger than the outside would indicate. The phone booth that UNIX-like operating systems use is called "links," created with the command ln.
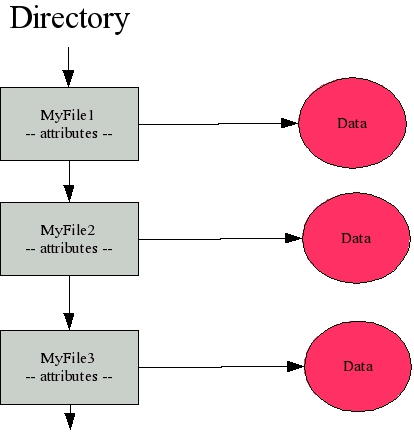
If you issue an ls command, you ask the OS to return a list of files appearing in a directory. What you are seeing is the list of files, not the actual files themselves. Each file has a directory entry that holds the file's name, access information, permissions, owners, and locations within the file system where the blocks comprising the file can be found. Figure 1 shows this relationship.
Figure 1: The entries in the directory listing point to the location(s) on disk where the file's contents exist. (Click images to enlarge.)
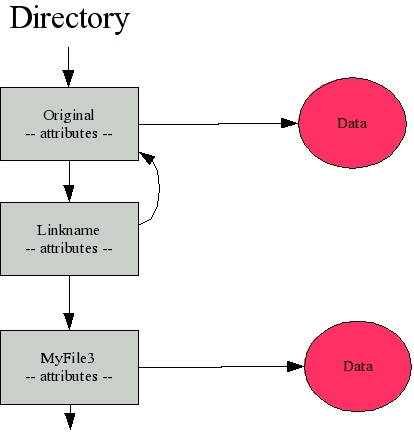
Linux provides two kinds of links: symbolic links (also called symlinks) and hard links. Windows users are already familiar with symbolic links. In their world, they are called shortcuts and can be investigated via the command line. They are simply files with a ".lnk" extension that Windows will use in a level of indirection to find the original file. In Linux, you create a symlink by issuing the command ln -s original linkname, where original is the real file and linkname is the name you wish to create. What you get is a directory entry that is designated as a symbolic link and points back to the original directory entry. Figure 2 demonstrates the results.

Figure 2: With a symbolic link, a directory entry is made that points to the original directory entry. This link can point to a file anywhere in the directory tree.
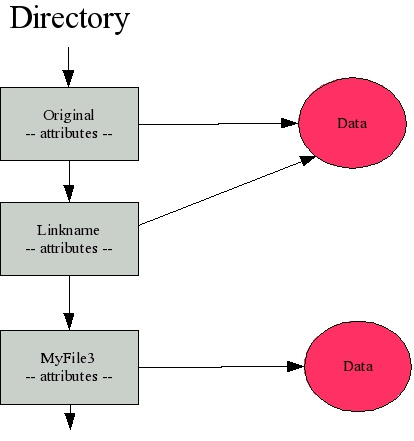
Where Linux diverges from Windows is with its hard-link facilities. Returning to the last example, let's omit the soft-link (-s) switch and issue the same command: ln original linkname. This time, the result is not a directory entry that points to the original directory entry but, instead, a directory entry that points to the same file locations as the original entry, as shown in Figure 3.

Figure 3: A hard link points to the actual data and therefore can be created only within the same file system.
Confused yet? Now, let's delete original with the command rm original. The file is gone, right? No, it's still there. The contents are still accessible via the file name linkname. The contents are only inaccessible once all directory entries pointing to them have been deleted, so it takes the rm linkname command to actually delete the file's contents.
The Cliffhanger
We're out of space for this month, so the solution using our "phone booth" will have to wait. If you are interested (or impatient), I guarantee that a few well-chosen search terms given to Google will yield results. Next month, we'll finish the discussion on links, create the scripts to create the snapshots, and review some of the other issues you'll face in actually moving the data about. I encourage you to review some of the documentation found on the Samba site so that you'll have a better idea of Samba's power. Until next month!
Barry L. Kline is a consultant and has been developing software on various DEC and IBM midrange platforms for over 21 years. Barry discovered Linux back in the days when it was necessary to download diskette images and source code from the Internet. Since then, he has installed Linux on hundreds of machines, where it functions as servers and workstations in iSeries and Windows networks. He co-authored the book Understanding Linux Web Hosting with Don Denoncourt. Barry can be reached at


 Business users want new applications now. Market and regulatory pressures require faster application updates and delivery into production. Your IBM i developers may be approaching retirement, and you see no sure way to fill their positions with experienced developers. In addition, you may be caught between maintaining your existing applications and the uncertainty of moving to something new.
 IT managers hoping to find new IBM i talent are discovering that the pool of experienced RPG programmers and operators or administrators with intimate knowledge of the operating system and the applications that run on it is small. This begs the question: How will you manage the platform that supports such a big part of your business? This guide offers strategies and software suggestions to help you plan IT staffing and resources and smooth the transition after your AS/400 talent retires. Read on to learn:
LATEST COMMENTS
MC Press Online