Sometimes, you want a white background instead of the standard "green-screen."
By default, iSeries Access is "green-screen," green text on a black background. But there are times when a white background is desirable. This tip walks you through setting up a "reverse-image" session definition where the background is white.
Why Reverse Image?
Green text on a black background has been around for many, many years, so why would anyone want to change it?
Some simply prefer a white background to a black background. Others who connect to more than one machine sometimes prefer a visual clue about which machine they are connected to, especially if there is a mix of production and testing machines. A white background can help.
For me, the primary reason for a white background is hard-copy documentation. Depending on the quality and/or age of your copier, screen shots of a black background may be unreadable. Even if your printer and copier have merged and you can run off 10 identical "copies" from your PC, black background screens eat up a whole lot more ink.
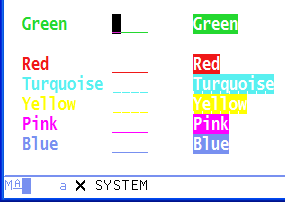
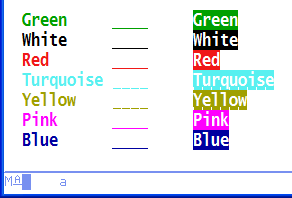
A typical i5/OS screen is shown in Figure 1. After some simple color remapping, the screen will look like Figure 2. (Note that the screenshots are from sessions running in a window, and I have remapped the font to Lucida Sans Typewriter Demibold. If you need help changing your iSeries Access font, see TechTip: Soup Up iSeries Access, Part I.)
Figure 1: This is the typical green-on-black screen. (Click images to enlarge.)
Figure 2: This screen has been revised to have a white background.
The Color Mapping Roadmap
As a roadmap of where we are going, wherever we have a black background, we are going to remap it to white, and wherever we have white text we are going to remap it to black. And we will tweak a couple of other colors so they are more readable on a white background.
To illustrate as we proceed, I've created a simple demo screen that shows the seven standard colors, an I/O field, and the seven standard colors in reverse-image. Figure 3 shows the screen before any changes.
Figure 3: This demo screen shows the standard un-mapped colors.
Changing the Screen Background
Color mapping is done from Edit > Preferences > Appearance > Color Mapping, as in Figure 4.
Figure 4: Remap colors from here.
When you click on Color Mapping, a window pops up (Figure 5) where you can change any of the seven colors, the color in the Operator Information Area (OIA, the last line on the screen), and "other" colors.
Figure 5: The Color Mapping Main window provides your options.
We will start by changing the screen color. Click the plus sign (+) to the left of Others. You will see that Screen Color is highlighted (Figure 6, below) and that on the right, Background Color is set to black. Foreground Color is grayed out and cannot be changed. The Sample text box is showing white text on a black background.
Figure 6: The default screen background color is black.
Go to the Background Color dropdown and select white. This changes the background color for all colors. The text in the sample box immediately disappears because the screen background is now white, as in Figure 7:
Figure 7: The screen color is white, so sample text no longer displays.
If you click OK, the demo screen looks quite ugly, as in Figure 8.
Figure 8: After changing the screen color to white, you need to do more work!
The white fields are no longer visible, the OIA still has a black background, and the yellow is just about unreadable. But we can easily fix these problems.
Changing the OIA
Go back to the Color Mapping main window (Figure 5). Click the plus sign (+) to the left of OIA Color.
Highlight "OIA Background" and change the Background Color to white.
Highlight "Information Indicators" and change the Foreground Color to black.
The OIA is now fixed. The Demo Screen looks better, as in Figure 9:

Figure 9: OIA now has a white background.
Changing Field Colors
On the Color Mapping Screen (Figure 5), under Field Color, highlight White. Then change the foreground color to black. (You don't need to worry about the background color, because we have already taken care of that by globally changing the screen color to white.)
Highlight Yellow, and then change the foreground color to Mustard.
Blue against a white background may look washed out on your monitor. Optionally, highlight Blue and change the foreground color to Dark Blue.
If Green seems a bit too bright, change the foreground color to Dark Green.
Now if you click OK, the Demo Screen looks like Figure 10.

Figure 10: Your Demo Screen looks better after mapping is complete.
Final Touches and Caveats
If you have made the changes as listed above, then a typical OS/400 menu should look like Figure 2.
If you're uncomfortable with how some of the colors show up on a white background or you have an aversion to, say, Mustard, then you can create your own custom colors by clicking the palette icon to the right of a color dropdown box.
You can easily map any of the standard 5250 colors to just about any color, but be careful you don't go overboard. If a color is significant, for example, negative balances always show in red, you may not want to map red to another color or another color to red.
If you really mess up your session colors, just click the Defaults button in Figure 5. This will reset all color, and you will be back at a green-screen.
Code
I have provided the code for the demo screen since it may be useful for verifying that you have made all the changes. It is simple DDS (Figure 11) and a very simple CL program (Figure 12) to display the screen.
A DSPSIZ(24 80 *DS3)
A R RECORD
A 17 3'Green'
A FLD005 4A B 17 13
A 17 22'Green'
A DSPATR(RI)
A 18 3'White'
A COLOR(WHT)
A FLD004 4A B 18 13COLOR(WHT)
A 18 22'White'
A COLOR(WHT)
A DSPATR(RI)
A 19 3'Red'
A COLOR(RED)
A FLD002 4A B 19 13COLOR(RED)
A 19 22'Red'
A COLOR(RED)
A DSPATR(RI)
A 20 3'Turquoise'
A COLOR(TRQ)
A FLD001 4A B 20 13COLOR(TRQ)
A 20 22'Turquoise'
A COLOR(TRQ)
A DSPATR(RI)
A 21 3'Yellow'
A COLOR(YLW)
A FLD006 4A B 21 13COLOR(YLW)
A DSPATR(CS)
A 21 22'Yellow'
A COLOR(YLW)
A DSPATR(RI)
A 22 3'Pink'
A COLOR(PNK)
A FLD007 4A B 22 13COLOR(PNK)
A 22 22'Pink'
A COLOR(PNK)
A DSPATR(RI)
A 23 3'Blue'
A COLOR(BLU)
A FLD008 4A B 23 13COLOR(BLU)
A 23 22'Blue'
A COLOR(BLU)
A DSPATR(RI)
Figure 11: Demo Program: DDS for Display File REVERSE
PGM
DCLF FILE(REVERSE)
SNDRCVF
ENDPGM
Figure 12: Demo Program: CLP program to display REVERSE


 Business users want new applications now. Market and regulatory pressures require faster application updates and delivery into production. Your IBM i developers may be approaching retirement, and you see no sure way to fill their positions with experienced developers. In addition, you may be caught between maintaining your existing applications and the uncertainty of moving to something new.
 IT managers hoping to find new IBM i talent are discovering that the pool of experienced RPG programmers and operators or administrators with intimate knowledge of the operating system and the applications that run on it is small. This begs the question: How will you manage the platform that supports such a big part of your business? This guide offers strategies and software suggestions to help you plan IT staffing and resources and smooth the transition after your AS/400 talent retires. Read on to learn:
LATEST COMMENTS
MC Press Online