Does it replace the HTTP server? Does it help build Java applications?
WebSphere is a Java application server that supports the following:
- Java servlets
- JavaServer Pages (JSPs) with WebSphere Standard Edition
- Enterprise JavaBeans (EJBs) and the Java 2 Enterprise Edition (J2EE) specification with WebSphere Single Server (SE) or Advanced Edition (AE)
To use these Java technologies, you must have a Java application server installed on your machine. For servlets and JSPs, you can choose between IBM's WebSphere Standard Edition and the Apache Software Foundation's Tomcat server. To run EJBs and to fully exploit J2EE on the iSeries, your choices at this time include IBM's WebSphere Single Server, WebSphere Advanced Edition, and BEA's WebLogic.
A Java application server is defined as "middleware." Think of it as an optional extension to OS/400. You or your applications do not interact directly with the application server, but it must be installed and configured in order to run servlets, JSPs, and EJBs. It is internal plumbing.
Some users have found that IBM's implementation of WebSphere includes an internal HTTP server bundled within the product. So they think, "I don't need to use the IBM original HTTP server or the Apache-based HTTP server." Wrong! It's true that there is an HTTP server bundled with WebSphere, but its purpose is to support testing, diagnostics, and other technical support. To communicate with WebSphere and run WebSphere applications, you need to install and configure either the original HTTP server or the new IBM HTTP server based on Apache. Both of those HTTP servers receive a request from a user (person or machine), determine that the request is a request for an application defined to WebSphere, pass the request to WebSphere, receive the response (an HTML or XML data stream or an error), and return the result to the user.
How It Works
It is the job of the Java application server to process Java requests; it is the job of the HTTP server to communicate with the user.
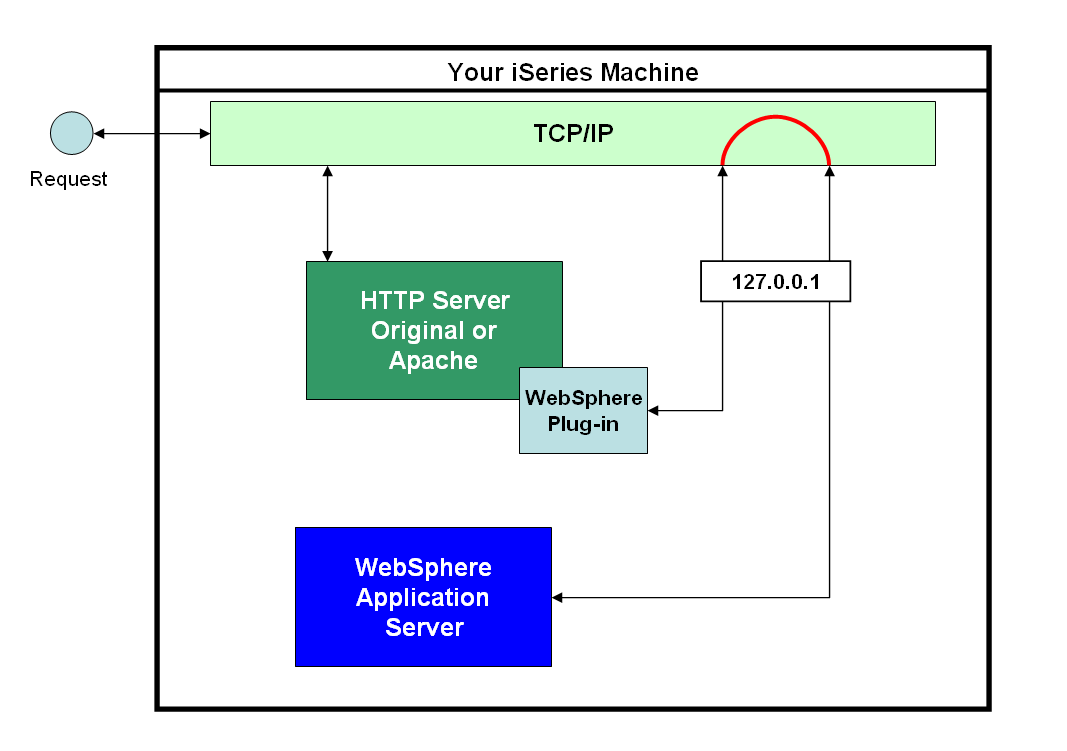
Figure1: WebSphere and the iSeries
Figure 1 illustrates the transaction flow of a request from an external user through your iSeries machine. The request routes through TCP/IP to your HTTP server (original or Apache-based). The HTTP server examines the request and determines that the request is a request for a servlet or JSP. It then passes the request to the WebSphere plug-in module and routes the request via TCP/IP to WebSphere. WebSphere runs the required Java applications, composes a response (an HTML page, XML stream, or error code), and returns the request via TCP/IP and the WebSphere plug-in to the HTTP server. The HTTP server transmits the result to the user.
At first glance, this appears to be very similar to Common Gateway Interface (CGI). The difference is that a CGI program would need to run within the HTTP server's job, and the program would need to reside on the same machine as the HTTP server.
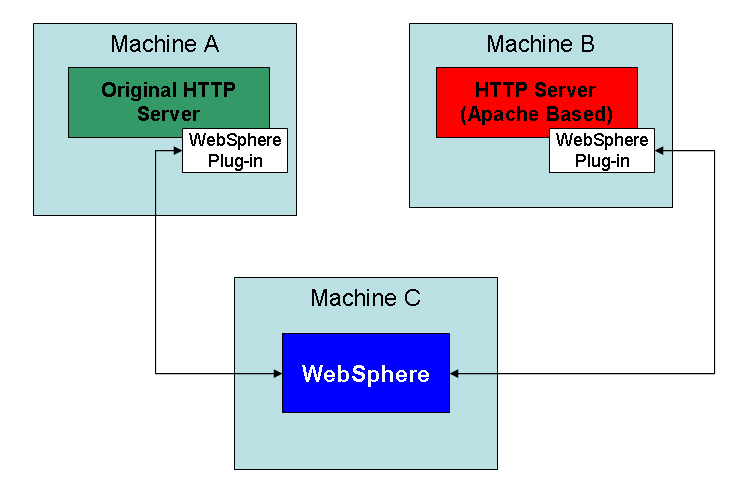
Figure 2: WebSphere with Multiple Machines
Figure 2 illustrates an alternative configuration using multiple machines. In this example, WebSphere runs on Machine C. Machines A and B use a TCP/IP connection to route requests to WebSphere and do not have the full WebSphere application server installed on them. Machine A has an original IBM HTTP server installed and configured, while Machine B has an Apache-based HTTP server installed and configured. In reality, you can have any number of HTTP server instances (original or Apache-based) installed and configured on any of number of machines. The key point is that WebSphere need not reside on the same machine as the HTTP servers. In fact, the machines running the HTTP servers or WebSphere need not be an iSeries (although I recommend running your servers on an iSeries). Any of these machines can be any IBM-supported machine (including Sun, HP, or others) running any IBM-supported operating system.
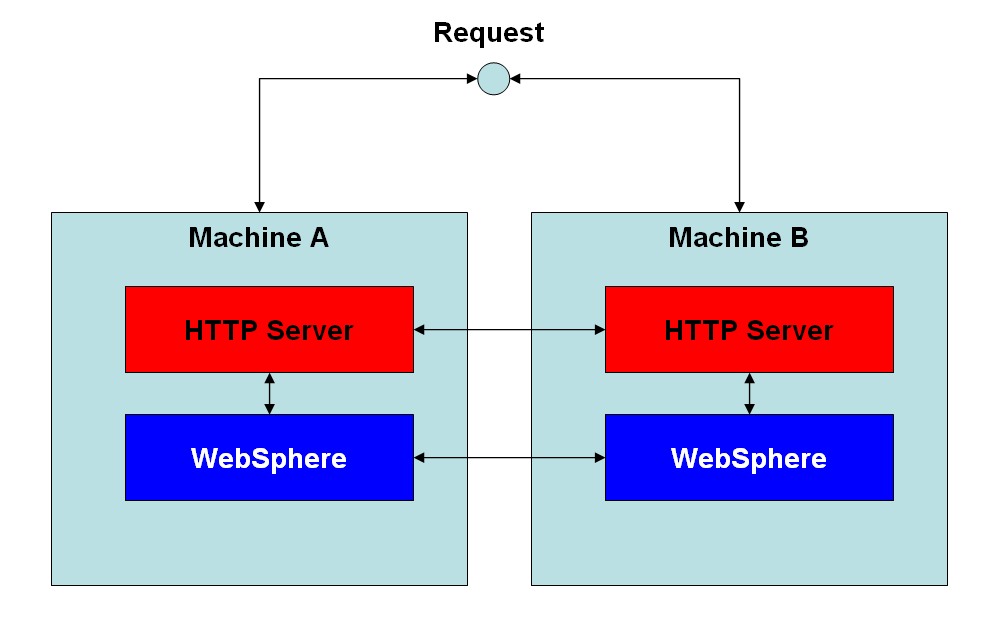
Figure 3: High Availability Configuration
Figure 3 illustrates a high availability configuration running on two physical iSeries machines in the same or different locations, or on a single iSeries machine logically divided using LPAR.
This configuration can be created to provide true 24x7 operations. You may use a load-balancing device such as a load-balancing router or IBM's WebSphere Edge Server to balance workloads between the two identical machines. You may also configure Machine B as a backup for Machine A, allowing it to assume processing only if Machine A becomes unavailable (e.g., you may want to take Machine A offline to install a new release of OS/400 or to replace it with a new model). The HTTP server is configured for high availability and provides a heartbeat monitoring mechanism that allows one server to take over for the other if it detects that its partner has gone down.
WebSphere also has its own built-in "cloning" facility to distribute work between WebSphere server instances running on the same or different machines. On some platforms (like a Windows-, Linux-, or UNIX-based environment), cloning is essential to provide the scalability necessary to support high transaction workloads. On an iSeries, the primary purpose of cloning is to provide high availability.
Configuring the HTTP Servers
Let's walk through the process of configuring WebSphere on two machines.
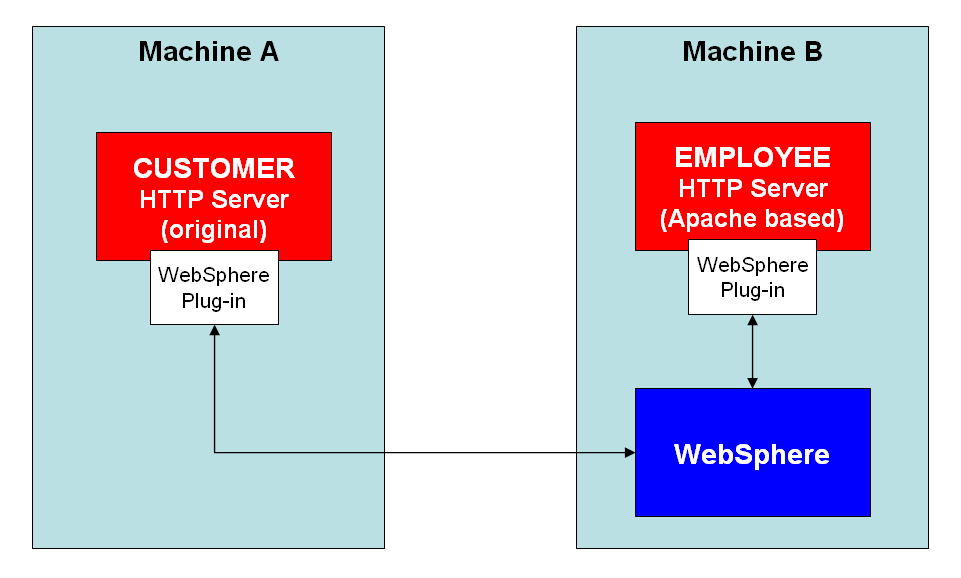
Figure 4: Two Machines with WebSphere Access
In Figure 4, two iSeries machines are configured to connect their HTTP servers to WebSphere. Machine A is a public Web site run on the original HTTP server. Since it is public, the company isolated it from other system resources on a Model 270e. Machine B runs the company's employee extranet-based site, providing applications and services to its employees within the LAN and over the Internet via a VPN-secured connection. Machine B also hosts a WebSphere application server along with the company's database and legacy applications.
This configuration example uses WebSphere 4.0 Advanced Edition. Single Server and Standard Edition are similar but have minor differences. Be sure to check the appropriate documentation.
First, follow IBM's instructions to install and test WebSphere on Machine B (EMPLOYEE). Use the "Installation and Initial Configuration guide" located on IBM's iSeries WebSphere Application Server Web site documentation link. Once you've finished, I strongly suggest that you install and run the sample applications to insure that WebSphere is properly installed and configured.
To configure the EMPLOYEE Apache-based HTTP server, follow these instructions:
- Bring up the Administrative GUI interface using http://yourmachine.yourdomain.com:2001.
- Click on "IBM HTTP Server for AS/400" from the first page.
- Select "Configuration and Administration" from the left frame of the next page.
- Since the administrative GUI remembers where you last were, you need to click on the Configuration button, and then select the Apache-based HTTP server that you wish to connect to.
- Click on the "Your Server Global Settings" link in the left frame. The "Your Server Global Settings" page should appear in the right frame.
- Now, look in the middle column of tasks under the heading "Dynamic Content." You will see "WebSphere Application Server" in this category. Click it.
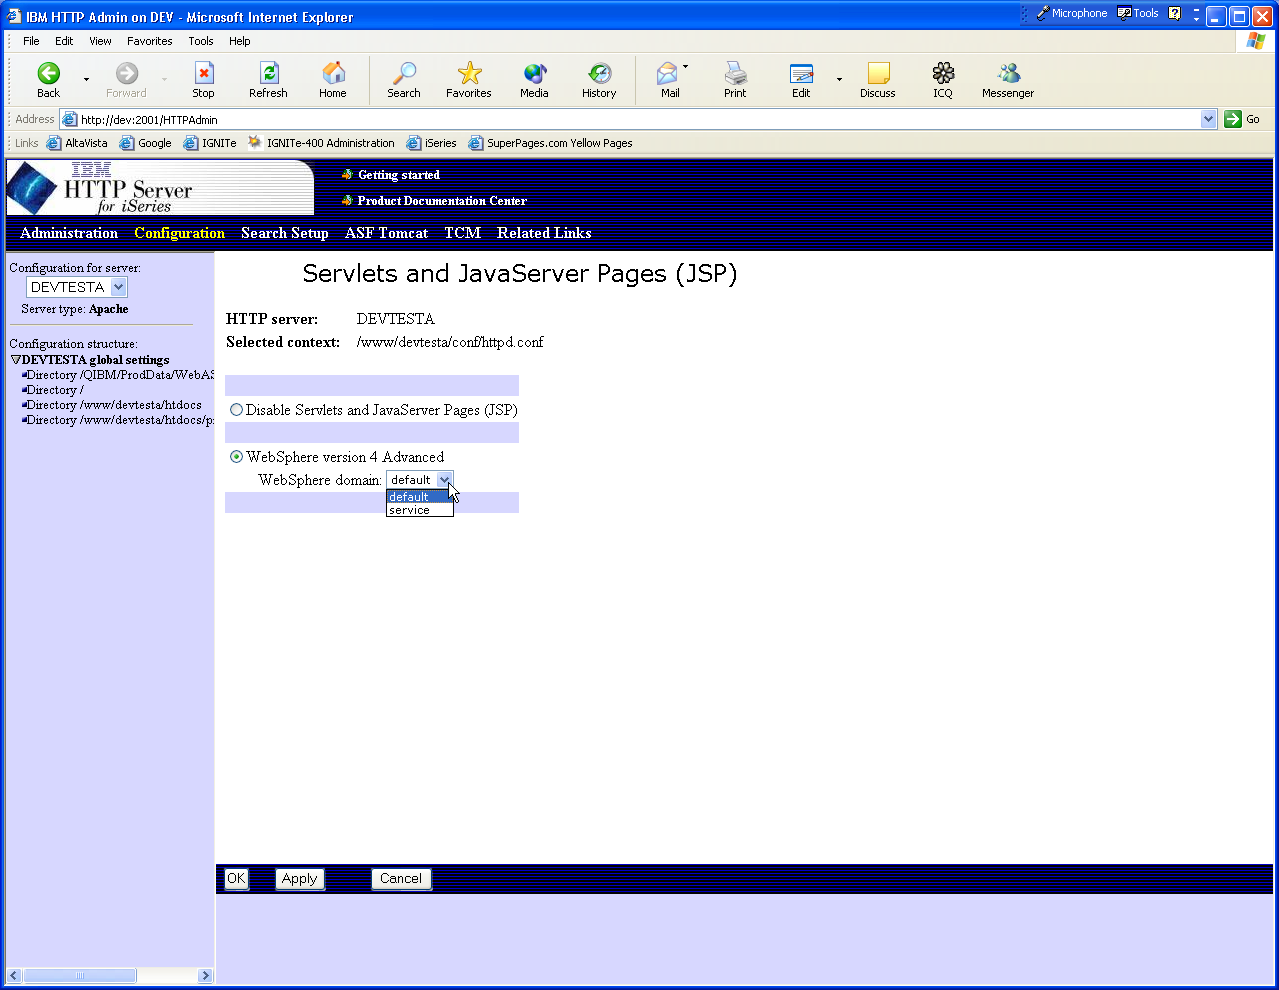
- You will see a choice for each WebSphere Application Server (WAS) you have installed on the machine. If, as in this example, you have WebSphere 4.0 Advanced Edition installed, you will see two choices. Click the radio button to select "WebSphere Version 4 Advanced." Select "Default" from the drop-down list, as shown in Figure 5.
- Click the "Apply" button.
- Finally, stop and start (not restart!) your server.
Now, you should be able to run your IBM sample applications from your Apache-based server. That's it for Machine B!
Figure 5: Configure the Apache-based server to access WebSphere
It gets a bit tricky to configure Machine A! First of all, when you bought WebSphere Advanced Edition, you bought a machine-specific license. You must install WebSphere Advanced Edition (or Single Server) OPTION "O" (*BASE) on your remote machine. IBM has packaged WebSphere so that its main functionality is in OPTION "1", which is not installed when you install the "base" component. The base component includes only the interface and plug-in code necessary for a remote HTTP server to communicate with a full implementation of WebSphere. After you install the WebSphere Advanced Edition base code (5733-WA4 OPTION 0) on your machine, follow these instructions:
- Create a directory to store your WebSphere plug-in XML configuration file: CRTDIR '/QIBM/UserData/WebASAdv4/mydir'. In my example, I created a directory called "wasrad" ("was" for WebSphere and "rad" for the name of my machine).
- Generate the subdirectories and other WebSphere-specific resources. This is done via Qshell (STRQSH). Log on to Machine A with a 5250 emulator and type STRQSH or just QSH from the command line (you will need *ALLOBJ special authority to accomplish this task).
- Change the WebSphere binaries directory:
CD /QIBM/ProdData/WebASAdv4/bin - Run the IBM-provided "crtreminst" command as follows:
crtreminst -instance wasrad (where "wasrad" is the name you created in step 1 above) - Copy the WebSphere plug-in configuration XML file from Machine B (the WebSphere machine) to Machine A (the machine with only the CUSTOMER HTTP server).
EXTREMELY IMPORTANT NOTE: You must complete this step every time you use the WebSphere Console to add an Enterprise Application or regenerate the "plug-in" on Machine B. If you do not, Machine A will not be able to communicate with Machine B!
You may use FTP, SNADS, or any other mechanism to copy the plug-in configuration file from Machine B to Machine A. I suggest mapping drives via a Windows PC and using Windows Explorer to accomplish the task.
Go to the /QIBM/UserData/WebASAdv4/default/config directory on Machine B. You should see a file named "plugin-cfg.xml" in this directory. Copy the file and paste it into the /QIBM/UserData/WebASAdv4/wasrad/config directory on Machine A!
Hang in there; you're almost done, and the last step is very easy: You must log into the Web-based administration GUI for the HTTP server on Machine A and configure the WebSphere plug-in.
- Bring up the Admin GUI: HTTP://machineA:2001
- Click "IBM HTTP Server for AS/400."
- Click "Configuration and Administration" from the left frame.
- Click the "Configure" button and select the server you wish to configure.
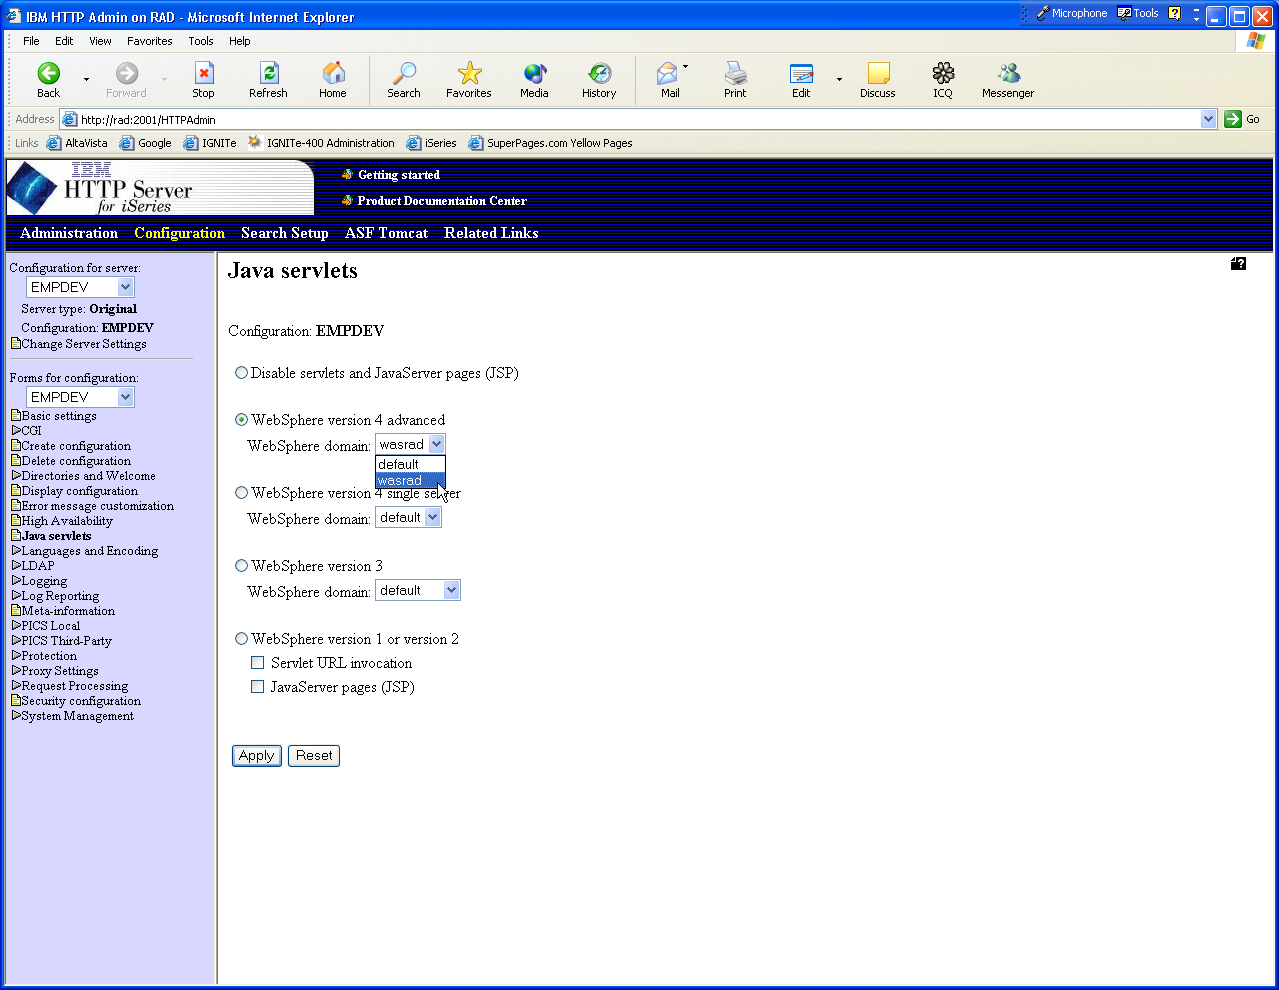
- Now, configure the original HTTP server, using the screen shown in Figure 6.
- To configure the plug-in, first click "Java Servlets" in the "Forms for configuration" list in the left frame. This should bring up the form shown in the right hand frame.
- Select the radio button for "WebSphere version 4 advanced" from the form.
- Click the down arrow on the "WebSphere domain" drop-down list and select the name of the directory (WebSphere remote instance name) that you created in the instructions above ("wasrad" in this example).
- Click the "Apply" button.
-
Now, stop and start (do not restart) your server.
Figure 6: Configure WebSphere Plug-in for Original HTTP Server
Congratulations! You should now have two HTTP servers, one on Machine A and one on Machine B, communicating with your WebSphere Advanced Edition application server running on Machine B!
Remember to copy the plugin-cfg.xml file to any remote machines after creating an "Enterprise Application" and regenerating the plug-in within WebSphere. You will most likely get an ERROR 500 or 401 "file not found" if you forget to copy the plug-in.
The plug-in file need exist only once for each machine you are working with. However, you must configure the WebSphere plug-in in each HTTP server instance you create to which you wish to provide WebSphere access.
IBM has promised to look into this process and see if it is possible to simplify it in a future release. Be careful, and be sure to remember to copy the plugin-cfg.xml file! I have forgotten on several occasion and was reminded when my server couldn't access a new application!
Bob Cancilla is the author the popular new book from IBM Press, IBM eServer iSeries: Built for e-business. He also wrote Getting Down to e-business with AS/400, available from MC Press.




 More than ever, there is a demand for IT to deliver innovation. Your IBM i has been an essential part of your business operations for years. However, your organization may struggle to maintain the current system and implement new projects. The thousands of customers we've worked with and surveyed state that expectations regarding the digital footprint and vision of the company are not aligned with the current IT environment.
 TRY the one package that solves all your document design and printing challenges on all your platforms. Produce bar code labels, electronic forms, ad hoc reports, and RFID tags – without programming! MarkMagic is the only document design and print solution that combines report writing, WYSIWYG label and forms design, and conditional printing in one integrated product. Make sure your data survives when catastrophe hits. Request your trial now! Request Now.
 Forms of ransomware has been around for over 30 years, and with more and more organizations suffering attacks each year, it continues to endure. What has made ransomware such a durable threat and what is the best way to combat it? In order to prevent ransomware, organizations must first understand how it works.
 Disaster protection is vital to every business. Yet, it often consists of patched together procedures that are prone to error. From automatic backups to data encryption to media management, Robot automates the routine (yet often complex) tasks of iSeries backup and recovery, saving you time and money and making the process safer and more reliable. Automate your backups with the Robot Backup and Recovery Solution. Key features include:
 Business users want new applications now. Market and regulatory pressures require faster application updates and delivery into production. Your IBM i developers may be approaching retirement, and you see no sure way to fill their positions with experienced developers. In addition, you may be caught between maintaining your existing applications and the uncertainty of moving to something new.
 IT managers hoping to find new IBM i talent are discovering that the pool of experienced RPG programmers and operators or administrators with intimate knowledge of the operating system and the applications that run on it is small. This begs the question: How will you manage the platform that supports such a big part of your business? This guide offers strategies and software suggestions to help you plan IT staffing and resources and smooth the transition after your AS/400 talent retires. Read on to learn:
LATEST COMMENTS
MC Press Online